Imagine transforming your home into a stylish haven with a simple yet eye-catching upgrade—Pop False Ceiling Designs are the perfect way to do just that! These creative and vibrant ceiling ideas have skyrocketed in popularity because they add a fun, modern touch while enhancing the overall aesthetic of any room.
In this article, you’ll explore a variety of innovative Pop False Ceiling ideas that cater to different tastes and moods. Whether you prefer subtle elegance or bold, playful styles, there’s something here to inspire your next home makeover and make your space truly stand out.
1. Geometric Neon Light Accents for a Modern Edge
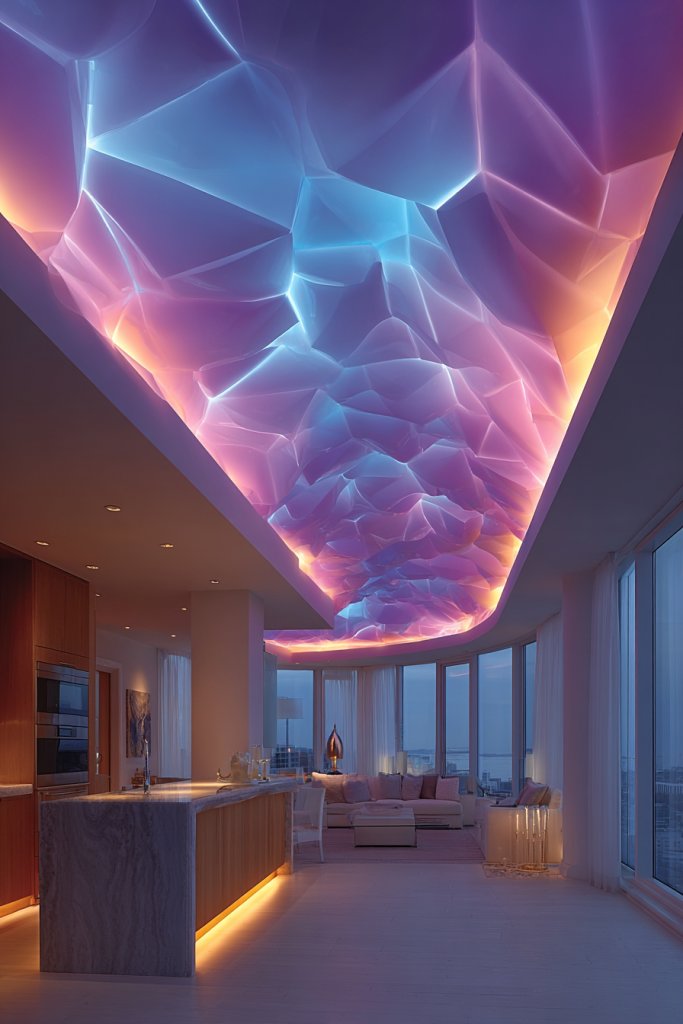
Ever wanted your ceiling to be the star of the room without going overboard? A bold geometric neon accent can turn a plain ceiling into a vibrant statement piece. It adds personality and a modern edge, especially if you’re tired of boring, flat surfaces. Plus, who doesn’t love a little glow that makes everything feel more lively?
Imagine sharp, angular lines illuminated with vivid neon in shades like electric blue or neon pink, creating a striking silhouette against a matte ceiling. The glow softly bounces off nearby walls, casting colorful reflections that energize the space. The geometric shapes can range from simple triangles to complex polygons, depending on your style. It’s like having a piece of modern art right above your head.
You can customize the neon colors to match your decor, from cool tones for a calm vibe to bright hues for a party-ready look. For smaller spaces, subtle geometric lines can add interest without overwhelming. In open-plan areas, larger shapes create focal points. Seasonal tweaks, like warmer colors in winter or cooler in summer, keep the look fresh. The shape complexity can also vary based on your skill level or budget.
Start by sketching your preferred geometric pattern and choosing the neon colors that suit your theme. Use flexible LED neon strips or rigid neon tubes, depending on your design. Mount the strips along wall edges or ceiling beams for a clean look. Ensure your electrical setup can handle the voltage and consider hiring an electrician for safety. Attach the tubing securely with clips or adhesive, avoiding sharp bends that might damage the lights. Finish with a dimmer switch for adjustable glow.
Add custom shapes like initials, symbols, or abstract patterns to make it truly yours. Pair the neon with minimalist wall decor or textured paint for a balanced look. Incorporate dimmable switches to switch between vibrant and subtle lighting. You can also install a remote control or app to change colors on the fly, making your ceiling a dynamic feature. This approach allows endless personalization for any mood or occasion.
A neon geometric ceiling elevates your space into a modern sanctuary that reflects your personality. It’s a fun, affordable upgrade that instantly boosts the room’s vibe. Perfect for creative souls or anyone looking to add a splash of fun, this idea makes your home feel fresh and trendy. Ready to light up your ceiling with some bold shapes? It’s easier than you think!
2. Wooden Slat Ceiling with Playful Curves
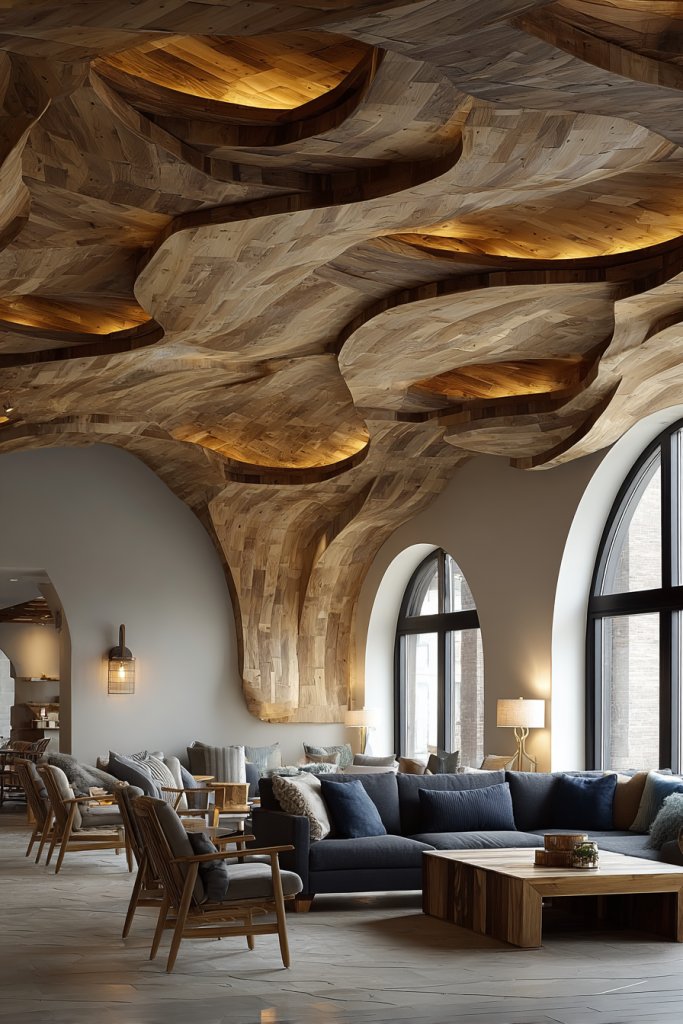
Feeling like your ceiling could use a little warmth and character? Wooden slats can bring a cozy yet contemporary feel that transforms any dull room into a welcoming haven. Plus, adding playful curves softens the sharp edges of modern design, making spaces feel more organic. Who said ceilings have to be boring?
Picture long, flowing wooden slats arranged in sweeping curves across the ceiling, creating a sense of movement and fluidity. The natural grain of the wood adds texture, while the gentle undulations cast soft shadows depending on the light. Warm light reflecting off the wood enhances this cozy, inviting atmosphere. It’s like bringing a piece of nature inside, but with a designer twist.
Opt for light-colored woods like oak or ash for a Scandinavian vibe, or darker woods like walnut for a richer look. You can keep the curves subtle for a minimalist aesthetic or go bold with dramatic swoops for a statement piece. Seasonal accents such as adding fairy lights or fabric drapes can change the mood without major overhaul. Small rooms benefit from gentle curves that make the space feel larger, while open areas can handle more dramatic swoops.
Start by measuring your ceiling and sketching your desired curve pattern. Select high-quality wooden slats that are easy to cut and install. Use a flexible mounting system or custom brackets to shape the curves, attaching the slats securely with nails or adhesive. Sand and finish the wood with a protective stain or lacquer for durability. For a seamless look, align the slats tightly, ensuring smooth curves. Consider adding LED strip lighting behind the slats for a subtle glow.
Personalize with different wood stains or paints for contrasting effects. Mix in decorative elements like carved motifs or inlays within the slats for unique flair. Incorporate hidden lighting or colored accent lights to emphasize the curves. You could also add textured textiles or layered ceiling panels underneath for extra depth. These details turn a simple wooden ceiling into a crafted art piece that reflects your personality.
A wooden slat ceiling with curves creates a calming, natural ambiance that’s perfect for any space. It’s a clever way to introduce warmth and movement while remaining stylish. This DIY-friendly project allows you to customize every detail, making your home truly yours. Ready to bring soft, flowing lines into your ceiling design? You’ll love how it elevates your entire room!
3. Colorful Drop Ceiling Panels for a Cheerful Vibe
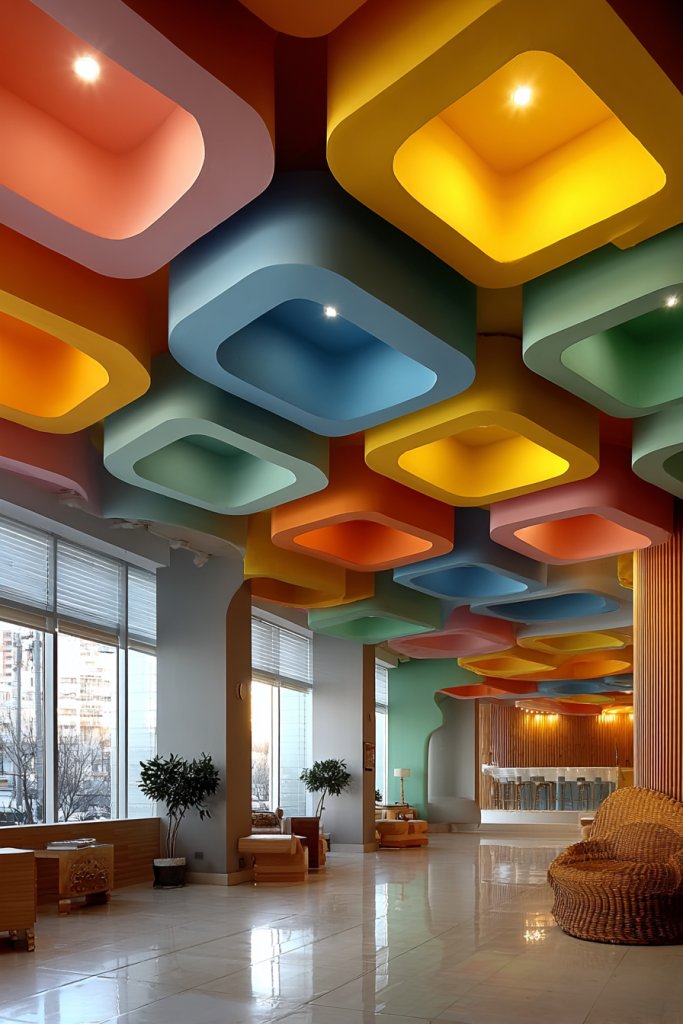
Bored with the same old white or plain ceilings? Bright, colorful panels can instantly inject energy into your space. They’re a playful way to make a statement and lift the mood, especially in kids’ rooms, play areas, or creative spaces. Who says ceilings should be dull?
Imagine a ceiling covered with vibrant, layered panels in shades like bold yellow, lively turquoise, and cheerful coral. The panels are arranged in a staggered or grid pattern, creating depth and visual intrigue. When illuminated, the colors pop, casting a lively glow that energizes the entire room. The varied hues and textures create a dynamic, fun atmosphere—like a playground for your eyes.
Choose panels in different sizes or shapes for a playful, eclectic look, or keep it uniform for a more organized vibe. Seasonal updates could include swapping out brighter tones for softer pastels or deep jewel tones depending on your mood. For small rooms, stick with lighter shades to keep the space feeling open; in larger areas, bolder colors work well. Combining matte and glossy finishes adds visual interest.
Start by selecting lightweight, durable panels made from PVC, foam, or wood composites. Use a suspended grid system to mount the panels securely to the ceiling. Arrange the panels in a pattern that suits your style—be it random, linear, or geometric. Secure each panel firmly, ensuring they are level and evenly spaced. Add LED lighting behind the panels or around the edges to make colors stand out even more.
Create a custom palette that complements your decor, or even incorporate your favorite patterns or motifs within the panels. Use removable panels for easy updates or cleaning, and consider adding textured finishes for extra flair. You could also incorporate some glow-in-the-dark or metallic panels for evening effects. Personal touches make this ceiling a true reflection of your personality.
Colorful ceiling panels turn an ordinary room into a lively, engaging space. They’re perfect for inspiring creativity and sparking joy every time you look up. With a little planning, you can achieve a vibrant look that feels both fun and sophisticated. Ready to brighten up your ceiling and your day? It’s easier than you think!
4. Starry Sky Ceiling with Fiber Optic Lights
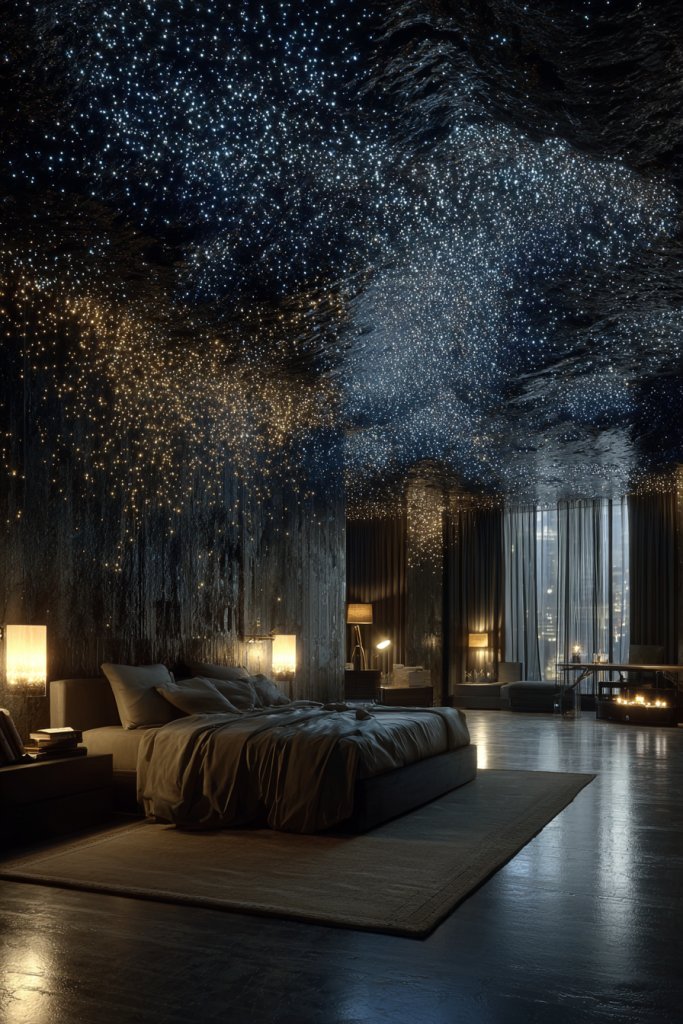
Ever wished to bring the night sky indoors? Creating a starry sky ceiling with fiber optic lights turns any room into a magical universe. It’s an enchanting feature perfect for bedrooms, lounges, or kids’ spaces. Plus, it offers a calming, dreamy vibe that’s hard to resist.
Visualize tiny points of light scattered across a dark ceiling, mimicking a clear night filled with stars. The fiber optic strands are connected to a hidden light source, giving the illusion of twinkling constellations. Soft, ambient lighting enhances the effect, creating a serene atmosphere. Some fiber optic kits allow color changes, adding extra wonder to the scene.
For a subtle night sky, keep the fiber optic points sparse and use cool white or blue lights. For a more dramatic look, increase the density and incorporate constellation patterns. In kids’ rooms, add themed shapes like moons or planets. Seasonal lighting effects, like gentle auroras or shooting stars, can make the experience even more immersive.
Begin by selecting a dark-colored ceiling paint, preferably matte to enhance the star effect. Drill tiny holes for the fiber optic strands, following your star pattern. Thread the fibers through these holes and secure them with adhesive. Connect the fibers to a light source with adjustable settings, and conceal the equipment in a nearby cabinet or ceiling cavity. Use a remote or app to control light colors and twinkle modes.
Personalize the star map with your favorite constellations, or even create a custom galaxy of your own design. Incorporate glow-in-the-dark paint around the fibers for added realism. Add a soft, textured ceiling covering or fabric to amplify the sense of depth. Set up a sound system with relaxing night sounds to complete the celestial experience.
A starry sky ceiling transforms your space into a tranquil retreat that sparks imagination. It’s a surprisingly doable project that turns ceiling space into a mesmerizing feature. Whether you want a romantic ambiance or a calming sleep environment, this idea delivers magic every time. Ready to turn your ceiling into a universe of wonder?
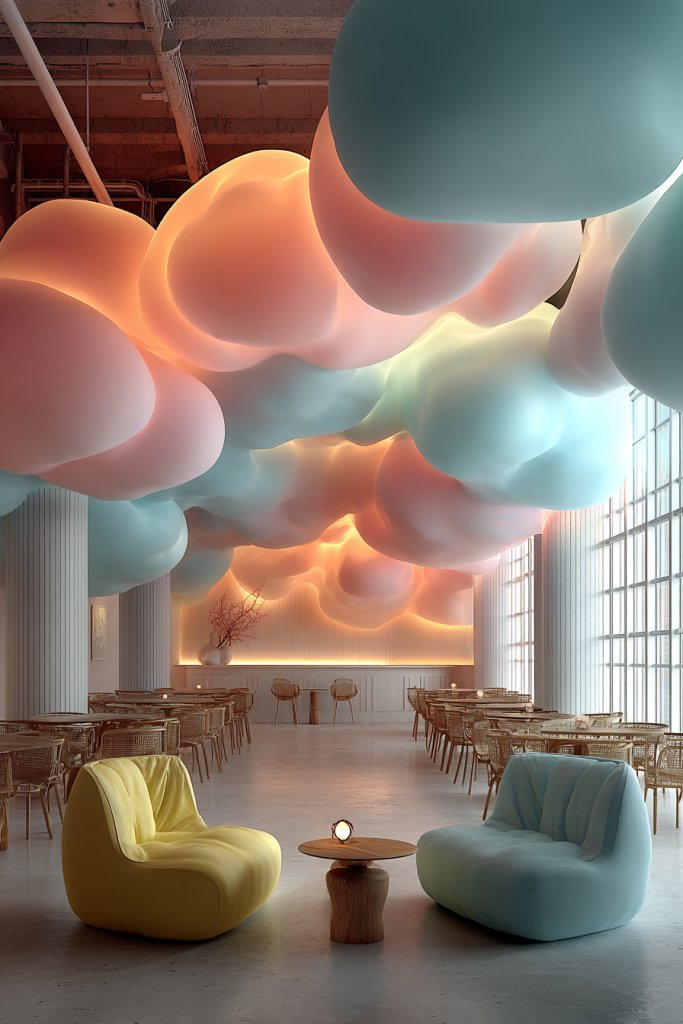
5. Suspended Cloud-Shape False Ceiling for a Dreamy Look

Looking to add a whimsical, dreamy touch to your space? A suspended cloud-shaped ceiling creates an airy, soft atmosphere that feels like floating among the clouds. It’s ideal for kids’ rooms, nurseries, or even a relaxing lounge. Who wouldn’t want to feel like they’re walking on air?
Picture a fluffy, white cloud suspended just below the actual ceiling, with gentle curves and rounded edges. The cloud is made from lightweight materials like foam, fabric, or acrylic coated in soft white. Hidden LED strip lights inside or around the perimeter provide a gentle glow, enhancing the cloud’s ethereal appearance. The overall effect is a floating, soft silhouette that adds a playful yet calming vibe.
You can customize the cloud’s size and number based on your space. For a more surreal effect, add multiple clouds at varying heights. Use different shades of white or pastel colors for a more colorful, fantasy-like look. Seasonal accessories like fairy lights or decorative stars can enhance the dreamy atmosphere. In small rooms, a single large cloud works best, while larger spaces can handle multiple smaller clouds.
Start with a lightweight frame or mold to shape your cloud, attaching it to the ceiling with sturdy hooks or brackets. Cover the frame with soft fabric or foam, and paint or finish as desired. Install LED strip lights or small recessed fixtures within the cloud for lighting effects. Conceal wiring carefully to keep the floating illusion intact. Add soft textiles or plush elements underneath to complete the cozy, cloud-like feel.
Personalize with glow-in-the-dark accents or subtle color tints that match your decor. Incorporate decorative elements like hanging stars or moons to amplify the fantasy vibe. Use textured fabrics for a cloud that looks fluffy and inviting. Consider adding a gentle soundscape of wind or rain to deepen the dreamy experience.
A cloud-shaped ceiling adds an imaginative, whimsical charm that instantly transforms a room. It’s a creative project that’s surprisingly accessible and highly customizable. This dreamy feature invites relaxation and sparks joy every time you look up. Ready to float into a world of your own design? Let your ceiling do the dreaming!
6. Layered Drop Ceiling with Hidden LED Strip Lighting
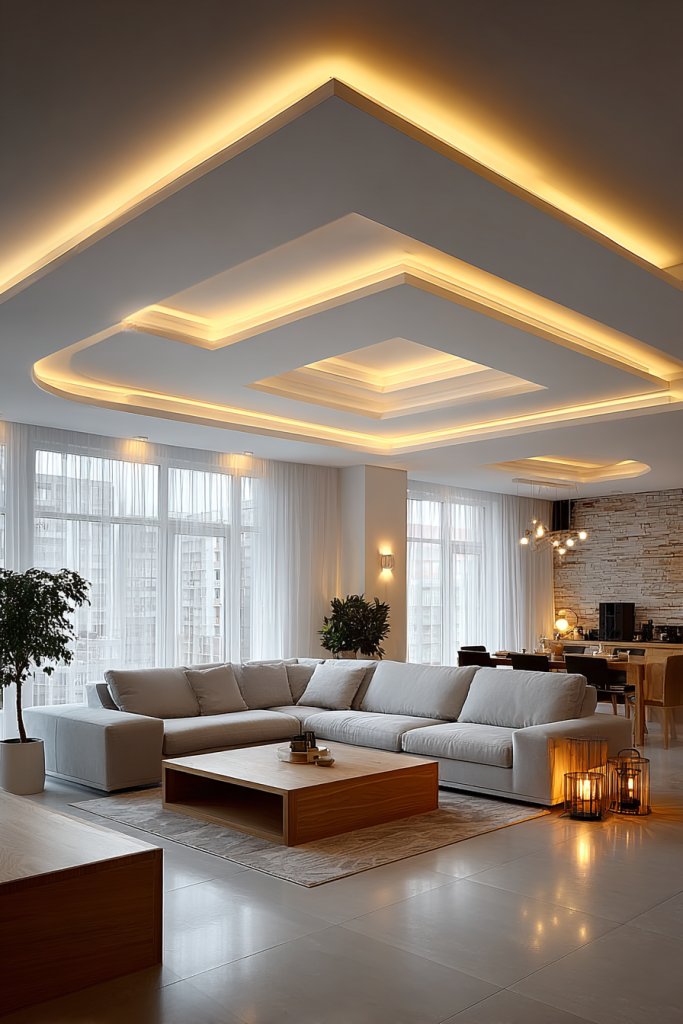
Tired of flat, uninspiring ceilings? A layered drop ceiling with concealed LED strips can add depth and dimension effortlessly. It’s perfect for creating a cozy, inviting ambiance or a sleek, modern look. Who says your ceiling can’t be as interesting as your walls?
Visualize a ceiling with multiple layers of panels, each set at different heights, creating a stepped effect. Hidden LED strip lights are placed behind or within these layers, casting a soft glow that highlights the depth. The interplay of shadows and light adds visual interest, making the ceiling look like a carefully crafted architectural feature. The layered effect can be bold or subtle, depending on your preference.
Use materials like wood, MDF, or acrylic for the panels, choosing finishes that match your decor—matte, gloss, or textured. In small spaces, keep layers minimal to avoid overwhelming the room; larger areas can handle more dramatic multi-level designs. Color-wise, stick to monochrome for a sleek look or mix shades for more vibrancy. Seasonal accents like warm-toned lighting in winter or cool in summer can tweak the atmosphere.
Begin by designing your layered pattern and measuring ceiling dimensions. Cut panels precisely, ensuring they fit securely at different heights. Attach the panels with sturdy brackets or clips, maintaining consistent gaps for a clean look. Install LED strips along the edges or behind panels, connecting to a dimmer or controller for adjustable lighting. Conceal wiring within the ceiling cavity or behind decorative moldings. Finalize the setup with paint or finish touches to unify the design.
Add colored or dimmable LED strips to match your mood or decor theme. Incorporate textured or patterned panels for extra visual interest. Use smart controls to change lighting modes, creating different atmospheres for movies, parties, or relaxation. Combine with other ceiling features like coves or architectural beams for a layered, multi-dimensional effect. Personal touches like custom colors or lighting sequences make it uniquely yours.
A layered ceiling with hidden lighting elevates your space into a chic, sophisticated environment. It’s a clever way to add architectural flair without major renovation. This design is versatile enough to suit any style, from minimal to eclectic. Feeling inspired? It’s a rewarding project that transforms your ceiling into a focal point that impresses every guest!
7. Mirrored False Ceiling for a Space-Enhancing Effect
Want to make your room look bigger and brighter? A mirrored false ceiling can double the sense of space and reflect light beautifully. It’s an elegant trick that adds a touch of glamour and depth. Ever wondered how some rooms seem to expand effortlessly? Mirrors might be the secret.
Imagine a ceiling covered with large, glossy mirror panels arranged in a grid or mosaic pattern. The mirrors reflect the entire room, creating an illusion of endless space. When paired with warm or cool lighting, they amplify brightness and add a luxurious glow. The reflective surface also captures the room’s decor, making everything feel more cohesive and expansive.
Choose mirror panels with different finishes—high gloss, frosted, or tinted—to create varied effects. For small or dark rooms, full mirror ceilings open up the space dramatically. In larger rooms, partial mirrors or decorative shapes add interest without overwhelming. Seasonal accents like LED backlighting or color-tinted films can further customize the look. Keep safety in mind with shatterproof or laminated glass options.
Start by selecting high-quality mirror panels suited for ceilings, ensuring they are lightweight and shatter-resistant. Mount them with specialized adhesive or mounting brackets designed for reflective surfaces. Align panels carefully for a seamless appearance, matching edges precisely. Integrate LED strip lighting behind the mirrors for ambient glow, hiding wiring in the ceiling cavity. Finish with a protective coating or anti-fog treatment if needed.
Add decorative borders or framing to break the monotony and create visual focus points. Incorporate color-tinted or frosted films for subtle effects. Use smart lighting controls to change ambiance from bright daytime to soft evening glow. Combine with minimalist wall decor or textured wall finishes for a balanced aesthetic. Personal touches like custom shapes or patterns in mirror placement elevate the design.
A mirrored ceiling transforms your space into a bright, airy retreat that feels expansive and luxurious. It’s a simple upgrade with a high-impact result, perfect for small apartments or stylish homes. The reflective surface not only enhances the room’s size but also adds a sophisticated touch. Ready to reflect your style and boost your space? This idea is a game-changer!
8. Floral-Inspired Patterns with 3D Wall Panels
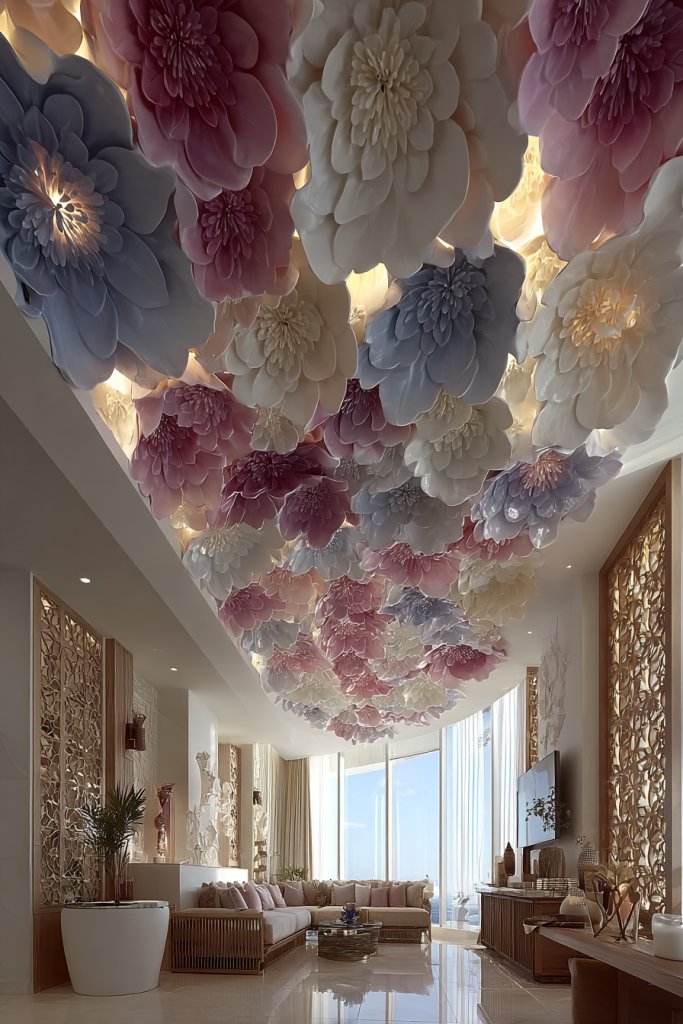
Craving a ceiling that feels alive and fresh? Floral-inspired 3D wall panels are a creative way to add a natural, artistic touch that energizes any room. They turn an ordinary surface into a statement of beauty and texture. Who says floral motifs are only for walls?
Visualize intricate, three-dimensional floral patterns rising from the ceiling, with petals and leaves crafted from textured materials. The layered design casts soft shadows, enhancing depth and visual interest. Light plays across the surfaces, highlighting the delicate details. The overall effect creates a lush, garden-like atmosphere that invites relaxation and joy.
Opt for bold, oversized flowers for a dramatic impact or subtle, smaller blossoms for a more refined look. Seasonal variations could include changing colors to reflect spring blooms or autumn tones. Incorporate metallic or gloss finishes for a contemporary twist. In smaller spaces, smaller floral motifs prevent visual overload; larger rooms can handle more elaborate patterns.
Choose high-quality, lightweight 3D wall panels made from MDF, PVC, or resin. Install using adhesive or mounting brackets, aligning the patterns carefully to ensure seamless flow. Seal or paint the panels in your chosen colors, from vibrant to pastel shades. Use accent lighting to cast shadows and emphasize the textures. Finish by cleaning the panels and ensuring all wiring or fixtures are concealed.
Customize with your favorite flower motifs or abstract floral designs. Add metallic paints or glitter accents for extra sparkle. Incorporate small, embedded LED spotlights to highlight specific features. Pair with complementary wall decor or textiles that echo the floral theme for a cohesive look. Personal touches like initials or custom color palettes make it uniquely yours.
Floral 3D patterns bring a breath of fresh air into your home, making every glance upwards a delightful experience. They combine artistry with nature-inspired beauty, elevating your decor effortlessly. This innovative ceiling idea proves that you don’t need a garden to enjoy floral charm. Ready to bloom your space into a floral paradise? Go for it!
9. Multi-Colored Puzzle Piece Ceiling Design
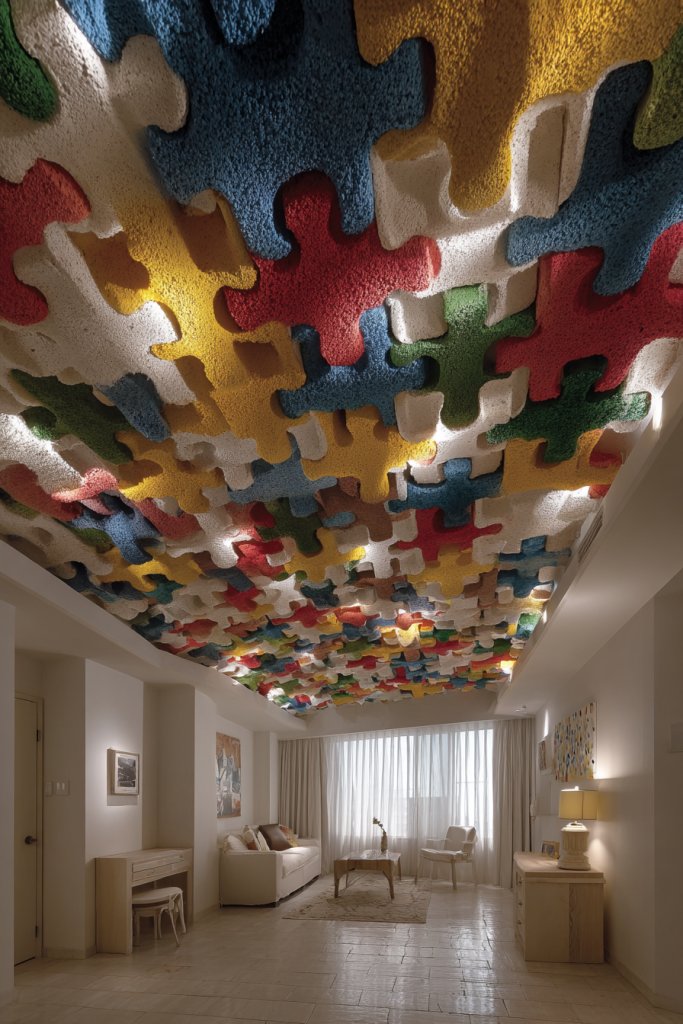
Looking for a playful way to add personality to your ceiling? Multi-colored puzzle pieces create a fun, eye-catching design that sparks curiosity and joy. It’s perfect for kids’ rooms, game rooms, or anyone young at heart. Who said ceilings can’t be a canvas for creativity?
Imagine interlocking puzzle-shaped panels in vibrant hues like red, blue, yellow, and green, fitting together seamlessly. The varied colors make the ceiling pop, transforming the whole room into a lively scene. When illuminated, the contrasting shades create a dynamic, energetic vibe. It’s like a giant, whimsical puzzle coming to life overhead.
Use different sizes or shapes for a more eclectic look, or keep a uniform puzzle piece size for a cleaner pattern. Seasonal or theme-based color swaps can refresh the look—think pastel colors for spring or metallics for festive seasons. Incorporate glow-in-the-dark or reflective finishes for night-time fun. Small rooms benefit from lighter colors to avoid clutter, while large spaces can handle bold contrasts.
Select lightweight, durable puzzle-shaped panels made from MDF, foam, or acrylic. Attach with strong adhesive or mounting hardware, ensuring each piece aligns perfectly. Seal or paint the panels in your preferred colors, considering matte or gloss finishes. Use LED strip lighting around the edges or behind the panels for added brightness and color effects. Conceal wiring within ceiling cavities for a seamless look.
Create your own custom color scheme, or incorporate patterns, images, or symbols within some puzzle pieces. Use reflective or glow-in-the-dark paints for nighttime effects. Arrange the puzzle in a pattern that matches your personality or room theme. Add decorative borders or frames to enhance the overall design. Personal touches make it a true statement piece.
A puzzle piece ceiling turns your room into a playful, imaginative space that’s full of energy. It’s an affordable way to add a bold statement and showcase your creativity. This idea is perfect for inspiring joy and laughter every time you look up. Ready to piece together a fun new ceiling? Your playful side will thank you!
10. Abstract Art-Inspired False Ceiling with Bold Shapes
Craving a ceiling that doubles as a piece of modern art? Abstract shapes and bold forms can turn your ceiling into a striking focal point. It’s perfect for art lovers or anyone wanting to break free from traditional designs. Who says ceilings must be plain?
Picture large, irregular shapes painted in contrasting colors or finished with textured surfaces, floating across the ceiling. The shapes can resemble splashes, geometric fragments, or freeform strokes. When illuminated with directional or ambient lighting, they cast intriguing shadows and highlight their dynamic forms. The overall effect is a lively, energetic piece of art overhead.
Use colors that complement or contrast your existing decor—think black and white for minimalism or bright primaries for vibrancy. Incorporate metallic or glossy finishes for a contemporary feel. For smaller rooms, keep shapes simple and limited; larger spaces can handle complex, overlapping forms. Seasonal or mood-based color updates can keep the look fresh.
Design your abstract layout on paper, then transfer it to the ceiling using stencils or freehand painting. Use high-quality paints or textured finishes to add depth. Consider installing sculptural elements or 3D panels for extra dimension. Use directional lighting to emphasize the shapes and shadows. Seal the surface with a clear coat for durability and easy cleaning.
Inject your personality by customizing shapes, colors, or textures—perhaps adding metallic accents or glitter. Incorporate LED lighting to change moods, from bright and energetic to subdued and calm. Pair with minimalist wall decor to let the ceiling stand out. Personal touches like initials or favorite motifs can make the design uniquely yours.
An abstract, bold ceiling pushes your decor into the realm of contemporary art, making a statement that’s all your own. It’s an engaging conversation starter and a symbol of creative confidence. Such a design proves that ceilings can be as expressive as walls. Ready to make a bold artistic statement? Let your ceiling be your canvas!
11. Herringbone Patterned Ceiling with Contrasting Colors
Want to add a classic yet modern touch to your ceiling? A herringbone pattern brings timeless elegance with a fresh twist. It’s a subtle way to elevate your space without overwhelming it. Who knew such a simple pattern could make such a statement?
Imagine a ceiling covered in a herringbone design created with painted wood or tiles in contrasting shades—say, dark gray and white or natural wood and black. The zigzag pattern guides the eye across the ceiling, creating a sense of movement and sophistication. When lit with soft ambient lighting, the pattern gains depth, adding a cozy yet polished vibe.
You can opt for natural wood tones for a warm look or go high-contrast with painted panels for a striking effect. Smaller spaces benefit from subtle color differences, while large rooms can handle bolder contrasts. The pattern can be applied to the entire ceiling or just as an accent in a central area. Seasonal tweaks might include changing the color palette or adding metallic accents for special occasions.
Lay out your pattern on paper, then cut or paint panels accordingly. Use a precise measuring tape and level to ensure straight lines. Attach the panels with adhesive or nails, maintaining tight joints. For painted designs, mask areas carefully and apply multiple coats for vivid contrast. Finish with a clear sealant to protect the surface. Install indirect lighting to highlight the pattern’s texture and sharp angles.
Add a personal touch by incorporating metallic or textured finishes within the pattern. Use LED strip lights along the edges for a glowing effect that emphasizes the zigzag. Pair with complementary wall decor or textiles that mirror the pattern. You can also experiment with different color combinations for seasonal updates or mood shifts. Unique in its simplicity, this pattern can be endlessly customized.
A herringbone ceiling combines classic charm with modern sophistication, elevating your decor effortlessly. It’s a smart choice for those who appreciate timeless design with a contemporary edge. This pattern is versatile enough for any room and easy to adapt over time. Ready to zigzag your way into a stylish new ceiling? The timeless appeal is in your hands!
12. Floating Box Ceiling with LED Backlighting
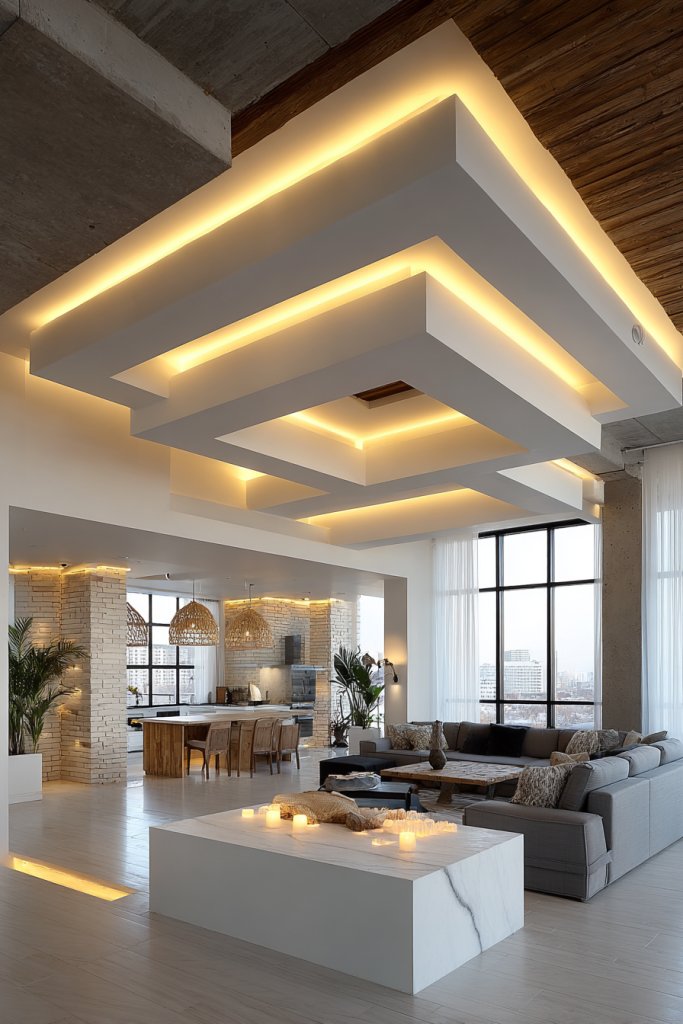
Looking for a sleek, modern upgrade that adds depth without clutter? A floating box ceiling with LED backlighting offers a minimalist yet dramatic statement. It creates a layered, architectural look that’s both functional and stylish. Who says ceilings have to be flat and boring?
Visualize a series of box-like structures suspended at different heights, with clean lines and sharp angles. Each box is illuminated from behind with LED strips, casting a soft glow that defines each layer. The floating effect makes the ceiling seem to hover, adding a sense of space and sophistication. The interplay of light and shadow enhances the three-dimensionality.
Choose materials like MDF, acrylic, or metal for the boxes, finishing with paints or veneers that match your decor. Keep the color palette monochrome for a sleek look or add accent colors for contrast. Small spaces benefit from subtle, slim structures; larger rooms can handle more elaborate arrangements. Seasonal lighting effects or dimmable LEDs allow you to change the mood easily.
Design your box layout with precise measurements and secure the structures to the ceiling using brackets or supports. Hide wiring within the boxes or ceiling cavity, connecting LED strips to a dimmer or controller. Attach the boxes with screws or strong adhesive, ensuring they are level and stable. Finish with paint or veneer for a polished look. Test lighting before completing the installation.
Customize with different LED colors or dynamic lighting modes for various occasions. Incorporate textured surfaces or metallic finishes for added depth. Use smart controls to switch between brightness levels or colors remotely. Pair with minimalist wall decor or integrated shelving underneath for a complete modern aesthetic. Personal touches like recessed lighting or artistic accents make the space uniquely yours.
A floating box ceiling elevates your space into a high-end, architectural masterpiece. It’s a statement of modern design that combines form and function effortlessly. This project is surprisingly accessible with the right planning and tools. Ready to add a layered, luminous dimension to your home? It’s a design upgrade you’ll love showing off!
13. Playful Cone and Dome Structures for a Quirky Feel
Want to add a fun, quirky element to your ceiling? Cone and dome-shaped structures bring a playful, sculptural vibe that’s sure to spark interest. It’s perfect for creative spaces, kids’ rooms, or anyone looking to break from the norm. Who says ceilings can’t be whimsical?
Imagine small or large cone-shaped elements suspended at various heights, creating a dynamic, three-dimensional landscape overhead. The smooth curves and pointed tips give a sense of movement and energy. When lit with spotlights or colored LEDs, the shapes cast intriguing shadows and add depth. The overall effect feels lively, artistic, and full of personality.
Use a range of materials like painted plaster, resin, or lightweight composites for easy installation. Play with colors—bright primary hues for a bold look or pastel shades for a soft, dreamy atmosphere. Vary the sizes and heights for a more organic, sculptural feel. Incorporate seasonal accents or themed motifs for special occasions. Larger spaces can handle more complex arrangements, while smaller rooms benefit from a minimalist approach.
Design your cone or dome layout on paper, then construct or buy pre-made shapes. Attach suspended supports or wires securely from the ceiling, ensuring they are evenly spaced and stable. Use strong hooks or anchors suitable for your ceiling material. Connect lighting options like spotlights or LED strips inside or around the shapes for dramatic effects. Conceal wiring carefully to maintain the sculptural integrity.
Customize with different colors, finishes, or textured surfaces to match your decor. Add internal lighting for glowing effects or external spotlights for dramatic shadows. Mix in thematic motifs, like stars or abstract patterns, to personalize the design. Incorporate removable or adjustable elements to change the look over time. This playful ceiling invites creativity at every turn.
Cone and dome structures turn your ceiling into an interactive, artistic installation. They showcase your playful side and elevate your decor beyond typical designs. This quirky feature can be as simple or elaborate as you like, making it accessible for DIY enthusiasts or professionals. Ready to sculpt a ceiling that’s full of fun? Let your imagination soar!
14. Polka Dot Ceiling with Bright Colors for a Retro Touch
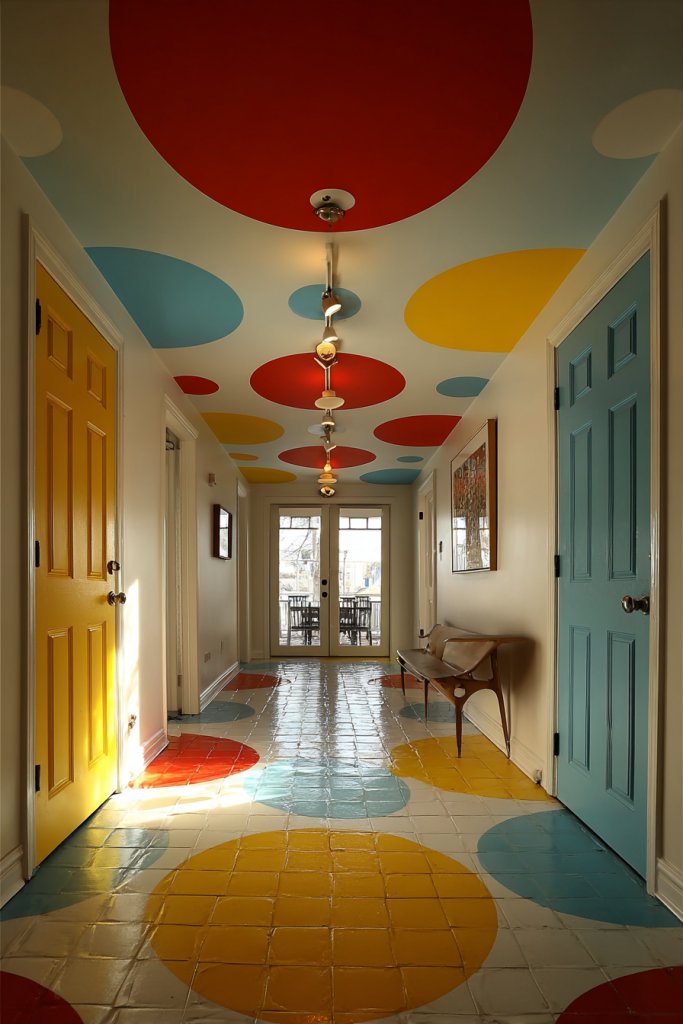
Looking to inject some retro charm and playful energy into your room? Polka dots in bright colors are a timeless pattern that instantly lifts the mood. They’re perfect for creating a cheerful, whimsical atmosphere. Who says ceilings can’t be fun?
Picture a ceiling dotted with large, colorful circles in shades like hot pink, sunny yellow, and turquoise. The dots are randomly or systematically arranged, giving a lively, upbeat vibe. When illuminated, the colors pop against a neutral background, making the ceiling a lively feature. The playful pattern adds a sense of nostalgia and joy.
Use different sizes of dots or mix in metallic or glitter finishes for an extra sparkle. For a more subtle retro look, keep the colors pastel or muted; for a bold statement, go for neon hues. Seasonal updates could include swapping colors or adding metallic accents. Keep the background neutral to let the dots stand out or choose a contrasting color for the ceiling itself.
Create polka dot patterns with stencils or adhesive decals, ensuring even spacing for a uniform look or random placement for a casual feel. Use bright, washable paints or textured vinyl decals for durability. Seal with a clear coat to protect the design. Pair with complementary wall decor or furniture that echoes the playful theme. Consider adding lighting that enhances the dots’ vibrancy.
Incorporate personalized motifs, like initials or symbols, within some dots for a custom touch. Use glow-in-the-dark or reflective paints to add nighttime effects. Mix in some patterns or textures in the dots for extra dimension. Match your furniture and accessories to the color palette for a cohesive retro vibe. Personal touches like these make the ceiling uniquely yours.
A polka dot ceiling is a fun, nostalgic way to brighten your space and reflect your playful personality. It’s an easy DIY project with a big visual payoff. This design can be adapted to any room, from kitchens to kids’ bedrooms. Ready to dot your space with cheerful charm? It’s a retro revival you’ll love!
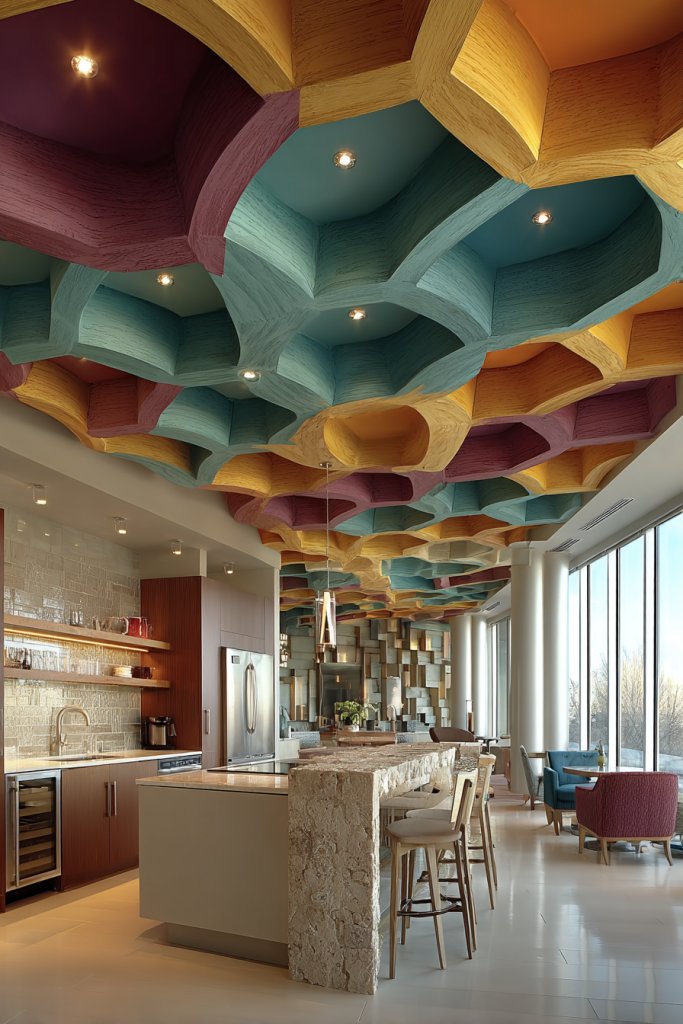
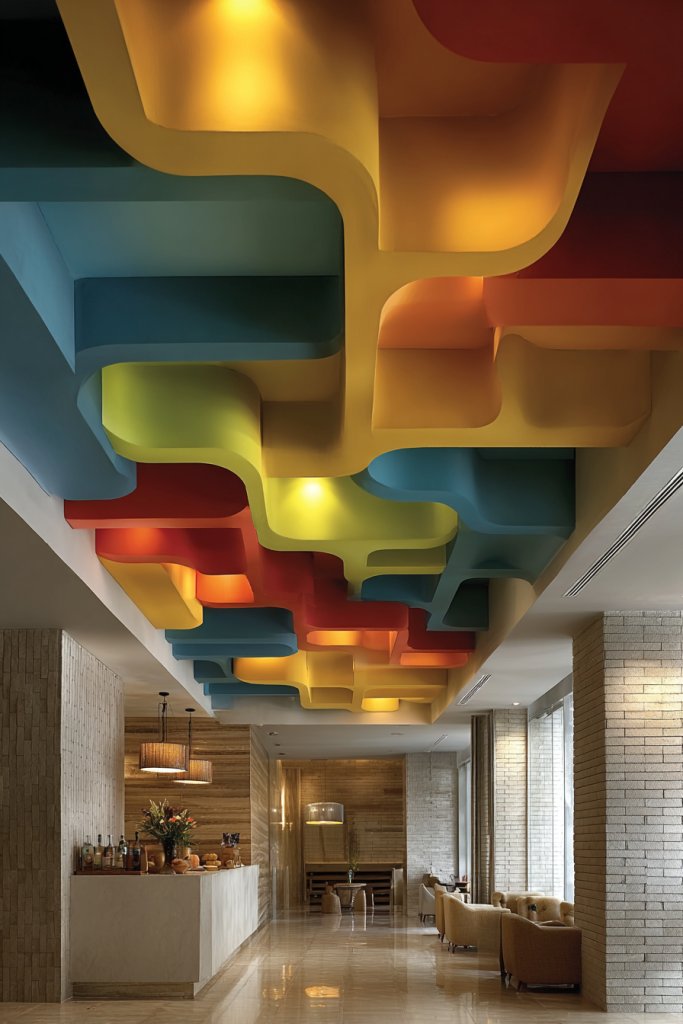
15. Multi-Layered Ceiling with Overlapping Circular Panels
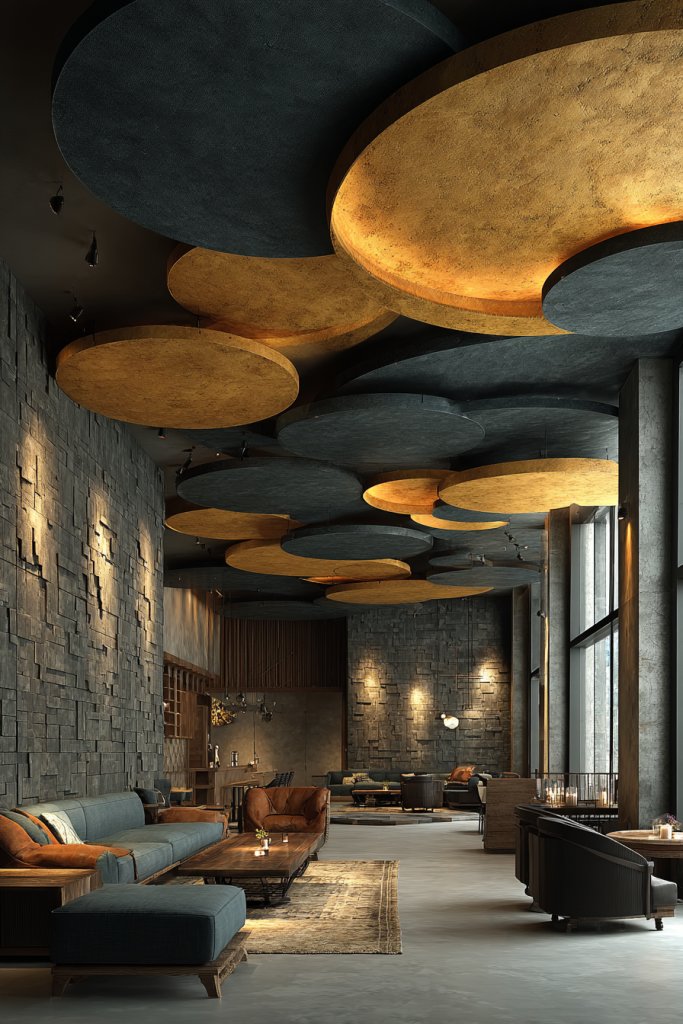
Want a ceiling that feels dynamic and full of movement? Overlapping circular panels create a layered, sculptural effect that adds depth and visual intrigue. It’s perfect for modern or eclectic spaces aiming for a bold statement. Who says flat ceilings are boring?
Imagine a series of large, circular panels arranged in a layered, overlapping pattern across the ceiling. The varying heights and sizes create a sense of motion, almost like ripples or bubbles frozen in time. When lit from above or behind, the edges glow softly, emphasizing the depth. The overall effect is mesmerizing and adds a sculptural dimension to your decor.
Use different materials like acrylic, wood veneer, or fabric-covered panels to customize the look. For a sleek, contemporary vibe, keep the colors monochrome or metallic; for a playful touch, incorporate vibrant hues. Vary the sizes and overlaps for a more organic feel or symmetry for a more formal look. Seasonal lighting or color updates can refresh the aesthetic.
Design your pattern on paper, then cut the panels accordingly. Attach the layers with strong mounting supports or adhesives, ensuring they are level and securely fixed. Use soft, indirect lighting within or behind the panels to enhance the layered effect. Conceal wiring and supports in the ceiling cavity or within the panels themselves. Finish with paint, laminate, or fabric covering to match your decor.
Add colored or textured finishes for extra flair. Incorporate LED backlighting to create glowing or color-shifting effects. Play with the arrangement—some panels can be fixed at different angles or heights for a more dynamic look. Personal touches like embedded motifs or custom colors make it uniquely yours. This layered ceiling is a statement of creativity.
A multi-layered circular ceiling turns your space into an artful, engaging environment. It’s a bold move that showcases your design confidence and taste. Perfect for entertaining or relaxing, it elevates your decor to new heights. Ready to layer up and make a splash? Your ceiling is the new canvas!
16. Patterned False Ceiling with Geometric Cutouts
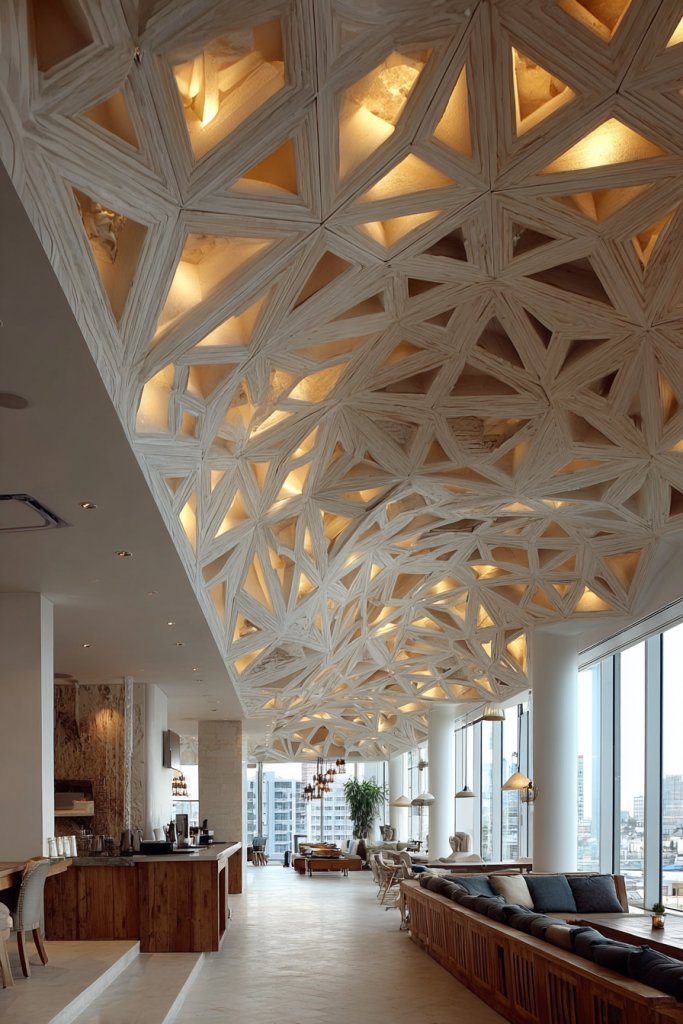
Craving a ceiling that’s both functional and visually captivating? Geometric cutouts create a pattern that adds depth, light play, and an artistic edge. It’s a clever way to break up monotony and introduce a modern touch. Who knew cutouts could be so stylish?
Envision a ceiling with precisely cut geometric shapes—triangles, hexagons, or diamonds—arranged in a repeating pattern. Behind the cutouts, LED strips or concealed lighting cast a glow that filters through, creating interesting shadows and highlights. The negative space adds a layered, textured effect, making the ceiling a dynamic focal point. It’s both architectural and artistic.
Mix different shapes and sizes for a more complex pattern, or keep it uniform for a sleek look. Use contrasting colors or finishes to make the cutouts stand out, like matte black against a glossy white background. Incorporate seasonal color themes or metallic accents for a luxe feel. This design adapts well to both small and large spaces.
Sketch your pattern and transfer it onto the ceiling with a stencil or tape for precision. Cut the shapes using a jigsaw or laser cutter, depending on material choice. Attach the panels securely with strong adhesive or mounting supports. Install concealed LED lighting behind the cutouts, ensuring wiring is hidden and neat. Finish with paint or veneer to unify the look.
Customize with different lighting modes, colors, or even project patterns onto the ceiling for special occasions. Use textured or metallic finishes within the cutouts for extra depth. Incorporate themed motifs or initials for a personal touch. Pair with simple wall decor to keep the focus on the ceiling’s intricate pattern.
A geometric cutout ceiling adds a high-tech, sophisticated vibe to any space. It’s a testament to modern design that’s both functional and artistic. This pattern invites admiration and sparks conversations. Ready to cut out the ordinary and bring in a new level of style? Your ceiling can be a work of art!
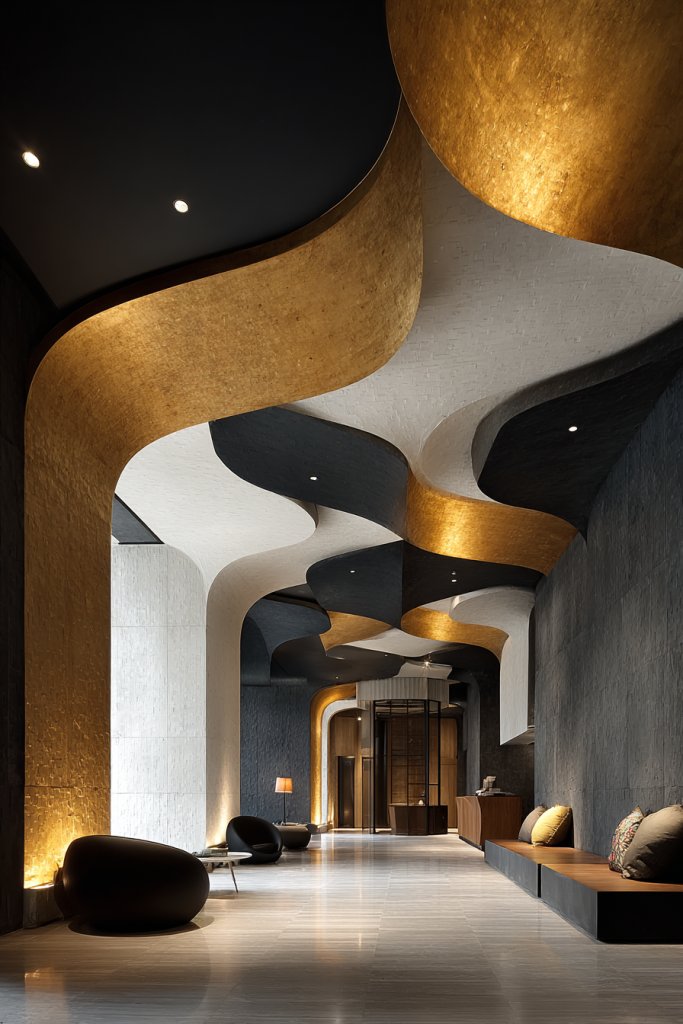
17. Contemporary Wavy Ceiling Design with Metallic Finishes
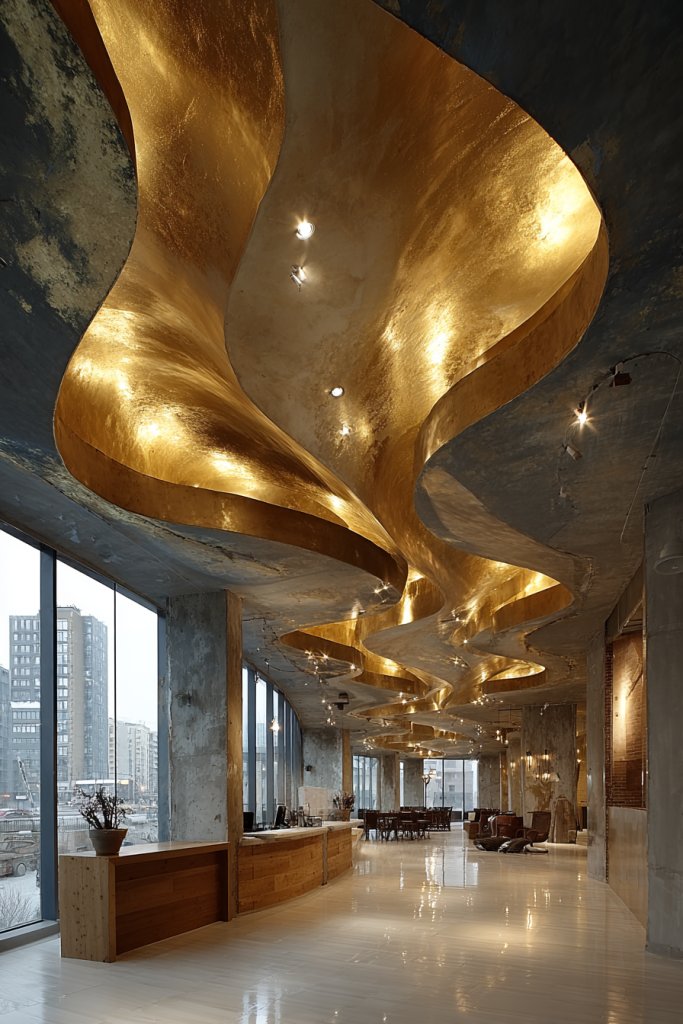
Looking for a ceiling that embodies movement and modernity? Wavy designs with metallic finishes create a vibrant, lively environment. They add a dynamic flow that energizes your space while keeping it sleek. Who says ceilings have to be static?
Imagine undulating waves across the ceiling, finished in shiny metallics like gold, silver, or copper. The curves catch and reflect light, creating shimmering effects that change with your lighting. When illuminated with spotlights or ambient lamps, the metallic surface intensifies the sense of movement and sophistication. The overall look is bold, elegant, and full of energy.
Opt for large, sweeping waves for a dramatic impact or gentle curves for a subtler effect. Use different metallic tones or combine matte and glossy finishes for contrast. Pair with minimalist decor to let the ceiling shine, or add textured wall treatments that echo the wave pattern. Seasonal lighting effects can further enhance the metallic shimmer.
Design the wave pattern on paper, then carve or mold the ceiling surface accordingly using lightweight materials like foam or MDF. Finish with metallic paint or foil for a reflective surface. Attach the waves securely using supports, making sure they follow the intended flow. Install directional lighting to accentuate the curves and reflections, and conceal wiring within the ceiling cavity. Seal and protect the metallic finish for longevity.
Add LED accent lighting along the wave edges for a glowing effect or color-changing modes for versatility. Mix finishes—matte, gloss, or textured—for a layered look. Personalize with embedded patterns, motifs, or initials that complement your decor. Incorporate decorative elements like textured wall panels or furniture in metallic tones to harmonize the space.
A wavy metallic ceiling exudes a contemporary vibe that’s both lively and luxurious. It’s a feature that showcases your bold style and confidence in modern design. This idea proves that ceilings can be as expressive as walls. Ready to wave goodbye to boring ceilings? Your space just got a whole lot more energetic!
18. Collage of Colorful Shapes for a Eclectic Style

Ever feel like your ceiling is just a boring flat surface that does nothing for your room’s vibe? Want to turn that plain expanse into a fun, eye-catching focal point? An eclectic collage of colorful shapes can do exactly that, injecting personality and energy into any space. It’s perfect if you’re tired of minimalism and crave a playful, artistic touch that sparks conversation.
Imagine a ceiling covered in a vibrant patchwork of geometric and organic shapes, each in bold hues like coral, teal, and sunny yellow. The shapes overlap and interact, creating a lively mosaic that seems almost alive. Textured materials like matte paints, glossy finishes, or even fabric patches add depth, while subtle shadows cast by different layers enhance the dynamic look. It’s as if your ceiling became a piece of modern art that you can enjoy every day.
This concept adapts easily to different styles by changing the color palette or shape complexity. For a boho vibe, opt for irregular organic shapes in earthy tones. For a futuristic look, go for sleek metallic hues and sharp angles. Smaller rooms benefit from lighter colors and less dense arrangements to avoid feeling overwhelming. Seasonal themes can be incorporated by swapping colors or adding thematic shapes like snowflakes or leaves.
Start by sketching your collage layout or using digital tools for precision. Select durable paints or adhesive-backed shapes that can be easily applied to the ceiling. Use painter’s tape or stencils to ensure clean lines. For a layered effect, add foam shapes or 3D elements for extra dimension. Carefully plan the arrangement to balance visual weight and avoid clutter. Finish with a clear sealant if using paint to protect your work from dust and smudges.
Personalize your collage with favorite colors or patterns that reflect your personality. Incorporate metallic or glitter accents for a touch of glam. You can also add glow-in-the-dark paints for a fun night-time effect. Consider using removable stickers or decals for easy updates, especially if you like changing themes regularly. Adding a few strategically placed LED strips around the edges can further highlight your artwork without overpowering it.
Creating a collage of colorful shapes on your ceiling turns an ordinary space into a vibrant conversation starter. It’s a bold move that shows off your artistic side and makes your home truly unique. Don’t be afraid to experiment with different shapes and colors—your ceiling is a blank canvas waiting for your personal touch. Get ready for compliments and a fresh sense of style that’s all your own.
19. Suspended Bubble-Like Ovals for a Fun, Light Feel
Feeling like your ceiling needs a playful upgrade that won’t weigh down the room? Looking for a way to add a sense of whimsy and lightness? Suspended bubble-like ovals can transform your ceiling into a floating wonderland, making your space feel airy and fun. It’s perfect for creating a relaxed atmosphere that still feels modern and unique.
Picture soft oval panels in pastel shades or bright colors, suspended at different heights like floating bubbles. The smooth, rounded shapes catch the light differently, creating subtle reflections and shadows that dance across the ceiling. When combined with soft lighting, these ovals give an almost cloud-like feel, perfect for bedrooms or creative spaces. The gentle curves and varied heights make the ceiling look dynamic and lively without overwhelming the room.
Adjust the size, color, and spacing of the ovals to match your style. For a calming effect, choose light blues, pinks, or whites, and space the ovals closely together. For a vibrant, energetic vibe, opt for contrasting colors and wider spacing. Smaller rooms benefit from fewer, larger bubbles to avoid clutter, while larger spaces can handle more intricate arrangements. Seasonal themes can be incorporated with metallic or iridescent finishes.
Begin by selecting lightweight, durable materials like foam, acrylic, or thin wood veneer for the panels. Use strong fishing line or clear nylon thread to suspend each oval, attaching them to discreet hooks or anchors in the ceiling. Measure and mark positions carefully to ensure a balanced, symmetrical look. Vary the heights to add visual interest, and use LED backlighting or soft ambient lights to enhance the floating effect. Regularly check the suspension points for stability.
Experiment with different color combinations to match your decor theme or mood. Add metallic or holographic finishes for extra sparkle, especially in kids’ rooms or entertainment spaces. Incorporate small LED fairy lights inside or around the bubbles for a magical glow at night. To keep the look fresh, swap out or reposition the ovals periodically, giving your ceiling a mini-makeover without much effort. Personal touches like themed colors or glow-in-the-dark accents make this idea uniquely yours.
Suspended bubble ovals turn your ceiling into a playful, eye-catching feature that sparks joy and creativity. It’s a simple yet impactful way to add personality and fun to any room. Plus, it’s customizable and easy to update, so your ceiling can evolve as your tastes change. Dive into this project with confidence—you’ll enjoy a whimsical, light-filled space that feels fresh and inviting.
20. Retro-Inspired Sunburst Design with Bright Accents
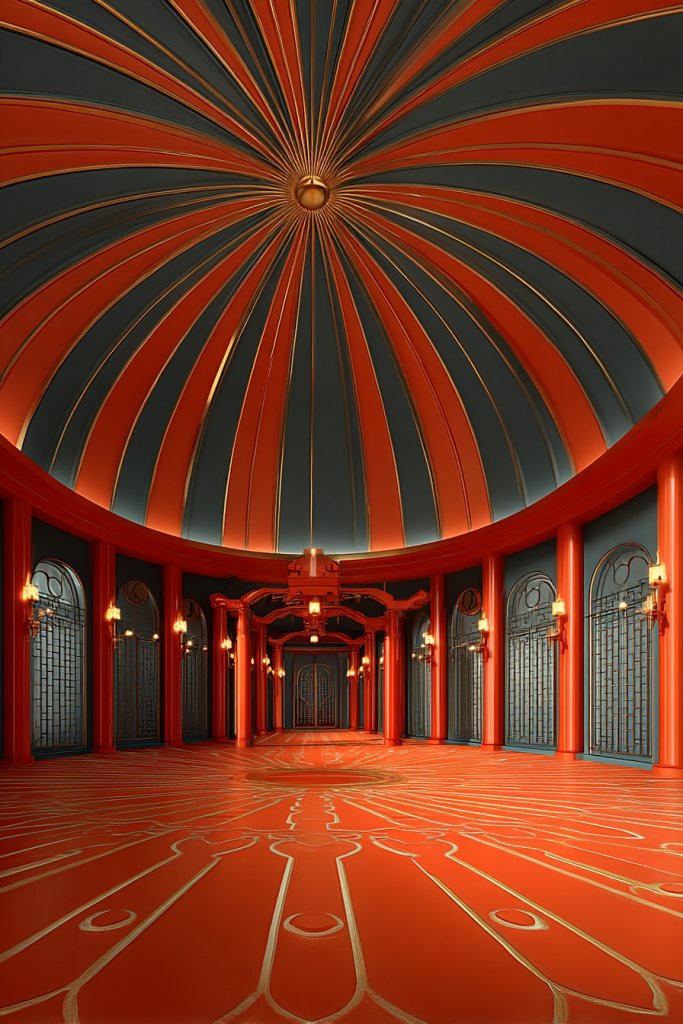
Want to make a bold statement that instantly grabs attention? A retro-inspired sunburst ceiling can do just that, adding a burst of energy and vintage charm. It’s perfect if you’re craving a focal point that combines nostalgia with a modern twist. Plus, it’s a surefire way to inject personality into a plain room.
Visualize a central circular element from which rays of bold colors radiate outward in a starburst pattern. Use contrasting shades like mustard yellow, teal, and coral for a true retro vibe, or stick to monochrome for a more subdued look. The rays can be painted directly onto the ceiling or created with layered panels and decorative moldings. When illuminated with spotlights or indirect lighting, the pattern pops, creating dynamic shadows and a lively atmosphere. It feels like a vintage poster come to life overhead.
Tailor the sunburst to your space by adjusting the size and number of rays. In small rooms, keep the pattern subtle with thinner rays and fewer colors. For larger spaces, extend the rays outward for maximum impact. You can also modernize the look by using metallic paints or glossy finishes. Incorporate fabric or textured materials for a more tactile experience. Seasonal changes can be made by swapping color schemes or adding themed accents.
Start by sketching your sunburst pattern and choosing a color palette. Use painter’s tape and stencils for clean, sharp lines or opt for hand-painted precision if you’re confident. For a layered effect, consider adding decorative wood or foam panels cut in rays, then paint or finish accordingly. Use spotlights or LED strips to highlight the rays, making them stand out even more. Ensure all elements are securely attached and sealed for longevity. This project balances DIY effort with professional touches for the best result.
Make it your own by adding metallic or iridescent accents to catch the light. Use glow-in-the-dark paints for a surprise nighttime glow. You can also incorporate small decorative elements like vintage-style decals or motifs at the center for extra flair. Pair it with complementary wall decor in similar colors to unify the room’s theme. This design is versatile enough to fit various styles, from mid-century modern to eclectic boho.
A sunburst ceiling is a bold move that instantly elevates your space and shows off your design daring. It combines nostalgia with creativity, making your room memorable. With careful planning and a bit of effort, you’ll create a statement piece that feels both timeless and fresh. Embrace the challenge—you’ll love the energetic vibe it brings to your home.
21. Interlocking Hexagon Pattern with Vibrant Colors
Looking for a ceiling design that combines modern geometry with a pop of color? An interlocking hexagon pattern offers a fresh, visually striking approach that feels both organized and playful. It’s perfect if you want a contemporary look that still feels lively and engaging. Plus, it can be tailored to suit small or large spaces alike.
Picture a ceiling covered in a honeycomb pattern, with each hexagon painted in vibrant shades like magenta, lime green, and electric blue. The interlocking shapes create a tessellated effect that draws the eye in multiple directions. When illuminated with bright, even lighting, the colors pop, and the pattern appears to extend endlessly. The geometric precision adds a sense of order, while the vivid palette keeps it energetic. It’s like having a piece of modern art overhead.
Customize the pattern by adjusting the size of the hexagons or using different color schemes. For a subtler look, opt for pastel hues or metallic finishes. For a bold statement, combine contrasting colors and add a glossy or textured surface. Large rooms benefit from bigger hexagons and more intricate arrangements, while compact spaces should keep it simple to avoid visual overload. Seasonal themes can be achieved through color swaps or metallic accents.
Begin by creating a grid or stencil to ensure perfect hexagon shapes. Use painter’s tape to outline the pattern, then fill each shape with high-quality, vibrant paint or adhesive tiles. For added dimension, consider layering materials like textured wallpaper or 3D panels within each hexagon. Use uniform lighting to evenly illuminate the pattern, emphasizing the colors’ vibrancy. Seal the surface with a clear coat for durability. This project requires patience but yields a stunning contemporary ceiling.
Incorporate metallic or iridescent paints for extra shimmer. Mix in custom colors that match your decor or mood. You can also add small reflective elements within some hexagons for a bit of sparkle. To keep it fresh, periodically update the color scheme or add new shapes. Complement the ceiling with matching geometric wall art or accessories to reinforce the theme. It’s a design that invites creativity and personal expression.
This hexagon pattern combines the beauty of geometry with lively colors, creating a ceiling that truly stands out. It’s a testament to how thoughtful design can transform a space. With a little effort, you’ll have a modern masterpiece overhead that sparks joy every time you look up. Dare to be bold—your ceiling can be the ultimate personal statement.
22. Artistic Graffiti-Style Ceiling with Bold Graphics
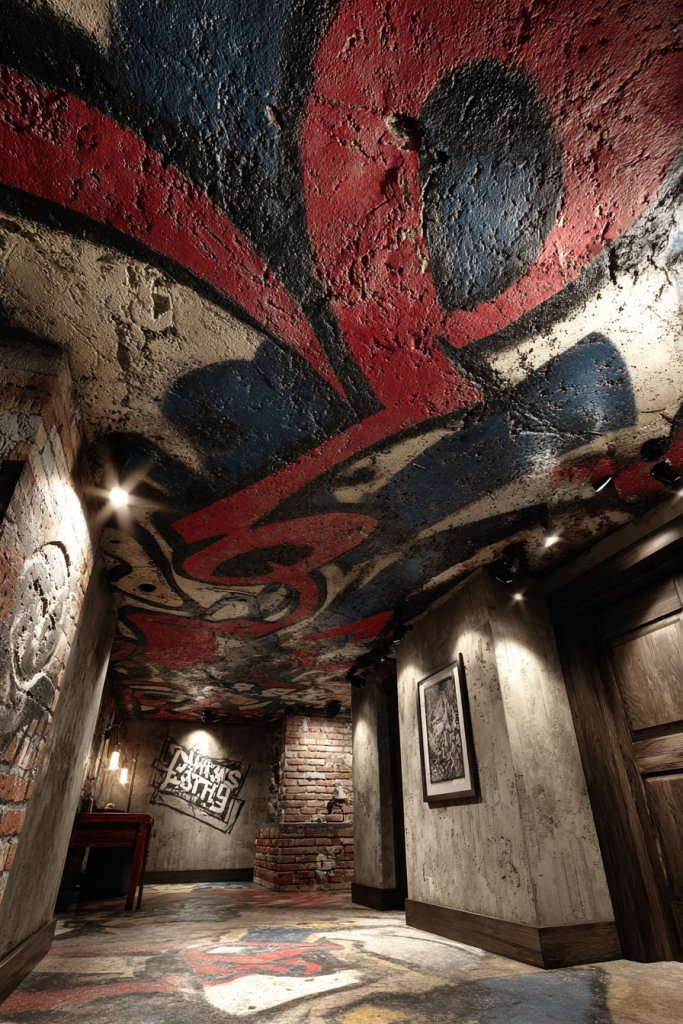
Ever wish your ceiling could scream personality and attitude? A graffiti-style ceiling with bold graphics turns a dull surface into a street-art masterpiece. It’s perfect if you want a space that feels rebellious, energetic, and totally unique. Plus, it’s an awesome way to showcase your creative side without needing a canvas.
Imagine a ceiling splashed with vibrant graffiti tags, abstract shapes, and playful doodles in neon pinks, blues, and yellows. The artwork appears spontaneous yet carefully curated, with layers of spray paint effects and bold outlines. When lit with colored LED strips or spotlights, the graphics come alive, casting dynamic shadows. It feels like an underground art scene has been brought straight into your home, making the ceiling the star of the show.
Adjust the intensity and style based on your taste—go for subtle stenciled patterns or full-blown murals. Use waterproof or spray-proof paints for longevity, especially in kitchens or bathrooms. For a more refined look, incorporate metallic or glow-in-the-dark paints. Smaller rooms benefit from focused, less cluttered designs, while larger spaces can handle more complex scenes. Seasonal or thematic graffiti can be added for special occasions or moods.
Start by sketching your graffiti design or hiring a professional artist for intricate murals. Use painter’s tape and stencils for sharp edges or freehand for a more raw effect. Choose high-quality spray paints or acrylics that adhere well and dry fast. Protect surrounding areas with drop cloths and ventilate thoroughly. Once dry, add LED lighting or black lights to enhance the vibrant colors. Regular touch-ups keep the graffiti fresh and lively.
Add metallic or fluorescent accents for extra pop. Incorporate your favorite symbols, quotes, or personal tags that tell your story. Use glow-in-the-dark paints for night-time surprises. You can also frame sections with decorative moldings or tape to create layered effects. Coordinate the wall decor to complement the graffiti theme, making the entire room feel cohesive. Your ceiling becomes a bold statement of your personality.
A graffiti ceiling is a daring, creative move that transforms your space into an urban art gallery. It’s a fun, rebellious way to express yourself and challenge traditional decor norms. With some planning and a splash of color, you’ll create a ceiling that energizes your entire home. Go ahead—make your ceiling a conversation starter and showcase your artistic spirit.
23. Multi-Color Strip Lighting in a Dynamic Pattern

Want to add energy and color to your ceiling without a major overhaul? Multi-color strip lighting arranged in dynamic patterns can do the trick. It’s perfect if you love customizable, vibrant atmospheres that can change with your mood. Plus, it’s an easy way to make your space feel lively and modern.
Visualize flexible LED strips running across your ceiling in zigzags, waves, or abstract shapes in a spectrum of bright hues. The lights can be programmed to change colors, pulse, or create gradients, transforming your room into a lively dance floor or calming retreat. When combined with textured ceilings or reflective surfaces, the lighting creates mesmerizing visual effects that captivate at every glance. It’s like having a light show right overhead.
Use different colors for different zones—cool blues and greens for relaxation, reds and oranges for energy. Create patterns that match your room’s shape or furniture layout, or opt for random, freeform designs for a playful vibe. Dimming options allow you to set the perfect ambiance for any occasion. For seasonal themes, sync the lighting with holiday colors or special events. The flexibility makes it suitable for any style.
Start by measuring your ceiling to determine the length of LED strips needed. Use a compatible controller to customize colors and patterns. Mount the strips with adhesive backing or channels for a clean, professional look. Conceal wiring along ceiling edges or within crown molding for a seamless appearance. Test the setup thoroughly before securing all connections. Power sources should be easily accessible for maintenance or upgrades. This setup requires minimal tools but a bit of planning to avoid tangled wires.
Sync the lights with music or set timers for dynamic effects. Use color palettes that match your decor or switch themes seasonally. Add smart controls for voice activation or remote changes. Incorporate dimming and scene presets to quickly change moods. Pair with smart home systems for a fully integrated experience. Your ceiling becomes a canvas for endless customization and fun.
Colorful strip lighting turns your ceiling into a vibrant centerpiece that elevates your mood and style. It’s a simple upgrade that packs a punch, perfect for parties or chill evenings. With endless pattern options and color schemes, your space can evolve effortlessly. Embrace this tech-savvy approach and enjoy a lively, personalized environment that’s always ready for fun.
24. Nautical-Inspired Rope-Patterned Ceiling Design
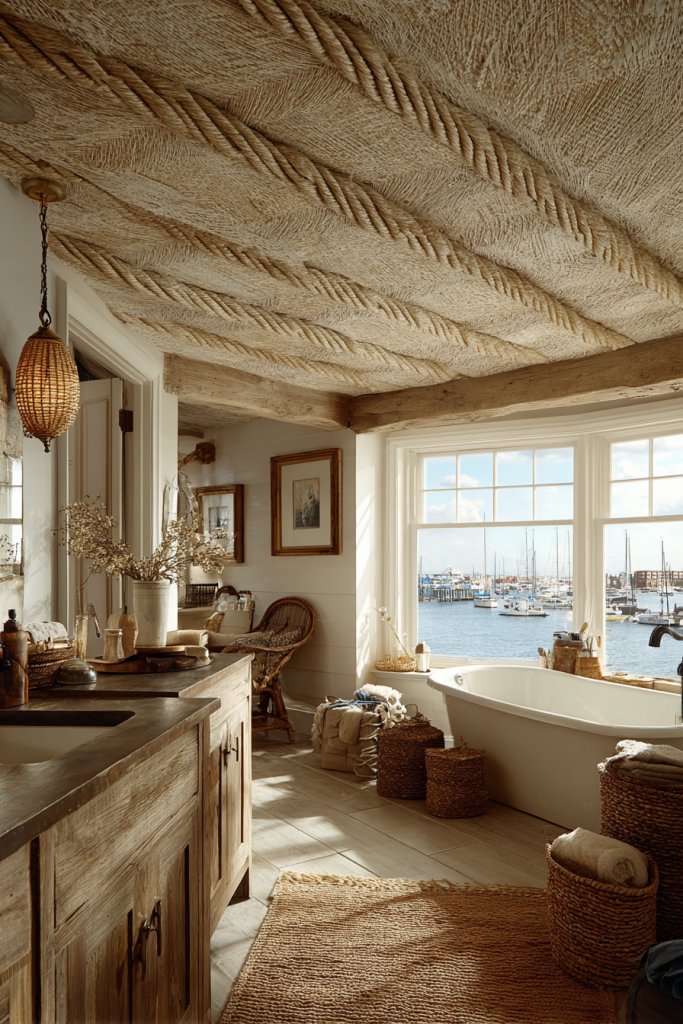
Dreaming of a seaside escape in your own home? A nautical-inspired rope ceiling can bring that maritime charm right into your space. It’s perfect if you love the ocean vibe and want a subtle yet impactful design twist. Plus, it adds texture and warmth, making your ceilings feel cozy and inviting.
Imagine a ceiling wrapped with thick, twisted ropes arranged in elegant, swirling patterns. The natural fibers or faux ropes in shades of beige, navy, and white create a tactile, textured surface that evokes maritime adventures. When paired with soft, ambient lighting, the ropes cast gentle shadows, enhancing the nautical atmosphere. Decorative knots and nautical motifs can be incorporated for extra charm. It feels like a ship’s deck or beach cottage, adding warmth and character.
Adjust the rope thickness and pattern complexity based on your room size. Use lighter colors for a breezy, summery feel or darker tones for a cozy, vintage vibe. Incorporate metallic accents or paint to mimic weathered wood or ship hulls. For a more modern twist, combine the ropes with sleek, minimalist lighting fixtures or wall decor. Seasonal changes can be made by swapping out the ropes or adding decorative nautical elements.
Start by designing your rope pattern, either freehand or using stencils. Attach the ropes securely with strong adhesive or mounting brackets, ensuring they follow your planned pattern. Use soft LED lighting behind or around the ropes to highlight their texture. For larger areas, stretch the ropes taut or layer them for a richer look. Seal or treat the ropes to withstand humidity if necessary. Regular maintenance involves cleaning and inspecting knots for stability.
Add decorative elements like ship wheels, anchors, or shells for a more themed look. Incorporate LED strip lighting along the ropes for ambient glow. Use paint or stain to distress the ropes for a vintage, weathered appearance. Mix materials like wood and rope to create contrast and interest. This design can be a conversation starter and a unique expression of your love for the sea.
A nautical rope ceiling adds charm and character, transforming your space into a coastal retreat. It’s a creative, tactile approach that emphasizes texture and theme. With some planning, you’ll craft a cozy, inviting atmosphere that feels both fresh and timeless. Dive into this project and enjoy a home that’s full of maritime magic.
25. Playful Puzzle-Theme Ceiling with Interchangeable Panels
Tired of a static, boring ceiling? Want a fun, versatile design that can change with your mood or season? A puzzle-themed ceiling with interchangeable panels offers a playful, customizable solution. It’s perfect for creative souls who love to switch things up and keep their decor fresh. Plus, it adds a tactile element that sparks curiosity.
Picture a ceiling composed of colorful, puzzle-shaped panels that fit together like a giant jigsaw. Each piece can be removed or swapped out, revealing different colors, textures, or patterns underneath. The panels might be in bright hues, metallic finishes, or even textured surfaces like faux wood or fabric. When assembled, they create a lively mosaic that invites interaction and playfulness. It’s like having a giant, interactive artwork overhead.
Use a variety of colors or themes—geometric, nature-inspired, or abstract—for different rooms or seasons. Materials can range from lightweight plastic to textured wood or fabric-covered panels. For a sleek look, keep the puzzle pieces uniform and monochrome, focusing on subtle contrasts. For a more eclectic style, mix and match colors and textures freely. This system allows you to personalize your space with ease.
Design a grid or frame to hold the puzzle panels securely in place. Use lightweight, durable materials for the panels, ensuring they’re easy to remove and swap. Incorporate magnetic or hook-and-loop fasteners for quick changes. Arrange the panels in a pattern that balances visual weight and accessibility. Regularly update the panels to match seasons, holidays, or your changing tastes. This project combines DIY fun with functional decor.
Create custom panels with photos, patterns, or textures that tell your story. Use paint, decals, or fabric covers to add variety. Incorporate glow-in-the-dark or metallic elements for extra flair. Keep a few spare panels on hand for spontaneous updates or special occasions. Coordinate the ceiling with other decor elements like throw cushions or curtains for a cohesive look. It’s a playful way to keep your home feeling fresh.
A puzzle-themed ceiling is a clever, engaging way to showcase your personality. It invites interaction and adds a layer of fun to everyday living. With minimal tools and a bit of planning, you can create a space that’s uniquely yours—dynamic, colorful, and constantly evolving. Embrace the playful spirit and enjoy a ceiling that’s as creative as you are.
Conclusion
From sleek minimalistic designs to colorful, statement-making ceilings, this collection of Pop False Ceiling ideas offers endless ways to elevate your home decor. Don’t hesitate to experiment and bring your unique style to life with these fun and dynamic options. Embrace the opportunity to transform your space—your dream ceiling is just an idea away!