Imagine stepping into a kitchen that feels both timeless and inviting—where classic charm meets effortless elegance. Timeless kitchen ideas have enduring appeal because they combine functionality with aesthetic appeal, creating spaces that remain stylish through changing trends.
In this article, you’ll find a variety of inspiring ideas that blend traditional elements with modern touches, perfect for elevating your kitchen’s look. From cozy color palettes to elegant fixtures, these ideas will help you craft a space that’s both beautiful and practical, no matter your personal style or home size.
1. Elegant White Shaker Cabinets with Brass Hardware
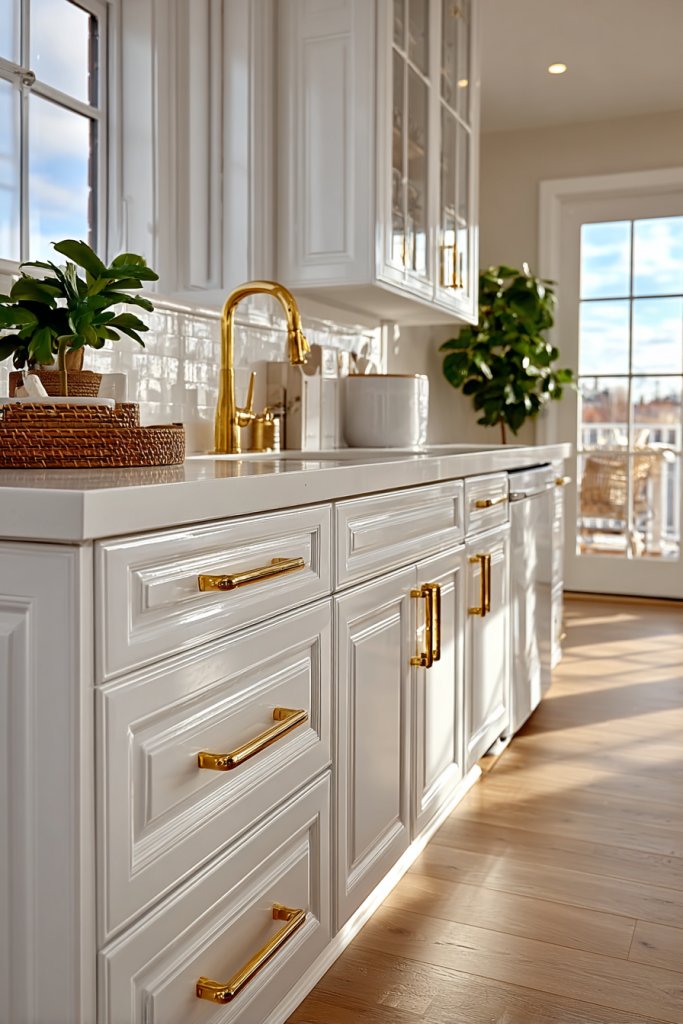
Ever wish your kitchen could look effortlessly stylish without feeling cold or sterile? White shaker cabinets are the perfect solution, blending timeless elegance with simplicity. They create a clean canvas that pairs easily with any decor style, but many worry they’ll look plain or fade into the background. The right hardware can make all the difference, adding a touch of sophistication. This idea offers a way to keep your kitchen both classic and modern.
Imagine smooth, matte white cabinets with subtle square panels that add depth without clutter. The brass hardware gleams softly, catching the light as you move around the kitchen. The warm tones of brass contrast beautifully against the crisp white, creating a sophisticated yet inviting atmosphere. The overall look feels fresh and timeless, like a well-curated boutique kitchen. It’s a subtle but impactful style that elevates everyday cooking.
Switch to matte black or antique bronze hardware for a more dramatic or rustic vibe. Consider distressed or glazed finishes on cabinets for a vintage or farmhouse feel. You can also vary the cabinet layout—install glass-front doors in some sections for display, or keep everything sleek and uniform. Seasonal updates might include swapping hardware finishes or adding decorative handles for holidays. The key is balancing simplicity with personality.
Start by selecting high-quality shaker cabinets—preferably solid wood for durability. Choose hardware that complements your style—brass, nickel, or matte black are popular options. Measure carefully before purchasing, and consider pre-drilled holes to streamline installation. Use a screwdriver or drill to attach hardware firmly, ensuring smooth operation. If repainting existing cabinets, prep the surface properly with sanding and primer for a flawless finish. Take your time to align hardware evenly for a professional look.
Add personalized touches like engraved initials or custom knobs. Mix and match hardware styles for an eclectic feel, or keep it uniform for a minimalist aesthetic. Incorporate soft textiles like linen dish towels or padded cabinet pulls for extra comfort and style. A touch of brass or gold accents on other fixtures can tie the look together across the space. These small details make your kitchen uniquely yours.
Classic white shaker cabinets with brass hardware prove that simplicity can be striking. They stand the test of time and easily adapt to changing trends. Trust that investing in quality materials will give you a look that lasts for years. Ready to make your kitchen feel like a stylish retreat? With a little effort, you can achieve a timeless, elegant look that feels both fresh and forever.
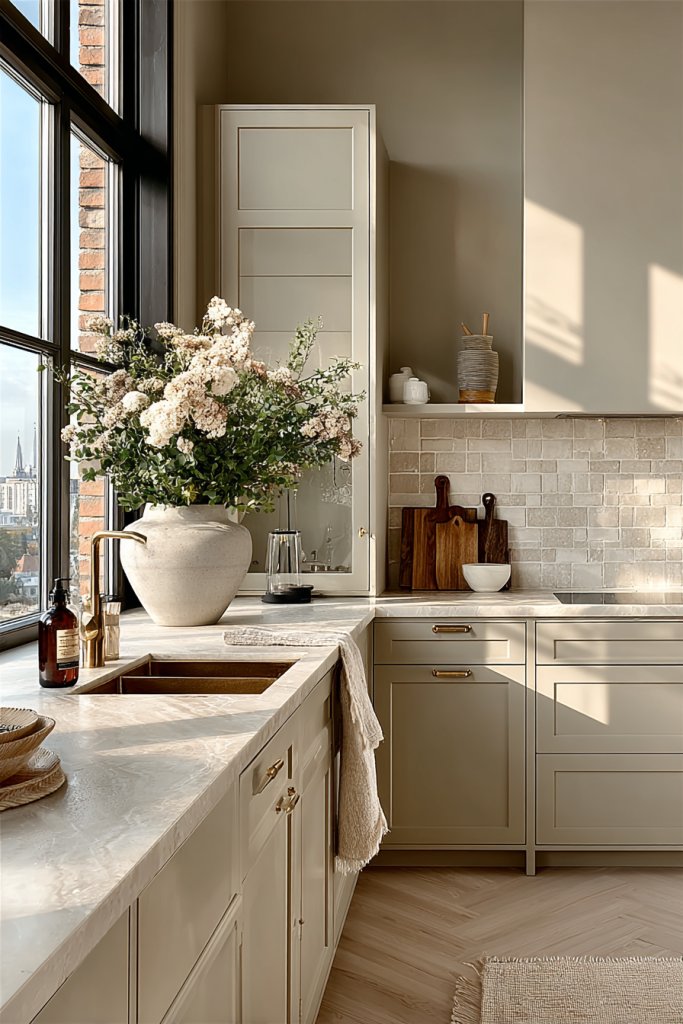
2. Marble Countertops with Subtle Veining
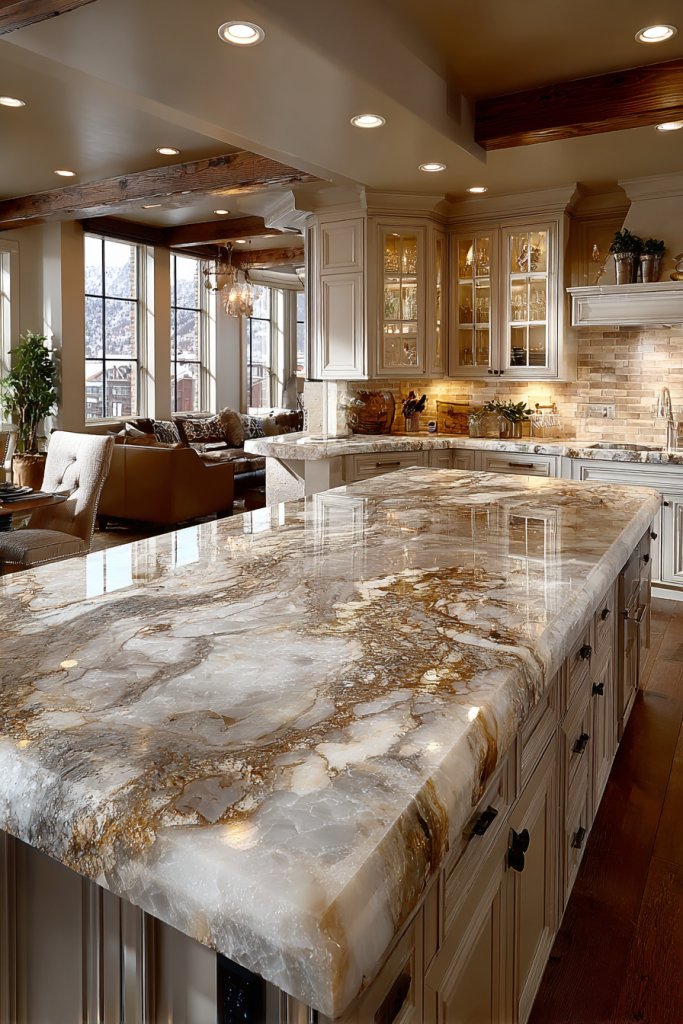
Ever dream of a kitchen that screams luxury but still feels warm and welcoming? Marble countertops are the epitome of elegance, adding instant sophistication. But many shy away because they’re worried about maintenance or cost. The truth is, a well-chosen marble surface can be both practical and stunning, elevating your entire space. This idea offers a way to indulge in luxury without overdoing it.
Picture a sleek slab of marble with gentle gray veins flowing across a soft cream background. The surface catches the light, revealing a subtle shimmer that’s both calming and grand. The cool touch of marble under your fingertips invites you to linger at the prep station. Pair it with minimalist cabinetry and understated fixtures to let the stone be the star. The overall effect is a quiet opulence that feels timeless.
Opt for honed or leathered finishes to reduce shine and hide fingerprints. Incorporate marble with darker veining for a more dramatic look, or choose lighter tones for a softer ambiance. Combining marble with other materials like wood or stainless steel creates interesting contrasts. Seasonal touches might include layering with textured textiles or warm-colored accessories that complement the cool surface. The versatility allows for many aesthetic directions.
Start by selecting high-quality marble slabs—consider sample swatches to visualize the veining and shade. Seal the surface properly to prevent staining, especially if you cook frequently. Professional installation is recommended to ensure precise cuts and secure fitting. Maintain marble with gentle, pH-neutral cleaners and avoid acidic substances. For longevity, use cutting boards and avoid placing hot pots directly on the surface. Regular sealing keeps the stone looking pristine.
Customize your marble with edge profiles—beveled, bullnose, or ogee—to add detail. Incorporate complementary backsplash tiles or accents in similar tones. Personal touches like a marble cheeseboard or soap dish can complement the countertops. Mixing marble with other textures like matte cabinetry or textured backsplashes keeps the look fresh. These small details turn a simple surface into a style statement.
Marble countertops combine natural beauty with enduring style. They’re a smart investment that elevates your entire kitchen aesthetic. With proper care, they will age gracefully, developing a unique patina. Embrace the elegance and trust that classic marble is always in style. Ready to add a touch of luxury? Your dream kitchen might just be a slab away.
3. Open Shelving with Classic Dishes and Glassware
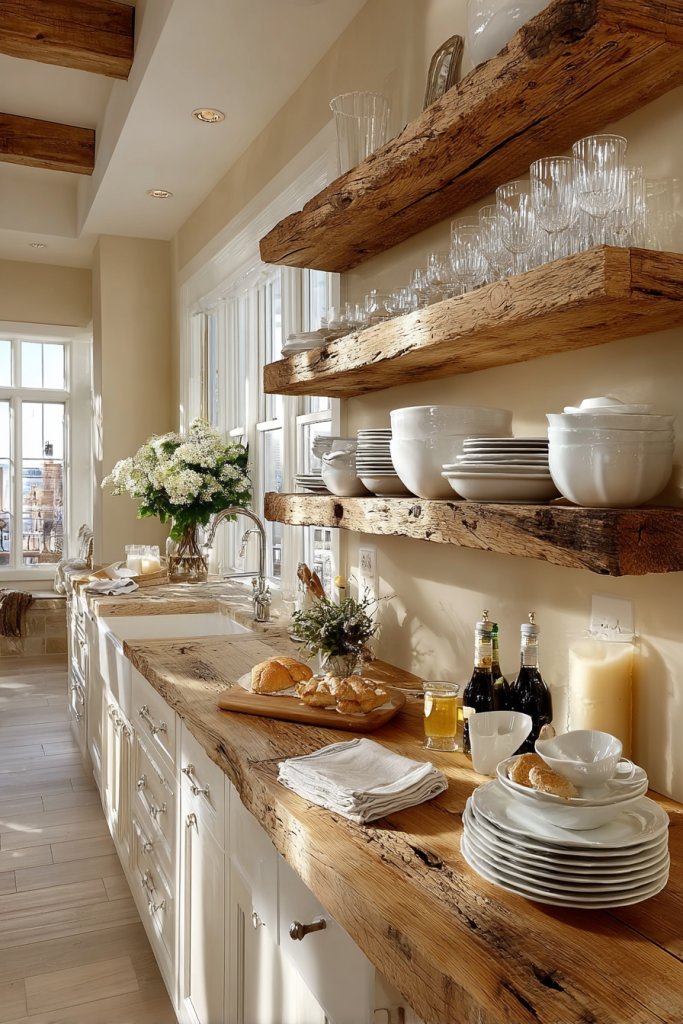
Tired of bulky upper cabinets that hide your favorite dishes? Open shelving offers an airy, accessible alternative that showcases your best dinnerware. It adds a sense of charm and casual elegance, but many worry about clutter or dust. The trick is styling your shelves thoughtfully to create a curated look. This idea transforms your kitchen into a display space that’s both functional and beautiful.
Visualize floating wooden or metal shelves holding vintage porcelain plates and delicate glassware. The open design allows you to layer items for visual interest, mixing heights and colors. Soft lighting or under-shelf LEDs highlight your collection, creating a warm glow. The space feels inviting, like a cozy cafe or boutique shop. Everything is within reach, yet carefully arranged to maintain order.
Choose rustic wood for a farmhouse vibe, or sleek glass and metal for a modern look. Incorporate baskets, decorative jars, or small sculptures for added personality. Adjust the spacing based on your collection size—more space for larger items, tighter for smaller collections. Change the display seasonally by swapping out dishes or adding decorative accents. Keep the arrangement balanced for a polished feel.
Install sturdy brackets or floating shelf hardware that can support weight. Use materials that match your kitchen’s style—wood, metal, or glass. Arrange dishes and glassware in an organized way—stack plates, hang cups or mugs upside down. Regularly dust and clean the shelves to keep everything looking fresh. Consider adding non-slip pads or liners for fragile items. The goal is easy access without sacrificing style.
Add vintage or handcrafted dishware to tell a story. Incorporate personal collections or heirlooms for sentimental value. Use decorative elements like a small plant or a unique utensil holder for contrast. Keep your shelves tidy but lively with a mixture of textures and finishes. Personal touches make your open shelving uniquely yours.
Open shelving invites you to display your personality while maintaining practicality. It’s a simple but effective way to make your kitchen feel alive and warm. When styled well, it becomes a focal point that shows off your taste. Ready to ditch the closed cabinets and embrace an open, inviting vibe? Your kitchen transformation starts here.
4. Subway Tile Backsplash in Neutral Hues
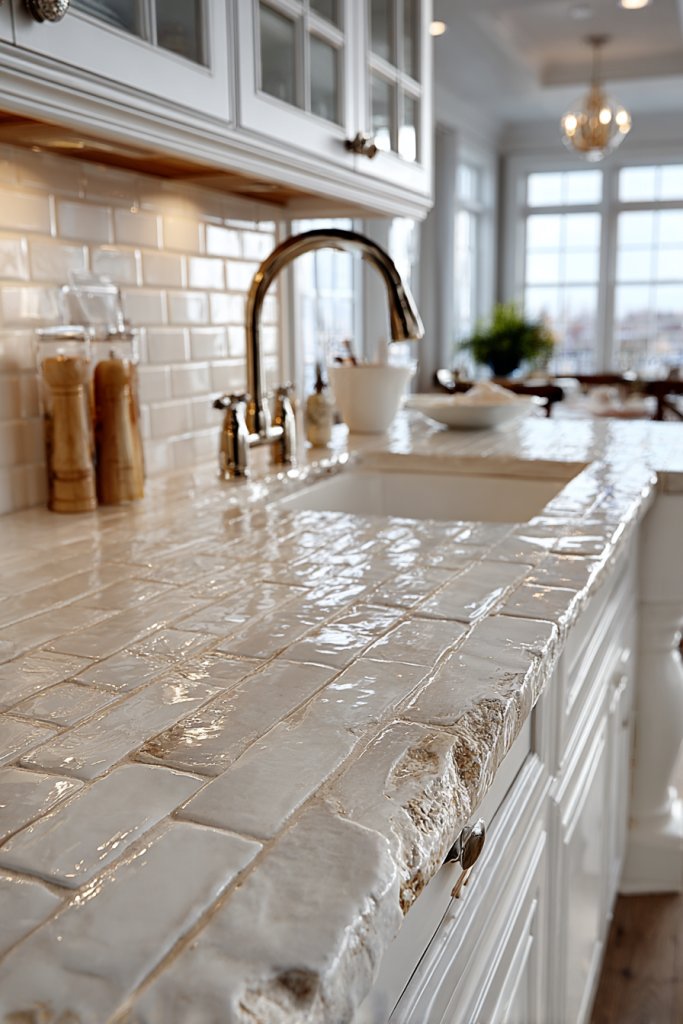
Does your kitchen feel a little too plain or uninspired? A classic subway tile backsplash offers a timeless solution that adds texture and depth without overwhelming. It’s versatile enough to work with any color palette, but many worry it might look too basic. The secret is in choosing the right grout and layout to elevate the look. This idea promises a clean, classic aesthetic with endless styling options.
Picture crisp white subway tiles arranged in a traditional running bond pattern, with subtle gray grout lines that define each tile. The glossy surface reflects light, making the space feel brighter and larger. Alternatively, soft gray or beige tiles create a more muted, calm environment. The textured surface adds visual interest, especially when paired with warm wood tones or painted cabinets. It’s a quiet but impactful detail that ties the whole room together.
Use different tile sizes—herringbone, stacked, or beveled—to add variety. Dark grout lines or contrasting colors can make the pattern pop. For a more rustic look, choose matte or textured tiles. You can also extend the backsplash higher or lower, depending on your style. Seasonal touches might include adding decorative trim or a border tile. The key is balancing simplicity with your personal style.
Start by selecting durable, easy-to-clean tiles suited for kitchen environments. Prepare the wall surface by cleaning and leveling it. Use tile spacers to ensure even gaps, and apply mortar with a notched trowel. Carefully place tiles, pressing firmly, and wipe excess grout. Wait for the grout to cure before sealing. Regular cleaning keeps the tiles looking fresh. Professional installation can ensure a flawless finish, especially with intricate layouts.
Mix tile sizes or colors for a unique look. Add decorative tiles as accents or borders. Incorporate metallic or matte finishes in grout or tile details for contrast. You could also layer with paint or textured wall treatments for extra depth. Personalize your space with handmade or vintage tiles for a truly one-of-a-kind feel. These details turn a simple backsplash into a statement.
A subway tile backsplash is a reliable choice that never goes out of style. It’s easy to maintain and can be tailored to fit any aesthetic, from modern to vintage. When installed well, it elevates the entire kitchen’s look and feel. Trust that this classic choice adds value and longevity to your space. Ready to refresh your kitchen with a timeless touch? It’s easier than you think.
5. Farmhouse-Style Apron-Front Sink
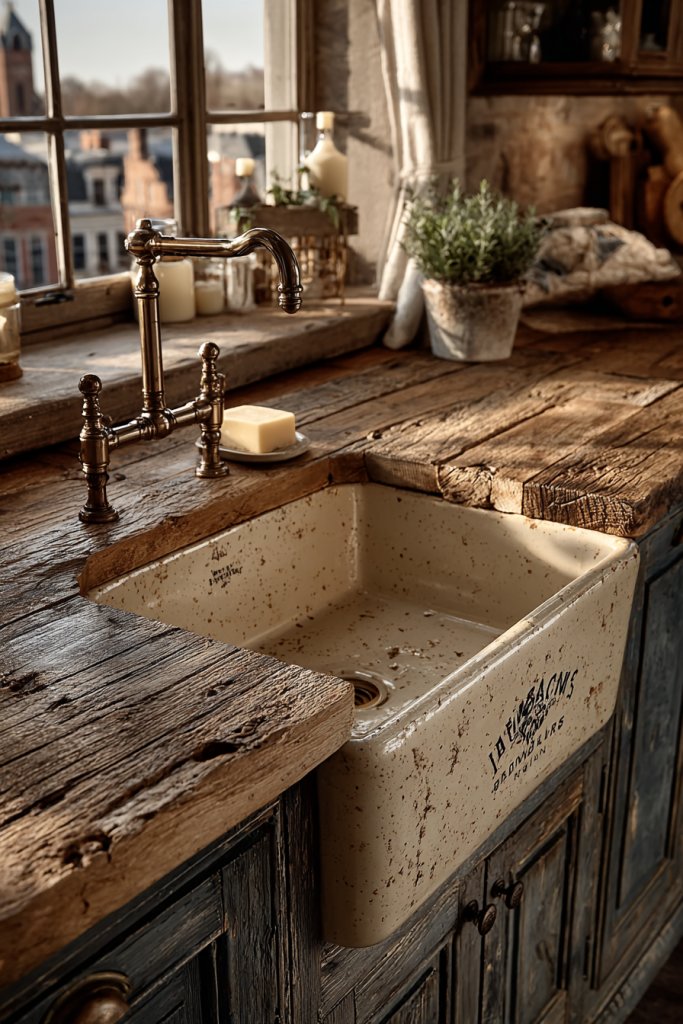
Ever wish your kitchen had a cozy, charming focal point that also feels practical? The farmhouse apron-front sink ticks both boxes, offering a nostalgic vibe with modern usability. Many shy away because they think it’s outdated or difficult to install, but it’s actually a versatile choice. This idea brings rustic warmth without sacrificing sophistication, making your kitchen feel welcoming and functional.
Imagine a large, deep porcelain or fireclay sink with a wide front panel that extends slightly beyond the counter. The distressed finish or vintage-inspired hardware adds character, making it feel like a treasured heirloom. Paired with reclaimed wood or painted cabinets, it creates a warm, inviting atmosphere. The soft curves and substantial size make it the heart of the kitchen, perfect for cleaning large pots or washing fresh produce.
Choose materials like fireclay, cast iron, or composite for durability. Finish options include smooth, matte, or subtly textured surfaces. For a more modern twist, pair it with sleek matte black fixtures or minimalist cabinetry. Seasonal adaptations could include vintage accessories or cozy dishcloths to accentuate the rustic feel. You can also opt for a single or double bowl depending on your needs.
Select a farmhouse sink that fits your cabinet opening—measure carefully! Install a sturdy apron-front base cabinet designed for this purpose, or modify an existing one. Connect plumbing with flexible hoses for easier setup, and ensure proper sealing to prevent leaks. Finish with complementary fixtures—brass or matte black faucets work beautifully. Keep in mind, a professional install ensures a flush fit and proper drainage. Maintenance involves gentle cleaning, avoiding harsh abrasives.
Add vintage or handcrafted faucet hardware for extra charm. Incorporate a soap dispenser or a built-in drain board for functionality. Decorate the apron with a small textile curtain or a vintage dish towel. Personal touches like a chalkboard label or a small potted herb (if plant content is acceptable) can make it truly your own. The goal is a mix of rustic charm and everyday practicality.
The farmhouse apron-front sink combines timeless appeal with real-world utility. It’s a statement piece that can anchor your entire kitchen design. Trust that its durability and classic look will stand up to daily use. Whether you prefer vintage or contemporary accents, this sink adds character and warmth. Ready to embrace a cozy, functional centerpiece? Your dream kitchen awaits.
6. Traditional Crown Molding and Wainscoting
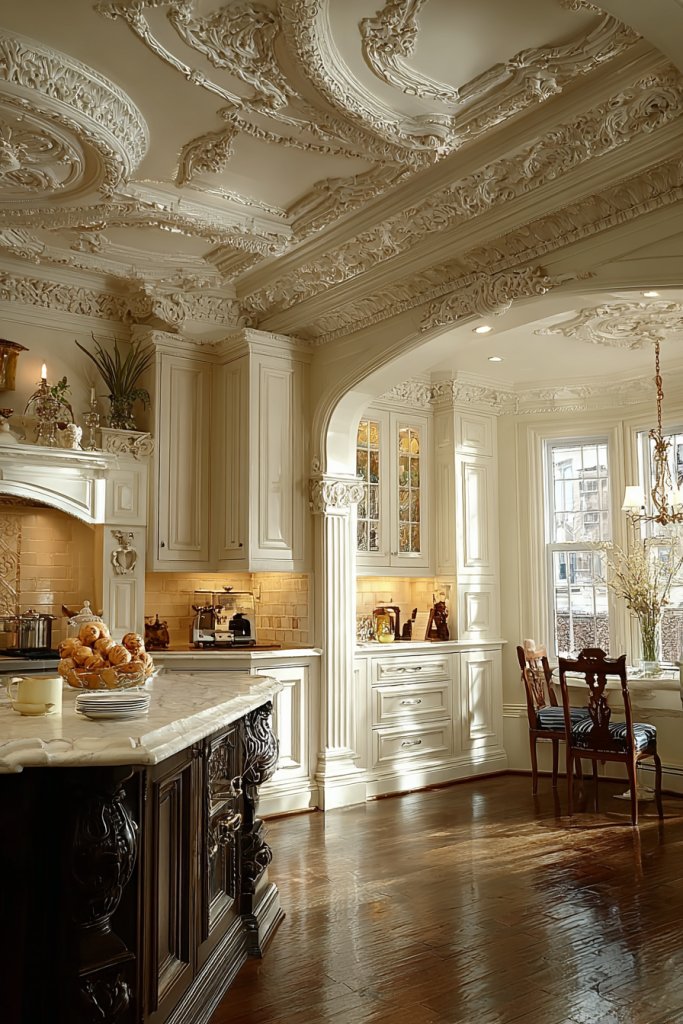
Craving a kitchen that feels polished and upscale without looking overly formal? Traditional crown molding and wainscoting can elevate your space dramatically. Many think these details are only for grand homes, but they add charm and architectural interest everywhere. The challenge is choosing the right styles and scales to suit your room. This idea offers a way to craft a refined, timeless environment.
Visualize ornate crown molding tracing the perimeter of the ceiling, with wainscoting running halfway up the walls. The molding has intricate profiles, painted in crisp white or a soft contrast color. Wainscoting panels are framed with beveled edges, creating a textured backdrop for your cabinetry. The overall effect is a room that feels custom-built, with layers of detail that draw the eye upward and around. It’s a subtle luxury that transforms ordinary walls.
Opt for simple, clean crown moldings in modern spaces, or go for elaborate, carved profiles in traditional kitchens. Wainscoting can be beadboard, raised panel, or shiplap—each offering a different vibe. Paint both molding and wainscoting in matching or contrasting colors for visual interest. For seasonal updates, consider changing paint colors or adding decorative trims. These details can be scaled to fit small or large rooms alike.
Begin by measuring your ceiling height and wall dimensions. Choose molding profiles that match your style—purchase pre-cut or custom-milled. Install crown molding with nail guns and level carefully to ensure clean lines. Wainscoting involves attaching panels with adhesive and finishing nails, then painting or staining. Sand and prime for a smooth finish, and add decorative trim as desired. Professional carpentry can help achieve precise, seamless results.
Add decorative accents like rosettes or medallions at ceiling corners. Use contrasting paint colors to highlight architectural details. Incorporate small, personal touches such as monogrammed initials or vintage picture frames on the wainscoting panels. Change up the color schemes seasonally or for special occasions to keep the look fresh. These timeless details can be customized endlessly.
Crown molding and wainscoting are classic elements that never go out of style, offering a high-end feel at any budget. They add character and depth, making your kitchen look professionally finished. When installed correctly, these details boost your space’s value and aesthetic appeal. Ready to add a touch of architectural elegance? It’s easier than you think to create a room that feels truly special.
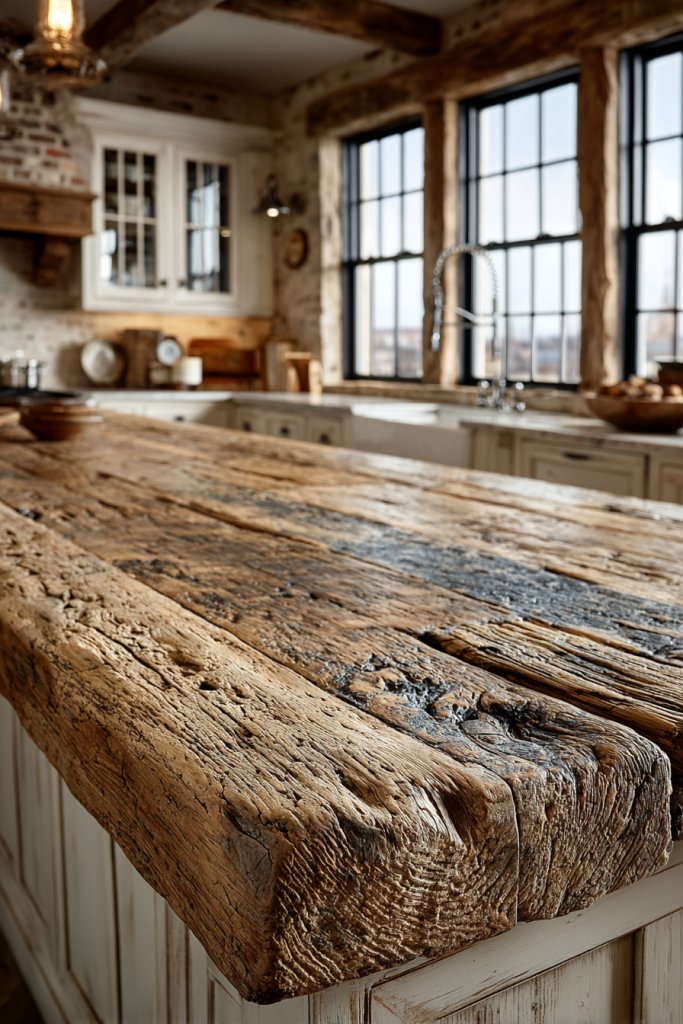
7. Warm Wooden Flooring in Classic Patterns
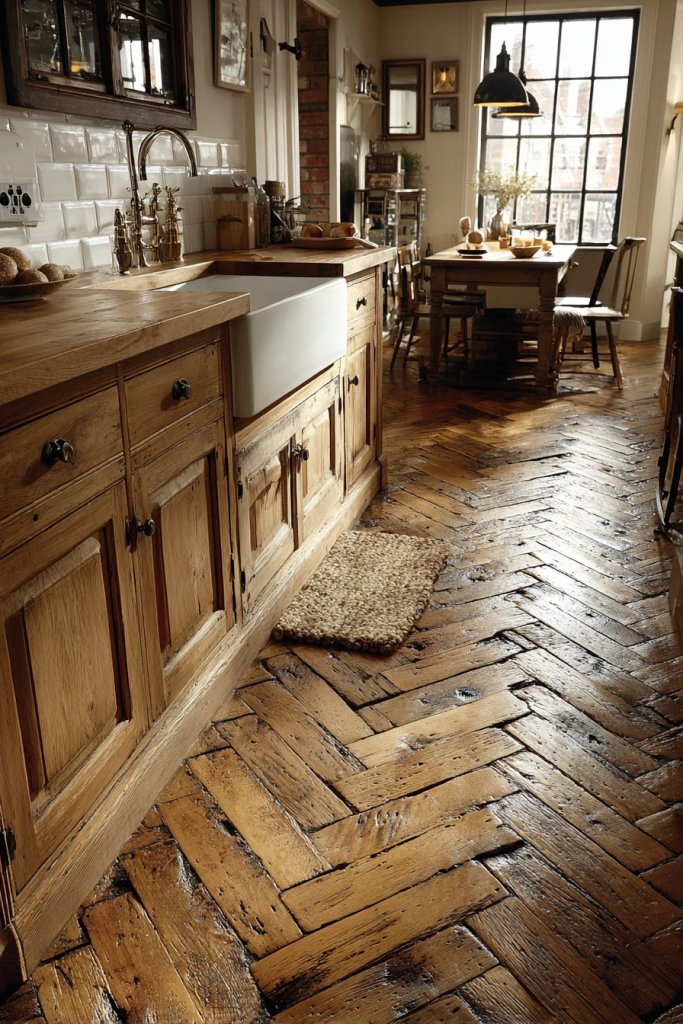
Looking for a flooring option that combines warmth, durability, and timeless style? Wooden floors are the gold standard, adding richness and character to any kitchen. But with so many options out there, it’s easy to feel overwhelmed. The right pattern and finish can make your space feel cohesive and inviting. This idea is about choosing classic layouts that stand the test of time.
Picture herringbone or wide-plank oak floors with a warm honey or deep walnut stain. The grain and texture add visual interest underfoot, creating a cozy, organic feel. The pattern guides the eye across the room, making the space appear larger and more intentional. Soft, natural light enhances the wood’s warmth, inviting you in for a relaxed meal or a quick coffee. It’s a foundation that anchors your entire kitchen aesthetic.
Opt for matte or satin finishes to reduce glare and hide scratches. Light-colored woods brighten smaller kitchens, while darker tones add drama. Incorporate rugs or runners to define zones or add softness underfoot. Seasonal updates might include swapping out rugs or adding textured textiles for added comfort. The pattern choice can be tailored to your space—more intricate for formal kitchens, simpler for casual living.
Start with high-quality hardwood or engineered wood suited for kitchens. Ensure subfloor is level and clean before installation. Choose a pattern—herringbone, chevron, plank—based on your style preference. Use professional installers for seamless joints and proper acclimation. Finish with a durable topcoat—urethane, oil, or wax—to protect against spills and wear. Regular sweeping and gentle cleaning will keep it looking beautiful for decades.
Layer with area rugs or runners that complement your decor. Add personal touches like painted or stenciled borders. Incorporate vintage or reclaimed wood elements for extra character. Changing textiles seasonally can refresh the look without major expense. This flooring style invites personalization while maintaining a classic foundation.
Wooden flooring in classic patterns elevates your kitchen’s style with minimal effort. It’s a durable choice that ages beautifully, developing a unique patina over time. When paired with the right decor, it transforms your space into a warm, welcoming retreat. Trust in the timeless appeal of wood and enjoy a space that feels both stylish and homey.
8. Vintage-Inspired Pendant Lighting
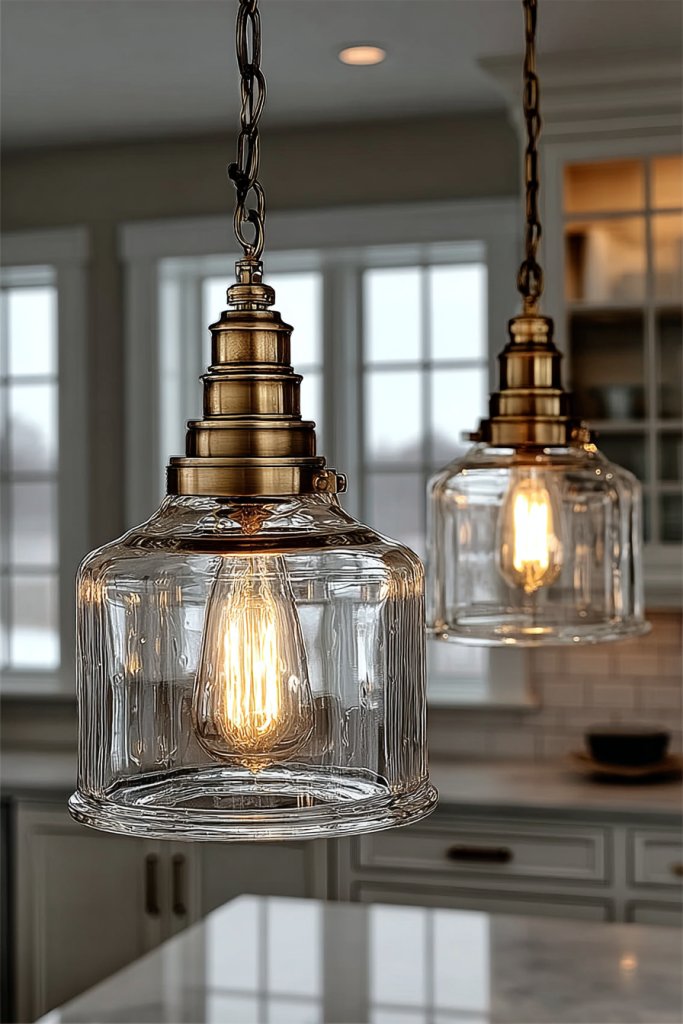
Want to add a touch of nostalgic charm to your kitchen without going overboard? Vintage-inspired pendant lighting offers a perfect blend of character and functionality. Many worry about choosing the right style or making it fit their space, but with a little guidance, you can create a statement piece that elevates your entire room. This idea brings a warm, inviting glow that feels both timeless and trendy.
Picture a series of glass or metal pendant lights hanging over your island or dining nook. The fixtures feature antique finishes—brass, bronze, or blackened steel—that develop a beautiful patina over time. Their warm glow casts cozy pools of light, perfect for food prep or casual dinners. The varied sizes and shapes add visual interest, making the lighting a focal point that complements your decor.
Choose fixtures with exposed bulbs for an industrial or rustic vibe, or go for shades with intricate details for a more elegant look. Mix and match different finishes or styles for an eclectic feel. Adjust the height based on ceiling height and room function—higher for larger spaces, lower for intimate settings. Seasonal updates can involve swapping bulbs for softer or brighter options, or adding dimmer switches for mood control.
Measure the space carefully to determine the ideal pendant height—generally about 30-36 inches above the countertop. Use quality hardware and adjustable cords or chains for flexibility. Connect wiring securely, following safety codes, and install fixtures with proper support. Consider dimmable LED bulbs for energy efficiency and adjustable ambiance. Professional installation ensures safety and a clean look.
Personalize with unique filament bulbs or vintage-inspired shades. Incorporate decorative details like tassels or fabric wraps on cords. Pair with matching sconces or under-cabinet lighting for layered illumination. Add dimmer switches to control intensity, enhancing mood and functionality. These small touches make your lighting both practical and a design feature.
Vintage-inspired pendant lighting adds instant character and warmth, transforming a simple kitchen into a stylish retreat. It’s a nod to history with a modern twist, making your space feel curated and cozy. Trust that the right fixtures will stand out as a design highlight, not an afterthought. Ready to brighten your kitchen with timeless charm? It’s easier than you think.
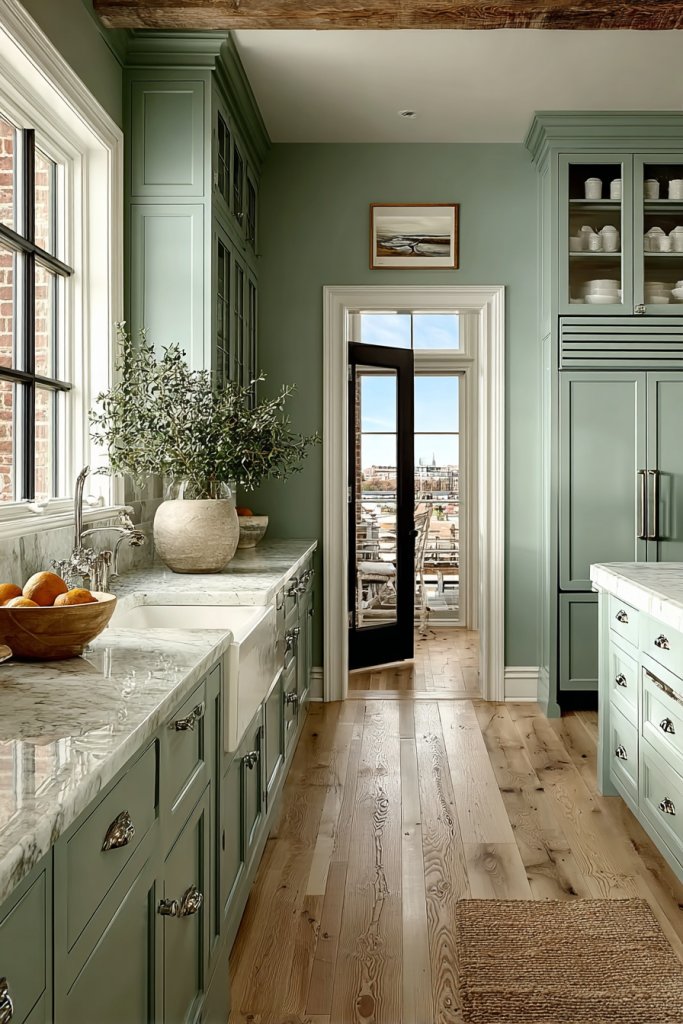
9. Neutral Color Palette with Soft Accents
Searching for a calming, versatile kitchen color scheme that won’t go out of style? Neutral palettes offer a sophisticated backdrop that adapts easily to changing trends and personal tastes. Many fear they’ll look dull or sterile, but with the right accents, neutrals become warm and inviting. This idea helps you create a peaceful, timeless space you’ll enjoy daily.
Imagine soft cream or beige walls paired with natural wood, stone, and textiles in similar muted tones. Subtle variations in texture—matte paint, linen curtains, woven baskets—add depth without visual clutter. Accents like a light-colored backsplash or a soft throw blanket introduce gentle pops of color. The overall look feels serene, balanced, and endlessly adaptable, like a well-loved retreat.
Layer in soft pastel hues or warm metallics for seasonal updates. Use contrasting trims or darker cabinetry to add dimension. Incorporate textured fabrics or patterned rugs to break up monotony. Keep the color palette light for small spaces or darker for a cozy, intimate vibe. These choices allow you to refresh the look without major overhaul.
Start with a neutral paint color—matte or eggshell finishes work well. Select cabinetry and countertops in complementary shades, and coordinate hardware in brushed nickel, matte black, or brass. Use textured or patterned textiles for window treatments and accessories to add visual interest. Keep the color scheme consistent across walls, cabinets, and flooring for harmony. Regular cleaning and gentle touch-ups will keep the palette fresh.
Add personal touches with colorful textiles, decorative storage, or artwork that fits within the neutral scheme. Incorporate natural elements like wood or stone accents for warmth. Use layered lighting—ambient, task, and accent—to highlight textures and colors. Small accessories like placemats or dish towels in complementary hues can refresh the look seasonally.
A neutral color palette with soft accents creates a calm, sophisticated vibe that lasts. It’s a flexible foundation that allows for easy updates and personalization. When styled thoughtfully, neutrals feel warm and inviting, perfect for everyday living. Trust in the timeless appeal of this approach—your kitchen will feel both current and forever stylish.
10. Classic Wooden Kitchen Island with Storage

Ever wish your kitchen had a focal point that’s both beautiful and functional? A classic wooden island can be the heart of your space, offering extra prep surface and storage. Many worry about style blending or size, but with the right design, it becomes a seamless part of your decor. This idea combines practicality with timeless charm.
Picture a sturdy, warm-toned wooden island with a thick butcher block top or natural grain finish. It features open shelves or cabinets underneath for pots, pans, or utensils—organized yet accessible. The raw texture of the wood contrasts beautifully with smooth countertops or sleek cabinetry. It invites gatherings and makes your kitchen feel more inviting and homey.
Choose reclaimed or distressed wood for a rustic look, or smooth, lacquered finishes for a modern vibe. Add wheels for portability or keep it stationary for stability. Incorporate hooks or rails for hanging utensils, or add a built-in wine rack. Seasonal styling might involve placing a bowl of fruit or a decorative tray on top—simple touches that personalize the space.
Select a solid wood or engineered wood that suits your style and budget. Build or buy a base that fits your kitchen layout—measure carefully! Finish with food-safe sealants or oils to protect the surface. Assemble with sturdy hardware, ensuring joints are tight and stable. Use the island regularly for prep, serving, or casual dining—adding decorative elements as you like.
Decorate with vintage or handcrafted accessories—think woven baskets, ceramic bowls, or a collection of your favorite cookbooks. Personalize the top with a colorful runner, or add seasonal decor like a small centerpiece. Incorporate storage solutions like pull-out trays or spice racks for added functionality. This piece becomes a reflection of your style and needs.
A wooden kitchen island is a versatile centerpiece that adds warmth and utility. It’s a timeless investment that can evolve with your decor. When styled well, it creates a welcoming, functional hub for your daily routines. Trust in the natural beauty and durability of wood—your kitchen will thank you for it.
11. Glass-Front Cabinets for Display
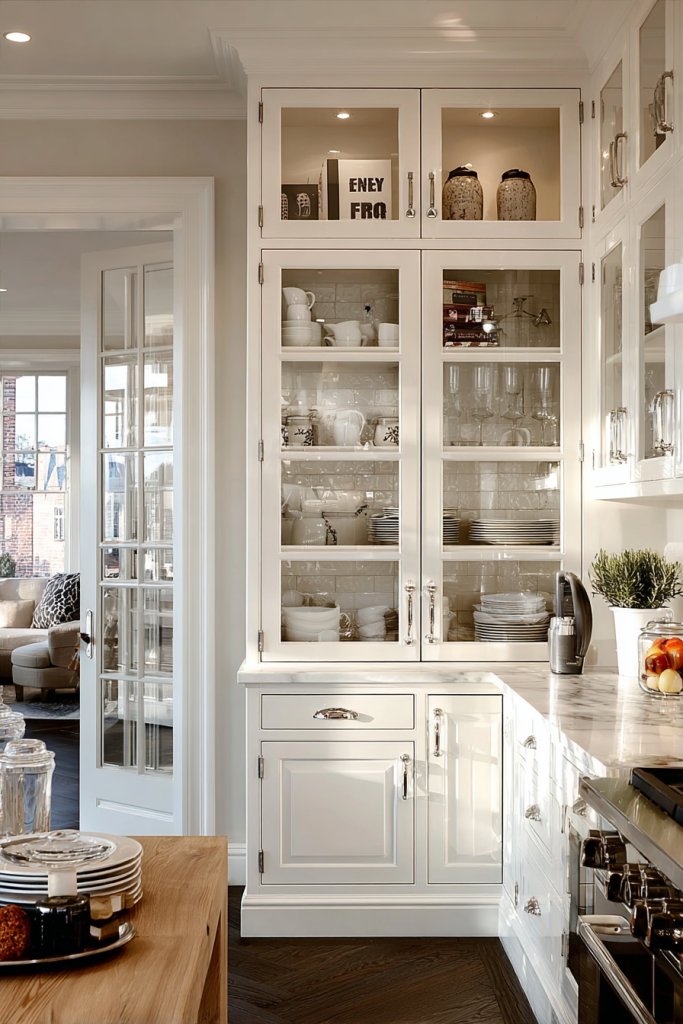
Looking to showcase your favorite dishes or collectibles without sacrificing storage? Glass-front cabinets offer a stylish way to display while keeping things organized. Many worry about dust or clutter, but with thoughtful styling, they become a highlight rather than an eyesore. This idea balances practicality with visual appeal, making your kitchen feel more open.
Imagine elegant glass doors revealing rows of vintage china, neatly stacked bowls, and delicate glassware. The transparent fronts create a sense of depth, especially when paired with interior lighting or contrasting back panels. The curated arrangement adds personality and charm, turning everyday storage into a decorative feature. It’s like having a mini gallery right in your kitchen.
Opt for framed or frameless glass doors, clear or textured glass for privacy. Incorporate interior lighting to highlight display pieces or add decorative backing. Mix open shelves with closed cabinetry for balance. Update displays seasonally or for special occasions—think colorful ceramics or themed accessories. Keep items tidy and intentionally arranged for a polished look.
Choose cabinets with glass inserts or retrofit existing ones with glass panels. Install with proper hardware, ensuring doors close flush and smoothly. Interior lighting options include LED strips or puck lights—easy to install and energy-efficient. Organize items in attractive arrangements—use matching dishware, or mix vintage pieces for flair. Regularly clean glass surfaces to maintain clarity and shine.
Decorate with a collection of heirloom dishes or colorful ceramics that reflect your personality. Incorporate decorative trims or stained glass for added detail. Use labels or small risers to create layered displays. Personal touches like a small collection of antique teacups or a curated set of cookbooks can enhance the look. These details make your cabinets both functional and uniquely yours.
Glass-front cabinets showcase your style and add a touch of elegance. They make your kitchen look curated and inviting, perfect for entertaining or everyday life. When styled thoughtfully, they balance openness with organization. Trust that a little effort in arrangement creates a stunning focal point—your space will feel brighter and more personalized.
12. Simple, Symmetrical Layouts for Balance
Ever feel overwhelmed by cluttered or chaotic kitchen layouts? Symmetry offers a calming, organized aesthetic that promotes ease and flow. Many think complex layouts are necessary for functionality, but simplicity often yields better results. This idea focuses on creating a balanced, harmonious space that’s both practical and visually pleasing.
Visualize a kitchen with evenly spaced cabinets on either side, matching countertops and identical hardware. The symmetry extends to appliances, with a stove centered between two work zones. The overall look feels orderly, inviting, and effortless to navigate. The balanced proportions give a sense of stability, making your space feel refined and restful. It’s like a perfectly composed photograph.
Use matching cabinet sizes and hardware for a seamless look. Incorporate symmetrical lighting fixtures or sinks for cohesion. For smaller kitchens, focus on balanced placement of key elements—think of it as visual harmony rather than mirror images. You can also experiment with asymmetry for a more relaxed vibe, but maintain overall balance. Seasonal accents can include matching textiles or decorative trims.
Plan your layout with attention to proportions and flow. Use identical cabinetry and hardware for a unified appearance. Position major appliances symmetrically—stove, fridge, sink—creating a natural workflow. When installing, ensure measurements are precise for perfect alignment. Use level tools and proper fasteners to avoid crooked lines. Keep everything symmetrical during the finishing touches for a polished result.
Introduce subtle variations like contrasting cabinet colors or hardware finishes for interest while maintaining overall symmetry. Add decorative details such as matching handles or trims. Personalize with coordinated textiles, like seat cushions or curtains, that mirror your color palette. These small touches reinforce the balanced, harmonious feel.
A symmetrical layout provides a sense of order and calm, perfect for busy kitchens. It’s a timeless approach that looks elegant and feels intuitive. When executed well, it enhances functionality and aesthetic appeal simultaneously. Trust in the power of balance—your kitchen will feel both serene and stylish.
13. Antique-Style Hardware and Fixtures
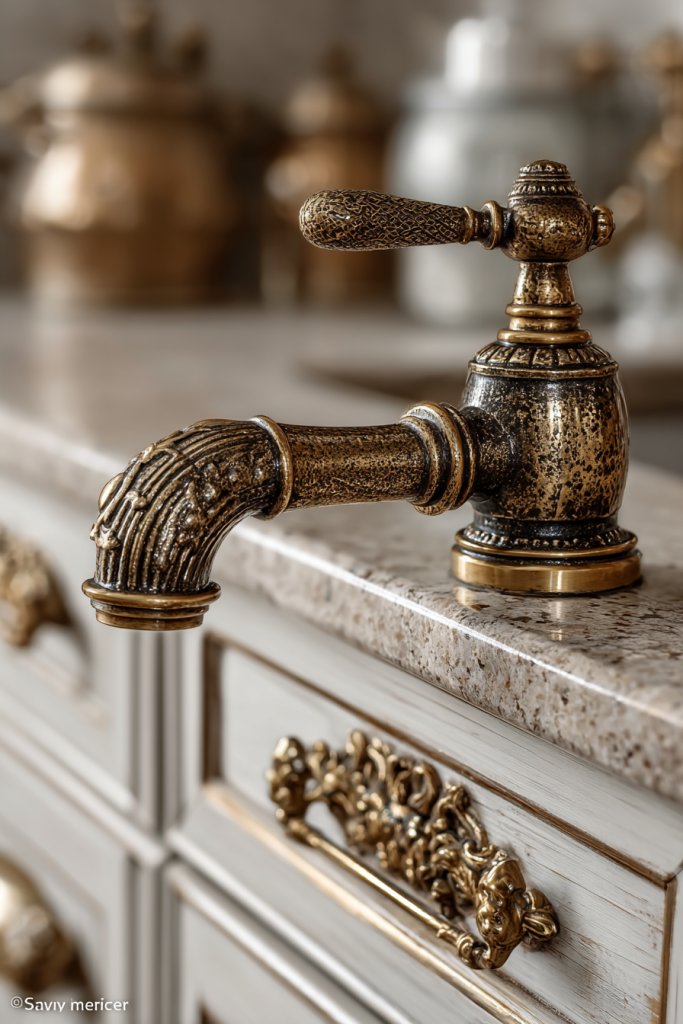
Want to add a touch of vintage charm to your kitchen without overhauling the entire space? Antique-style hardware and fixtures deliver instant character and nostalgia. Many worry about finding the right pieces or making them look authentic, but with the right choices, you can create a timeless vibe. This idea is about blending old-world charm with modern function.
Imagine brass or oil-rubbed bronze knobs and pulls on your cabinets, with a vintage-inspired faucet in a matte finish. The hardware’s intricate details and aged patina add depth and personality. The warm metallic tones catch the light subtly, complementing neutral palettes or bold accent colors. Paired with classic cabinetry, it creates a look that feels both nostalgic and refined. It’s like stepping into a different era.
Choose hardware with decorative motifs or simple, understated designs depending on your style. Mix metals—brass with matte black—for a layered, eclectic look. Incorporate antique fixtures in your lighting, or add vintage-style drawer pulls for a cohesive theme. Seasonal updates could involve swapping out hardware or adding decorative accents like vintage knobs to specific areas.
Select hardware with authentic finishes—brass, nickel, or bronze—matching your overall aesthetic. Use screws and fasteners that complement the hardware’s style. Replace existing knobs and pulls with vintage-inspired options, ensuring they align with pre-drilled holes. Clean and maintain metal finishes with gentle products to preserve their patina. Consider upgrading fixtures like faucets with vintage designs for a cohesive look.
Add decorative elements like vintage keyhole escutcheons or ornate drawer pulls. Personalize with engraved or custom-made hardware for a special touch. Pair hardware with complementary light fixtures or decorative trim to unify the design. Keep a collection of different vintage pieces to swap out seasonally or for special occasions.
Antique-style hardware instantly imbues your kitchen with character and history. It’s a simple upgrade that offers a high visual impact, blending seamlessly with various decor styles. When chosen thoughtfully, these details elevate the entire space. Trust in the charm of vintage hardware—your kitchen will feel uniquely yours.
14. Porcelain or Ceramic Tile Flooring with Patterned Details
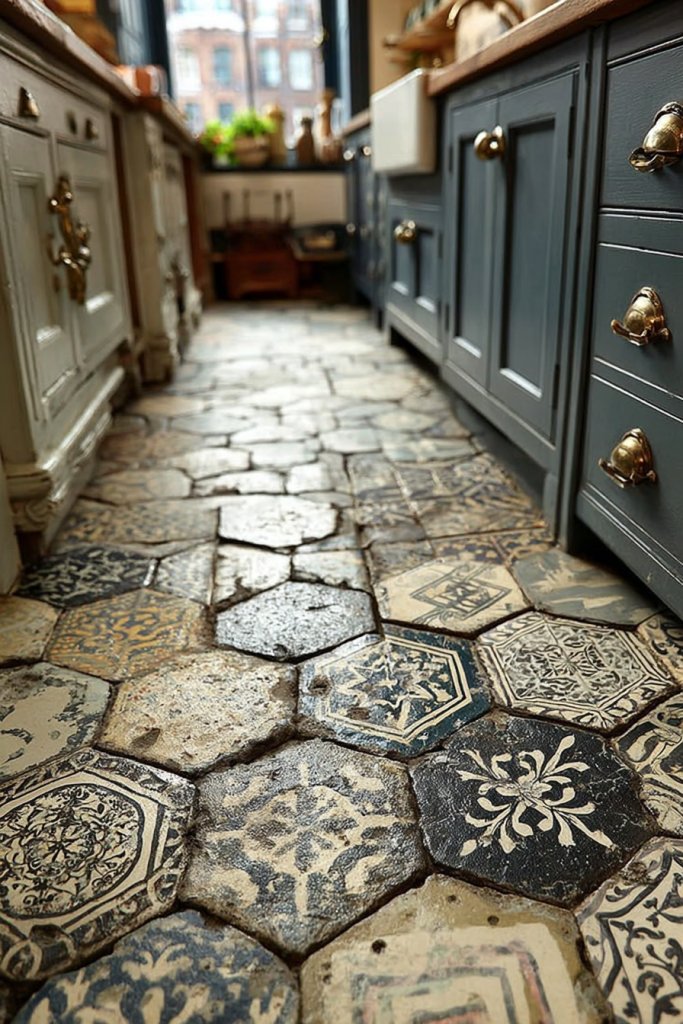
Craving a kitchen floor that combines durability with visual interest? Porcelain or ceramic tiles offer a classic, versatile solution that can be customized with patterned details. Many hesitate because they think tiles are cold or hard to maintain, but modern options are both warm-looking and easy to care for. This idea delivers a timeless foundation with a touch of artistry.
Visualize intricate encaustic or patterned tiles laid in a herringbone or floral motif. The vibrant designs add personality and depth, making the floor a focal point. The glossy or matte finishes reflect light beautifully, enhancing the room’s brightness. Pair with neutral cabinetry and simple countertops to let the floors stand out. It’s a look that feels both vintage and fresh, like a handcrafted masterpiece.
Choose tiles with bold patterns or subtle motifs depending on your taste. Mix different sizes or borders for a layered effect. Neutral or monochrome tiles work well in contemporary spaces, while colorful or patterned ones suit eclectic or vintage kitchens. Seasonal updates might include adding a rug or changing accessories to match tile colors. The key is balancing the busy patterns with calmer elements.
Select durable, slip-resistant tiles suited for kitchens. Prepare the subfloor thoroughly—clean, level, and dry. Use quality mortar and grout to ensure longevity and prevent cracking. Follow manufacturer instructions for cutting and laying tiles, and use spacers for consistent joints. Seal the grout for protection against staining and moisture. Regular cleaning with gentle products keeps the tiles looking pristine.
Decorate with matching or contrasting rugs to soften the look. Incorporate decorative trims or borders for extra detail. Personalize with vintage or handcrafted tiles as accents. Use color-coordinated cleaning tools and accessories to create a cohesive aesthetic. Seasonal or special occasion updates can involve swapping out rugs or decorative elements.
Patterned tile flooring adds instant charm and personality, making your kitchen uniquely yours. It’s a durable choice that ages beautifully and can be a statement piece for years. With proper care, it remains a functional and artistic feature. Trust in the timeless appeal of patterned tiles—your space will feel crafted and welcoming.
15. Classic Window Treatments with Valances or Linen Curtains
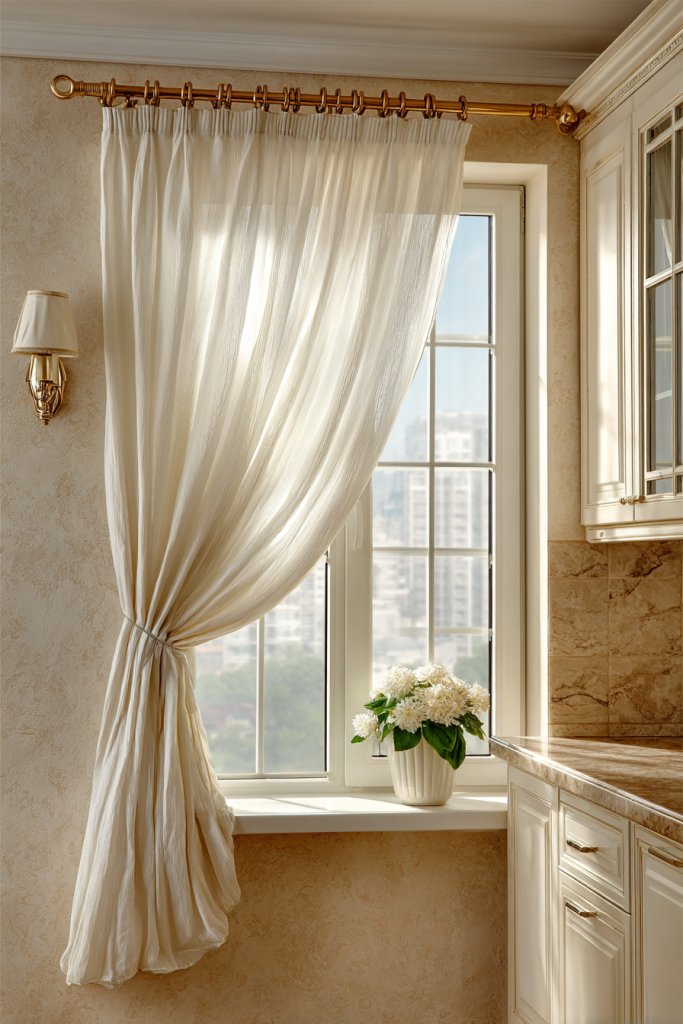
Want to soften your kitchen’s look and add a touch of elegance? Classic window treatments like valances or linen curtains are the perfect way to frame your windows. They bring in texture and color, making the space feel cozy and inviting. Many worry about their style fitting with the overall design, but options are endless. This idea helps create a warm, homey atmosphere.
Imagine light, airy linen curtains in a soft neutral, gently billowing with the breeze. A tailored valance with subtle pleats or ruffles adds a delicate decorative touch. The fabric’s texture contrasts beautifully with smooth cabinets and sleek countertops. Sunlight filters softly through, casting a warm glow. The overall effect is charming and relaxed, like a country cottage or a Parisian apartment.
Choose natural fibers like linen or cotton for a casual look, or opt for silk or velvet for more luxe appeal. Use decorative trims, tassels, or embroidery to add details. Adjust the length—floor-length for drama, or a shorter curtain for a more modern feel. Seasonal updates might involve swapping out fabrics or changing colors to reflect holidays or moods. The key is balancing simplicity with subtle elegance.
Measure your windows carefully to select the right curtain size and style. Install a curtain rod or tension wire that complements your decor—brass, wood, or painted metal. Use lightweight, easy-to-maintain fabrics that can be washed or steamed. Hang curtains neatly, ensuring even fullness and proper length. Consider layering with blinds or shades if needed for privacy and light control. Regular cleaning keeps everything looking fresh.
Personalize with decorative tiebacks, beaded trims, or fabric embellishments. Coordinate curtain colors with your overall color palette. Add small decorative accents, like vintage buttons or charms, to the curtain ties. Seasonal swaps of fabrics or colors keep the look fresh and suited to your mood. These details help your windows become a charming focal point.
Classic window treatments beautifully frame your views while adding softness and character. They’re an easy way to elevate your kitchen’s style without major renovation. When chosen thoughtfully, they create a cohesive, inviting ambiance. Trust that simple fabrics and classic designs will make a lasting impression. Ready to add timeless charm to your windows? It’s easier than you think.
16. Incorporate Open Shelves with Vintage Crockery
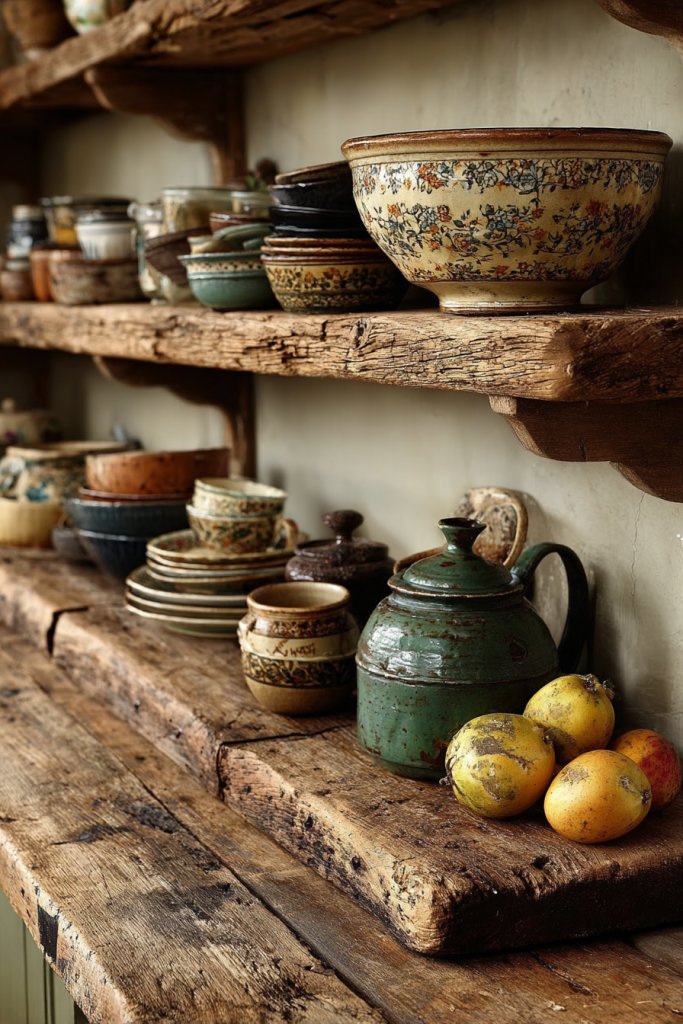
Craving a way to display your favorite vintage dishes without cluttering your counters? Open shelves filled with crockery and collectibles bring charm and personality to your kitchen. Many worry about dust or breakage, but with careful styling and placement, they become a focal point that’s both practical and pretty. This idea turns storage into a personal showcase.
Visualize rustic wooden shelves holding a collection of vintage ceramic bowls, teacups, and colorful plates. The open design allows you to mix and match patterns and textures, creating a lively, curated display. Every piece tells a story—family heirlooms, travels, or handmade treasures. Soft lighting or warm-toned accents highlight the collection, making it feel inviting and lived-in. It’s like having a mini museum in your kitchen.
Choose distressed wood or sleek metal brackets depending on your style. Group items by color or theme for visual cohesion. Incorporate small decorative elements like antique scoops or jars to add variety. Change displays seasonally or for special occasions—think holiday-themed ceramics. Keep the arrangement balanced for a harmonious look.
Install sturdy brackets or floating shelf hardware that can support weight. Arrange crockery with care, stacking bowls or lining up cups. Use padding or non-slip liners to protect delicate pieces. Regular dusting and gentle cleaning preserve their beauty. Consider adding under-shelf lighting for extra warmth and focus. The goal is easy access without sacrificing aesthetics.
Display special or handmade pieces to showcase your personality. Incorporate vintage or handcrafted items for authenticity. Use decorative hooks or small racks to hang utensils or cups alongside the shelves. Personalize with labels or tags for a charming, organized feel. These touches turn simple shelves into a storytelling feature.
Open shelving with vintage crockery adds instant charm and warmth, making your kitchen uniquely yours. It’s a practical way to display collectibles and keep essentials within reach. When styled with care, these displays become conversation starters and mood lifters. Trust in your eye for arrangement—your space will radiate personality and style.
17. Use of Decorative Moldings and Cornices
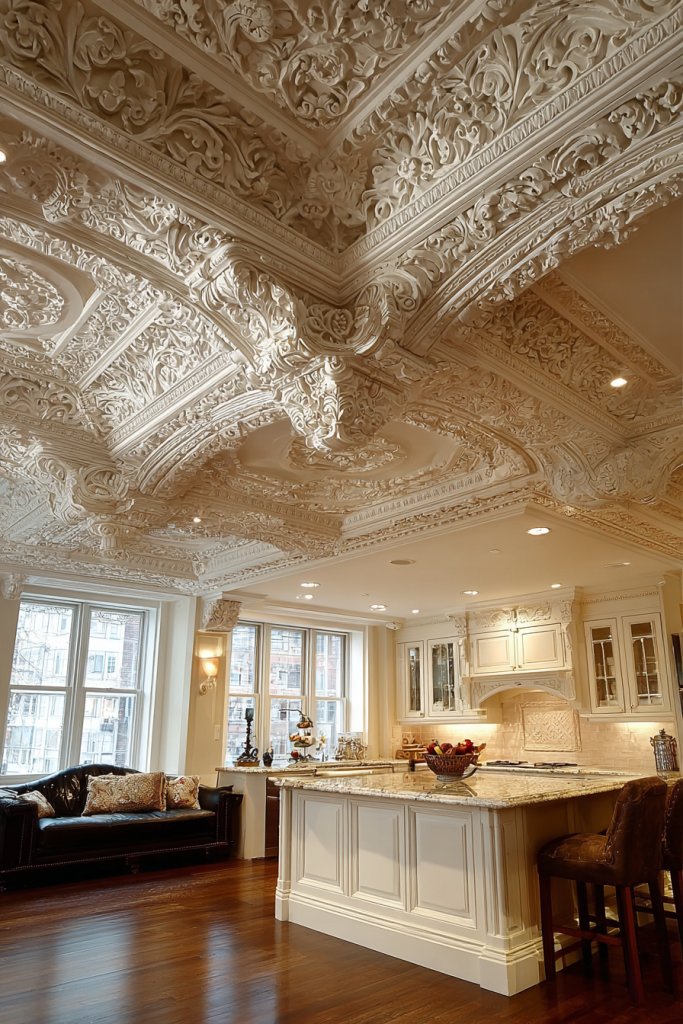
Looking to add architectural interest and a polished finish to your kitchen? Decorative moldings and cornices are the details that elevate your space from ordinary to elegant. Many think they’re complicated or only for grand homes, but with simple techniques, you can achieve a custom look. This idea offers a way to create a refined, timeless environment.
Imagine crown molding tracing the ceiling perimeter, with detailed cornices framing windows or cabinetry. The profiles might be ornate or subtle, painted in crisp white or contrasting shades to add depth. These details introduce layers of texture and shadow, making walls and ceilings feel more finished. The effect is a space that feels crafted and sophisticated, like a boutique hotel.
Select simple, clean lines for a contemporary look or intricate profiles for a traditional aesthetic. Use decorative trims, rosettes, or medallions at key points for added flair. Paint moldings in a contrasting color to highlight them, or keep everything monochrome for a seamless look. Seasonal updates could include adding decorative elements or changing paint finishes.
Begin by measuring wall and ceiling edges accurately. Choose molding profiles that match your style—purchase pre-cut or have them custom milled. Install crown molding with a nail gun and level, ensuring tight joints and smooth lines. Finish with caulking and paint to create a seamless appearance. For wall corners or window frames, add decorative corner blocks or trims for extra detail. Professional carpentry can ensure perfect fit and finish.
Personalize with decorative medallions or vintage appliques. Use contrasting colors or metallic paints for added impact. Incorporate small decorative accents like shell or leaf motifs for a luxurious touch. Seasonal or themed updates could involve changing paint colors or adding gilded details. These elements turn basic walls into a showcase of craftsmanship.
Decorative moldings and cornices are timeless features that add character and depth. They create a high-end feel at a reasonable cost and are adaptable to any style. When installed correctly, they make your space look professionally finished and thoughtfully designed. Trust in these details to elevate your kitchen’s aesthetic—your space will radiate sophistication.
18. Timeless Kitchen Utensil and Storage Jars
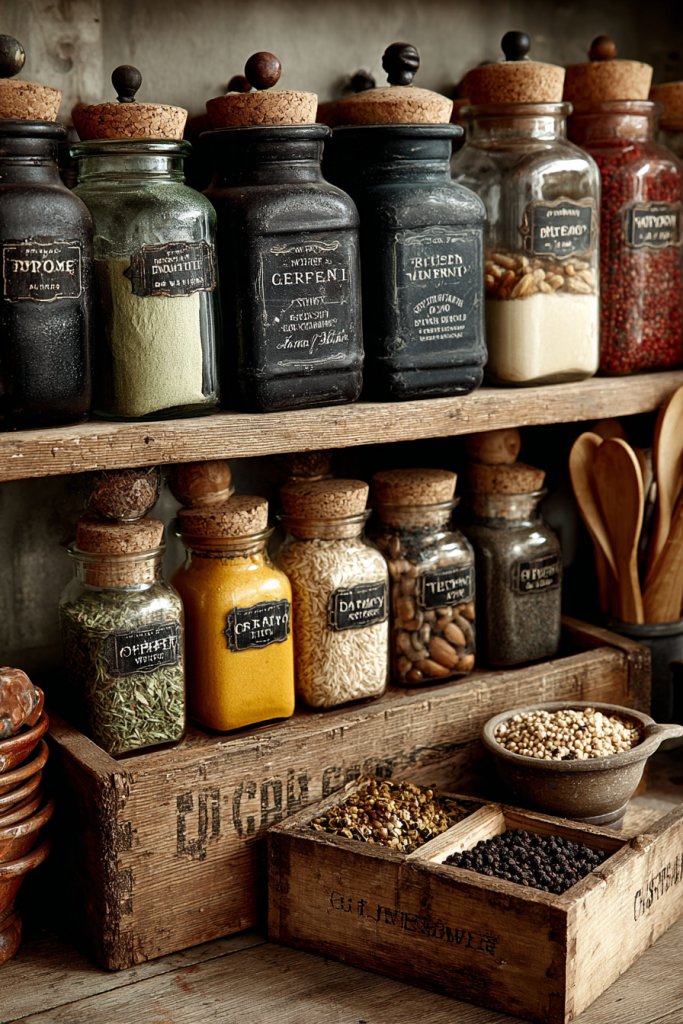
Ever find yourself hunting for utensils in a cluttered drawer? Stylish storage jars can turn practicality into decor, keeping essentials close at hand while looking charming. Many worry about the jars feeling too “kitchen-y” or out of style, but with classic designs, they become part of your aesthetic. This idea marries function and beauty effortlessly.
Visualize vintage glass or ceramic jars lined up on open shelves or countertops. They hold utensils, spices, or dried goods, with labels or decorative tags adding a personal touch. The uniformity of shape and subtle color variations create a cohesive look. The jars’ textures—smooth, embossed, or matte—add depth and interest, making everyday tools look intentional and attractive.
Choose from clear glass, colored ceramics, or metal tins depending on your style. Incorporate decorative labels or paint your own for a custom look. Use jars of different sizes grouped together for visual interest or in a grid pattern for order. Seasonal updates might include changing labels or adding decorative touches like ribbons or charms.
Select jars with tight-fitting lids to keep contents fresh. Label each jar clearly using chalkboard paint, adhesive labels, or hand-lettered tags. Store utensils upright or horizontally, depending on jar shape. Keep jars clean and dry to prevent mold or corrosion. Use matching or complementary jars for a unified look, and rotate contents seasonally for freshness.
Add decorative touches like painted or stenciled designs, or vintage charms hanging from lids. Personalize with handwritten labels or custom logos for a special touch. Use jars to display seasonal ingredients or homemade mixes. Combining these with small plants or textiles can add layers of style and function.
Timeless jars keep your essentials organized and accessible, while adding visual charm. They’re an easy upgrade that makes your kitchen look polished and curated. When styled thoughtfully, they reflect your personality and taste. Trust in their versatility—simple, beautiful, and practical.
19. Classic Wall Color with Contrasting Trim
Want to create a kitchen that feels fresh yet classic? The right wall color paired with contrasting trim can dramatically change the room’s mood. Many worry about choosing the perfect shades or making it look too bold, but with careful selection, you achieve a timeless, elegant look. This idea offers a simple way to add depth and personality.
Picture soft neutral walls—creams, warm beiges, or pale gray—accented with crisp white or darker trim. The contrast highlights architectural details and frames your cabinetry or windows beautifully. The interplay of light and shadow adds visual interest and depth. The overall effect feels bright, clean, and thoughtfully designed, like a boutique hotel or vintage home.
Use darker or more saturated trims for a bold statement, or keep everything light for a subtle, airy feel. Incorporate accent walls or paint the ceiling a complementary color for added interest. Seasonal updates could involve changing trim colors or adding decorative moldings. Keep the palette cohesive with your cabinetry and flooring for a harmonious look.
Choose high-quality paint suited for kitchens—washable, moisture-resistant finishes are ideal. Tape off trim and edges carefully for clean lines. Use brushes for detailed areas and rollers for large surfaces. Apply multiple thin coats for an even finish, and allow proper drying time. Consider repainting or touch-ups seasonally to keep the space looking crisp. Good preparation makes all the difference.
Add decorative accents like painted patterns or stenciled borders on the trim. Personalize with subtle color contrasts that reflect your style—think navy or emerald trims for a modern twist. Incorporate metallic or textured paints for extra flair. These small changes can refresh your space and make it uniquely yours.
A classic wall color with contrasting trim instantly elevates your kitchen’s style and sophistication. It’s a timeless technique that works with any decor and can be easily updated. When done well, it creates a polished, harmonious environment. Trust in the power of color and contrast—it’s a simple upgrade with lasting impact.
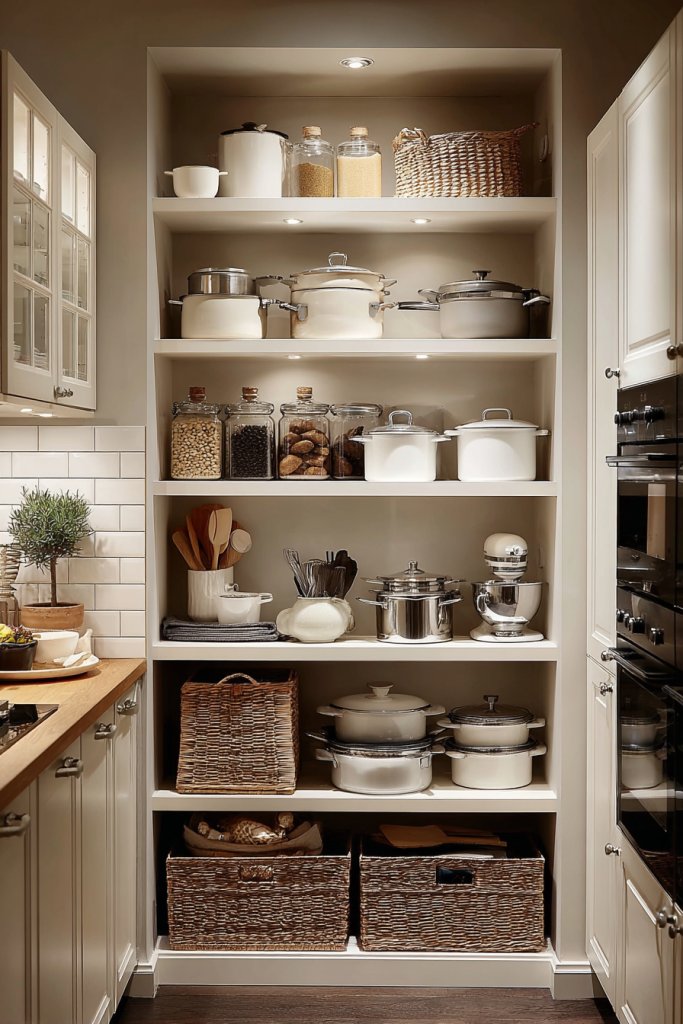
20. Built-In Pantry with Paneled Doors
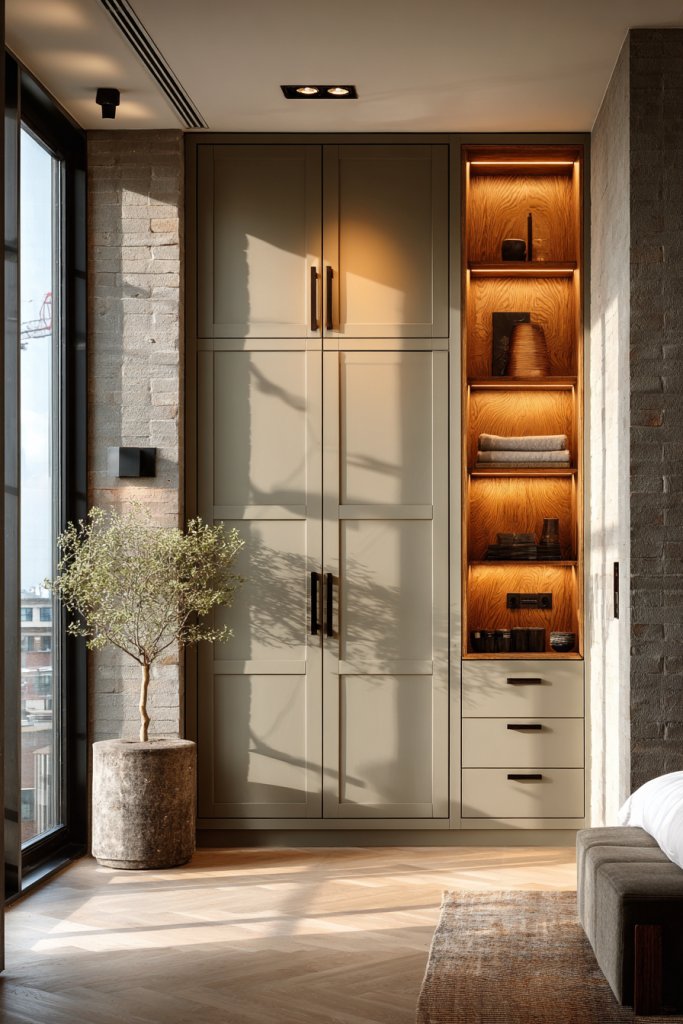
Tired of cluttered cabinets and hidden messes? A built-in pantry with paneled doors offers a sleek, organized solution that hides your essentials in style. Many fear the cost or complexity, but with smart planning, it becomes an achievable upgrade. This idea transforms storage from an afterthought into a design feature, making your kitchen both functional and elegant.
Imagine tall, seamless cabinetry with paneled doors matching your existing kitchen style. The doors hide adjustable shelves filled with neatly labeled jars, boxes, or baskets. The flush panels create a clean, uniform look that extends to the ceiling, maximizing vertical space. The overall effect is a refined, built-in look that feels custom and cohesive. It’s like having a walk-in closet for your kitchen.
Choose shaker or flat-panel doors for a modern look or raised panels for a traditional vibe. Incorporate glass inserts or open shelving inside for display. Use decorative hardware or keep the doors handleless for a minimalist appearance. Seasonal updates might include new hardware or interior organization systems. The key is balancing storage capacity with visual harmony.
Plan your space carefully—measure available wall and ceiling heights. Select cabinet units with adjustable shelves and paneled doors that match your decor. Use professional carpentry for precise installation, ensuring doors align perfectly. Finish with paint or stain that complements your kitchen palette. Incorporate interior organizers or baskets for added efficiency. Regularly declutter and reorganize for best results.
Add decorative hardware, like vintage knobs or pulls, to enhance style. Personalize with labeled containers or themed baskets inside. Incorporate lighting inside the pantry for easier access. Use removable liners or baskets to customize storage based on your needs. These touches make the space both practical and personalized.
A built-in pantry with paneled doors creates a seamless, high-end look that increases storage and organization. It’s a smart investment that adds value and style. When executed properly, it looks integrated and refined, elevating your entire kitchen. Trust in the power of thoughtful design—your space will feel more spacious and polished.
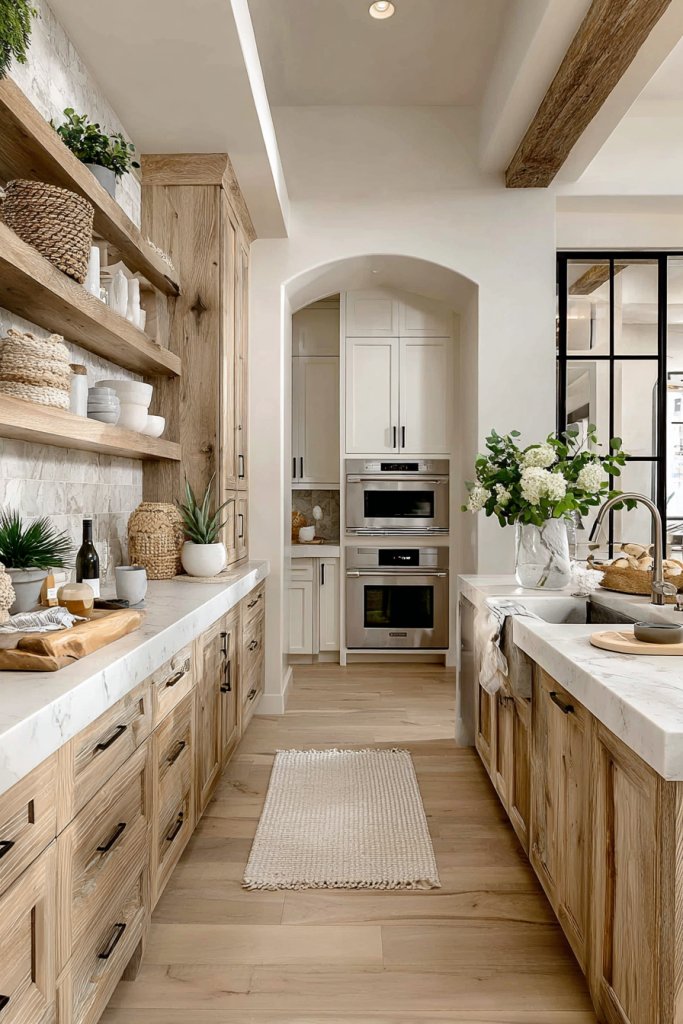
21. Incorporate Antique or Reclaimed Wood Elements
Looking to add character and sustainability to your kitchen? Antique or reclaimed wood elements bring warmth, history, and eco-consciousness into your space. Many worry about authenticity or cost, but with careful sourcing, you can achieve a rich, layered look. This idea combines vintage charm with modern values for a truly unique environment.
Imagine open shelving or accent walls made from reclaimed barn wood, with weathered textures and rich patinas. The aged surfaces add depth and visual interest, contrasting beautifully with sleek modern fixtures. Incorporate reclaimed wood in table tops, cutting boards, or framing. The result is a space that feels storied, warm, and eco-friendly—like a hidden gem.
Use reclaimed wood for accent walls, open shelving, or furniture pieces. Pair with modern materials like stainless steel or glass for contrast. Choose wood with natural imperfections for a rustic look, or smooth, processed wood for a refined vibe. Incorporate seasonal or decorative touches like painted signs or vintage hardware to enhance the aged charm.
Source reclaimed wood from reputable suppliers or salvage yards, checking for stability and safety. Prepare surfaces by cleaning and sealing to prevent pests or deterioration. Use appropriate fasteners—brackets, screws, or nails—to attach wood securely. Finish with protective sealants or stains that highlight the wood’s natural beauty. Regular maintenance involves gentle cleaning and inspections for wear.
Decorate with vintage signs, small art pieces, or personalized engravings on reclaimed wood surfaces. Combine different wood tones or textures for visual richness. Use reclaimed wood as a backdrop for open shelving or display areas. Incorporate seasonal accents, such as wreaths or seasonal paint, to keep the space lively.
Antique and reclaimed wood elements add history, warmth, and sustainability to your kitchen. They create a distinctive look that balances authenticity with craftsmanship. When styled thoughtfully, they elevate your space’s character and eco-conscious appeal. Trust in the timeless charm of reclaimed wood—your kitchen will tell a story.
22. Classic Butcher Block or Wood Cutting Boards
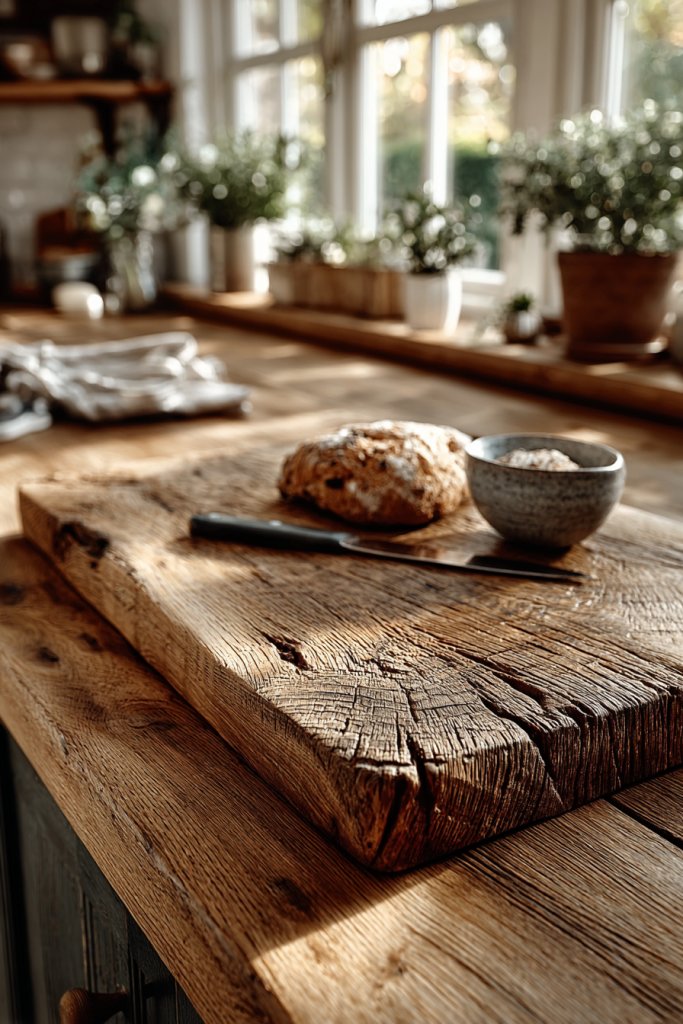
Eager to add a functional yet stylish element to your kitchen? Classic butcher block or wood cutting boards are a versatile choice, blending practicality with aesthetic appeal. Many worry about maintenance or hygiene, but with proper care, they can be long-lasting and beautiful. This idea is about making your prep space both useful and visually appealing.
Imagine a large, thick butcher block sitting on your countertop, ready for chopping or serving cheese. The natural wood grain adds warmth and texture, contrasting with sleek countertops or modern cabinetry. When stored vertically or displayed on a stand, it becomes a decorative focal point. The rustic charm invites you to cook more creatively and comfortably.
Choose from end-grain, edge-grain, or mixed wood styles depending on your preference. Use contrasting woods for visual interest or keep it uniform for simplicity. Incorporate decorative handles or engraved details for personalization. Seasonal styling might include adding a small dish towel or decorative holder. These boards can be used daily or showcased as a design element.
Select high-quality hardwoods like maple, walnut, or cherry. Seal the surface with food-safe mineral oil or beeswax for protection. Use the board for both prep and serving—clean with gentle soap and oil regularly. Store vertically or flat to avoid warping. Consider integrating a groove for catching juices or a decorative edge for added flair. Proper maintenance ensures longevity.
Engrave initials, quotes, or designs for a personal touch. Pair with coordinated utensils or bowls for a curated look. Use contrasting woods or inlays for extra detail. Display on open shelves or hang with leather straps for rustic charm. Seasonal accents like holiday decorations or themed engravings keep it fresh.
A beautiful wood cutting board elevates everyday cooking into an art form. It’s a practical investment that adds warmth and authenticity. When cared for properly, it becomes a cherished piece that ages well and tells a story. Trust in the natural beauty of wood—your kitchen will feel warm, inviting, and functional.
23. Organized, Symmetrical Pot and Pan Storage
Hate digging through cluttered cabinets to find the right pot or pan? Organized, symmetrical storage creates a neat, accessible kitchen that makes cooking less stressful. Many worry about space or style, but with thoughtful arrangement, you can maximize efficiency and aesthetics. This idea turns chaos into harmony, making every piece easy to find.
Visualize a wall-mounted rack with pots and pans arranged in perfect symmetry, with handles facing outward for easy grab-and-go. Alternatively, a pull-out drawer with dividers keeps everything in order, with matching lids neatly stacked. The arrangement creates a balanced, clean look, reducing visual clutter. It’s like having a well-organized toolbox, but for your kitchen essentials.
Use traditional wrought iron racks, sleek modern rails, or custom cabinetry with built-in dividers. Match or contrast finishes—brushed steel, matte black, or brass—to your decor. Incorporate lids and utensils into the layout for a cohesive look. Seasonal updates might involve adding decorative handles or labels for easy identification.
Choose a storage solution that fits your space—wall-mounted, pull-out drawers, or open shelving. Install sturdy hardware that can support the weight of heavy cookware. Arrange items in a symmetrical, logical order—by size, frequency of use, or style. Securely mount racks or install dividers, ensuring stability. Regularly declutter and reorganize for optimal function.
Add decorative touches like matching handles or labels. Incorporate small hooks for utensils or pot holders. Use color-coordinated lids or cookware for a unified appearance. Seasonal or themed decor can refresh the storage area and keep it engaging.
A tidy, symmetrical pot and pan setup simplifies cooking and adds visual appeal. It’s a smart way to combine organization with style, making your kitchen more efficient and attractive. Trust that well-planned storage boosts your confidence in the space. Your kitchen will be both functional and beautifully arranged.
Conclusion
Exploring these timeless kitchen ideas reveals a world of possibilities to enhance your home with enduring style. Whether you prefer classic cabinetry, vintage accents, or sophisticated details, these concepts can be adapted to suit your unique taste. Don’t hesitate to try out these ideas and make them your own—your dream kitchen awaits, ready to become the heart of your home.