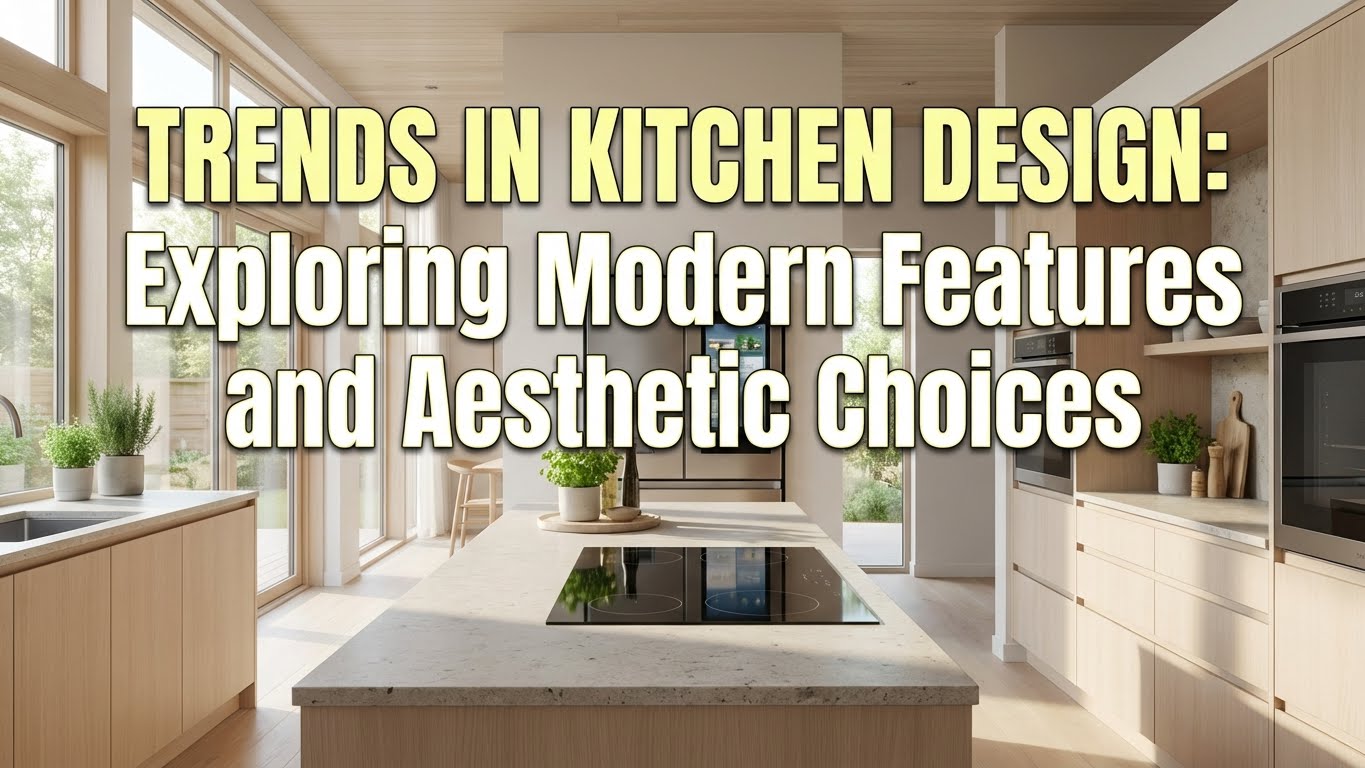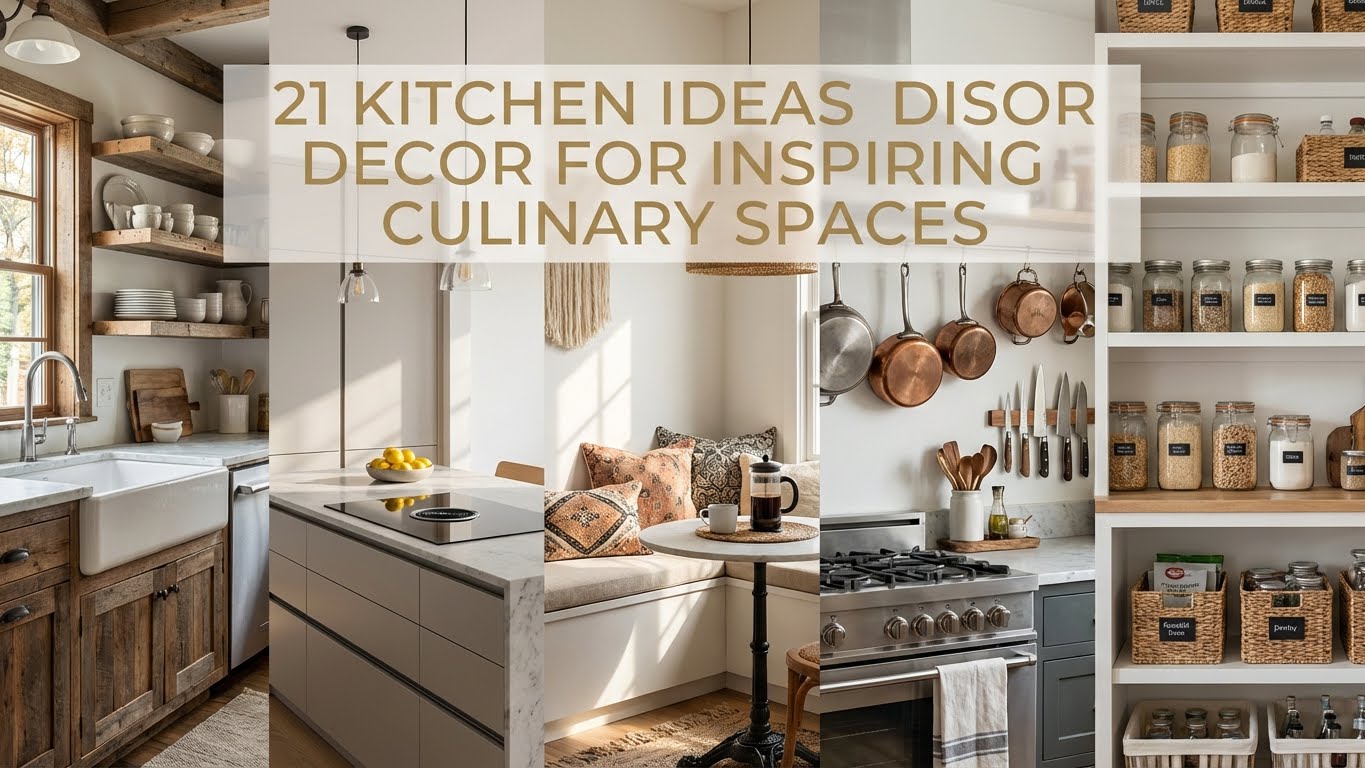
Imagine stepping into a kitchen that instantly sparks creativity and makes you want to cook every day—that’s the magic of thoughtful decor! Kitchen Ideas Decor have become incredibly popular because they combine style, comfort, and functionality, transforming ordinary spaces into inspiring culinary retreats.
In this article, you’ll discover a variety of decor ideas that cater to different tastes and lifestyles. From charming color schemes to clever storage solutions, these ideas will help you craft a kitchen that feels personalized and inviting. Get ready to be inspired and find the perfect touches to elevate your cooking space!
1. Open Shelving with Stylish Dishware Display
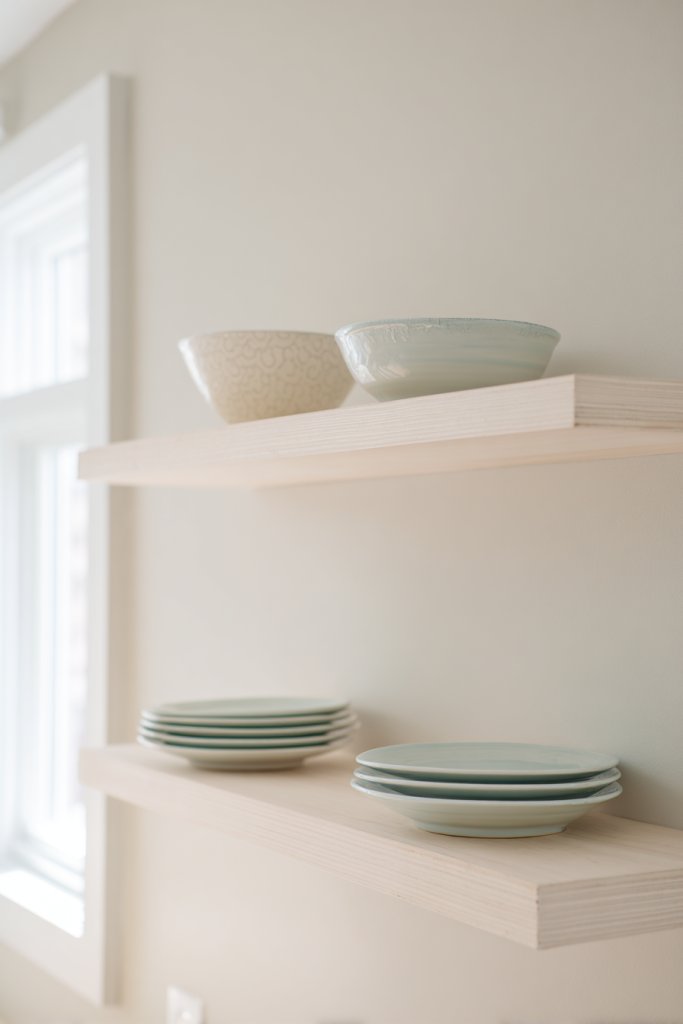
Ever feel like your kitchen is cluttered or lacks personality? Open shelving offers a simple fix by turning plain walls into focal points filled with your favorite dishware. It’s a way to showcase your style while keeping essentials within arm’s reach. Plus, who doesn’t love a good mix of colors and textures on display?
Imagine a set of floating wooden shelves mounted on a soft-colored wall, holding an array of vibrant plates, bowls, and glassware. The sunlight catches the shiny surfaces, creating subtle reflections. Vintage cups and mismatched dish sets add charm, making your kitchen feel like a cozy cafe. It’s a curated look that’s both functional and Instagram-worthy.
You can keep it minimal with sleek, modern shelves or go for a rustic vibe with reclaimed wood and industrial brackets. For smaller kitchens, narrow shelves work well above counters. During holidays, swap out dishware for seasonal items or themed sets. Even in open-plan layouts, open shelving can define a space without overwhelming it.
Start by measuring your wall space and choosing sturdy brackets or floating shelf systems. Select dishes or glassware that complement your overall decor—think bold colors or subtle neutrals. Secure the shelves at the right height for easy access, and organize your items by size or color for visual appeal. Regular dusting keeps the display fresh and inviting. For a DIY touch, repurpose old wooden planks and install with simple brackets.
Add decorative touches like hanging utensils or small plants on the shelves (though avoid overdoing greenery here, per restrictions). Use labeled jars or vintage tins for storage beneath the display for added charm. Incorporate your favorite collections, like vintage teacups or unique mugs, to make it truly yours. Play with symmetry or asymmetry to match your personal aesthetic.
Open shelving turns everyday kitchenware into art, making your space feel lively and welcoming. It’s a budget-friendly way to upgrade your decor without major renovations. Ready to show off your style and organize at the same time? Just install some shelves and start curating your dream kitchen display.
2. Bright Backsplash with Patterned Tiles
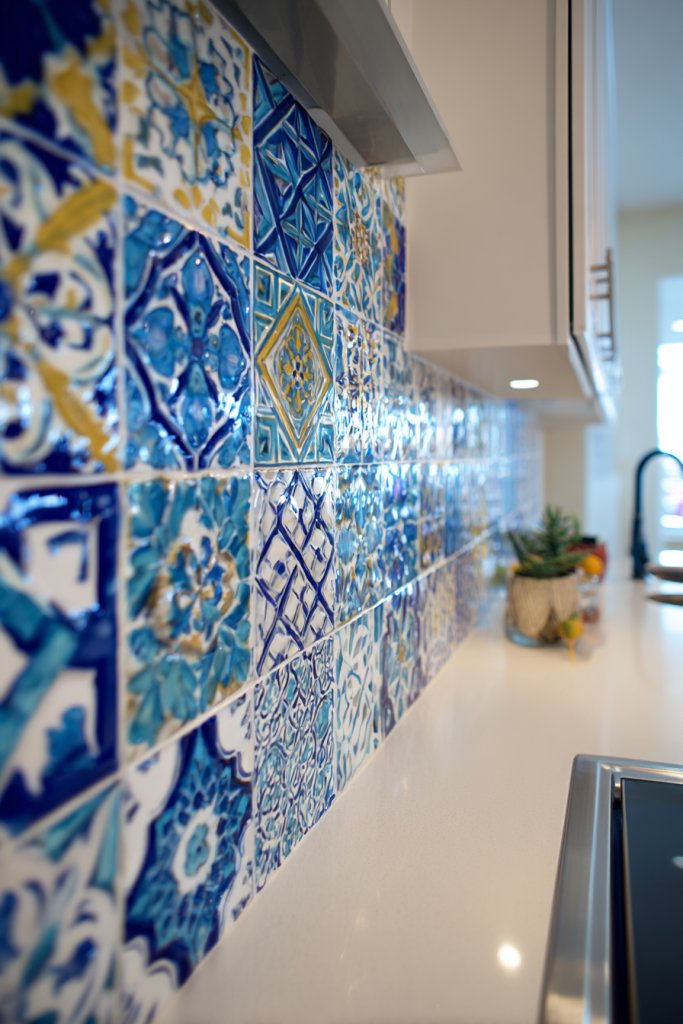
Tired of dull kitchen walls that blend into the background? A bold backsplash can instantly add personality and vibrancy. It’s like giving your kitchen a face-lift with minimal effort. Plus, a statement backsplash can be the focal point that ties the whole space together.
Picture a wall behind your stove covered in colorful, patterned ceramic tiles with intricate geometric or floral designs. The glossiness reflects light, making the space feel brighter. The textures and patterns create visual depth, transforming a plain wall into an eye-catching feature. The contrast with neutral cabinetry makes colors pop even more.
For a modern look, go with monochrome tiles in a sleek herringbone pattern. Vintage-inspired kitchens can benefit from classic subway tiles with contrasting grout. Seasonal themes can be introduced by swapping out tiles or adding decorative accents like metallic trims. Small kitchens can use vertical tile layouts to create height, while larger spaces can experiment with oversized tiles.
Pick durable, easy-to-clean tiles suited for kitchen environments, such as ceramic or glass. Measure the wall area thoroughly and plan your pattern before starting. Use spacers to ensure even grout lines and a level installation. For a DIY project, apply a quality tile adhesive and grout, then seal once dry. Consider hiring a professional for complex patterns or large areas for a flawless finish. Incorporate a contrasting grout color to enhance the pattern.
Add small decorative elements like metallic or mosaic inlays for a luxe touch. Use tiles with subtle textures or matte finishes for a softer look. For a personalized touch, integrate initials or motifs into the tile design. Complement the backsplash with coordinated countertop accessories, like a colorful utensil holder or patterned dishcloths.
A patterned backsplash instantly elevates your kitchen from bland to beautiful. It’s a creative outlet that reflects your style—whether boho, industrial, or minimalist. With so many options, you’re bound to find a design that sparks joy and makes cooking even more fun. Go ahead, make that wall pop!
3. Customized Chalkboard Wall for Menu Planning
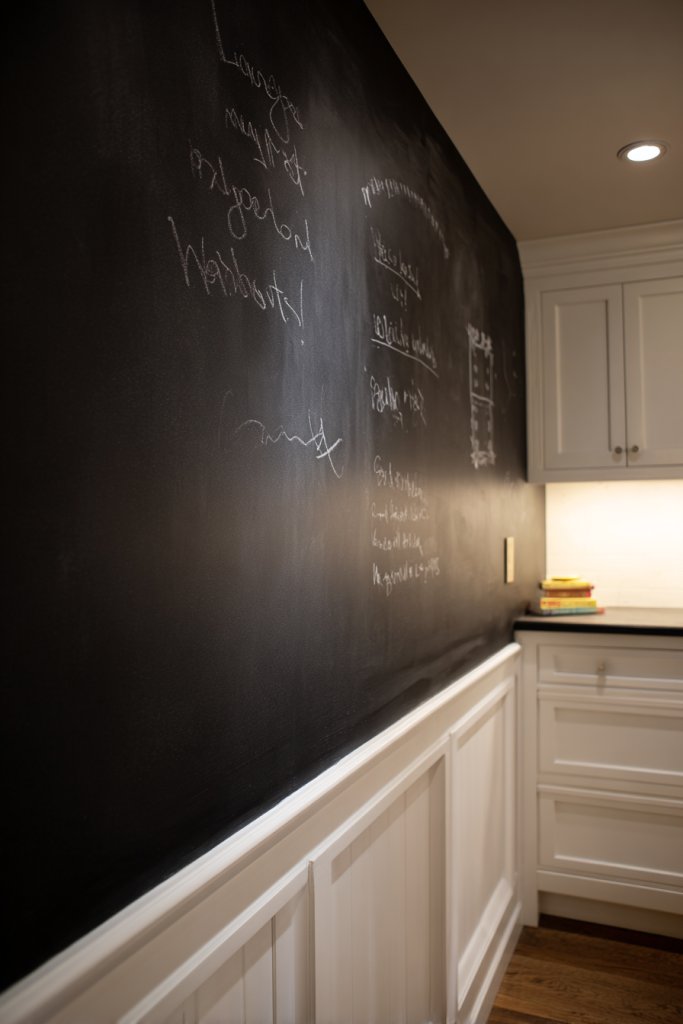
Ever wish your kitchen could double as a creative hub and a planning station? A chalkboard wall makes that possible, turning an empty space into a functional canvas. It’s perfect for jotting down grocery lists, meal plans, or even daily affirmations. Plus, it adds a playful touch that invites interaction.
Imagine a large wall painted with matte black or dark chalkboard paint, framed with colorful washi tape or sleek molding. You see handwritten notes, doodles, and weekly menus filled with vibrant chalk colors. The wall becomes a dynamic piece of decor that changes daily, adding character and practicality. Kids and adults alike love doodling and brainstorming here.
You can designate a small section as a mini menu board or cover an entire wall for maximum impact. Use magnetic paint underneath for attaching recipes or photos temporarily. For a more polished look, frame the chalkboard with decorative trim or paint a mural background. Seasonal themes can be added with temporary decals or chalk art.
Start by choosing a wall that’s easily accessible and free of obstructions. Apply a high-quality chalkboard paint, following manufacturer instructions for prep and drying times. Once dry, use colorful chalk or chalk markers for writing. Regularly clean with a damp cloth to keep the surface looking fresh. To make it more stylish, add a ledge underneath for holding chalk and erasers, or integrate it into a larger command station with hooks and shelves nearby.
Personalize your chalkboard with doodles, motivational quotes, or seasonal artwork. Use different colored chalks or metallic markers for variety. Incorporate a small corkboard or pegboard adjacent to hold notes and utensils, making it a multi-functional hub. Change the frame or add decorative stickers to match your decor theme.
A chalkboard wall turns your kitchen into a lively, interactive space that sparks creativity. It’s a cost-effective way to keep your family organized and engaged. Plus, it’s easy to update and customize, so your kitchen always feels fresh and personal. Ready to turn a blank wall into your new favorite feature?
4. Rustic Wooden Countertops for Warmth
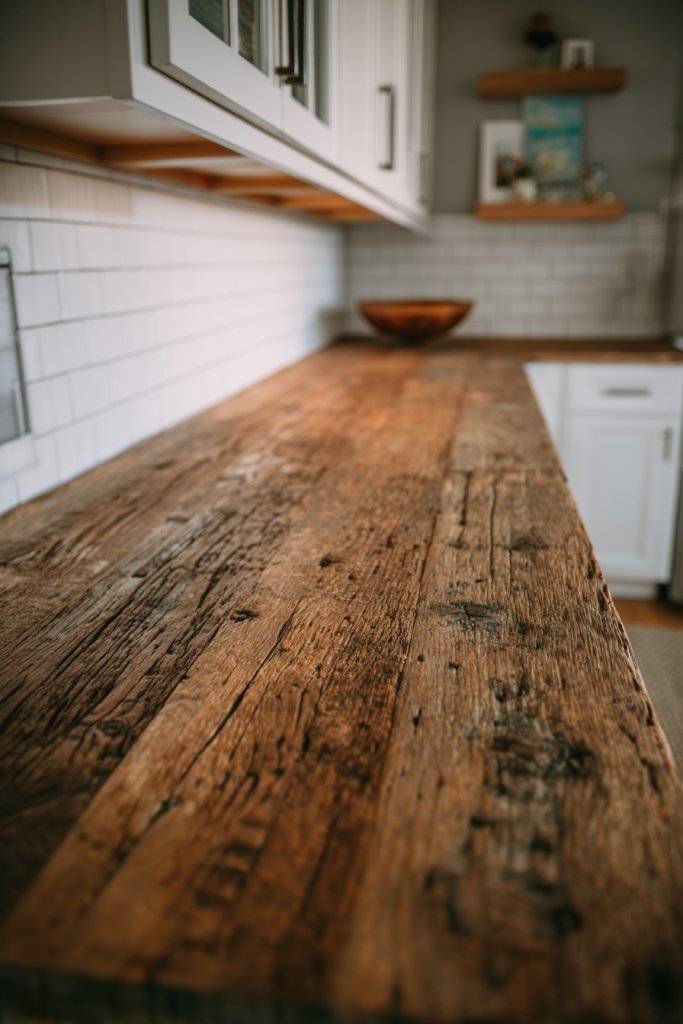
Does your kitchen feel cold or sterile? Rustic wooden countertops add instant warmth and charm, making the space inviting and cozy. They bring a natural element that grounds your design, especially if your cabinets are sleek and modern. Plus, wood ages beautifully, developing a unique patina over time.
Visualize a kitchen with thick, live-edge wooden countertops paired with vintage-style cabinets. The grain patterns and knots in the wood add texture and character. Under soft lighting, the warm tones glow, creating a welcoming atmosphere. The countertops look like they’ve been part of the home for generations, blending rustic charm with modern function.
Choose reclaimed wood for an eco-friendly approach or opt for engineered wood for durability. Match with open shelving or minimal hardware to keep focus on the natural beauty. During holidays, add seasonal accessories like a soft cream throw blanket with chunky knit texture on a nearby stool. For a more refined look, seal the wood with a matte finish to highlight its natural imperfections.
Select high-quality, sustainably sourced wood and decide on a finish that protects against moisture and stains. Prepare the surface by sanding thoroughly to smooth out any rough spots. Apply a food-safe sealant or oil, and let it cure fully before use. Mount the countertops securely to avoid any shifting. Regular maintenance involves re-oiling or sealing to keep the wood looking its best.
Add a custom edge detail or incorporate inlays for a personalized touch. Use decorative trims or carve subtle patterns into the edges. Pair with mismatched vintage stools or a distressed paint finish on nearby cabinetry. Incorporate a small, hidden drawer or compartment for utensils or spices for added functionality.
Rustic wood countertops evoke a sense of tradition and craftsmanship, connecting you with nature. They’re a statement of authenticity that ages gracefully, adding value and personality to your kitchen. Once installed, you’ll enjoy the blend of rustic appeal and everyday practicality—truly a timeless choice.
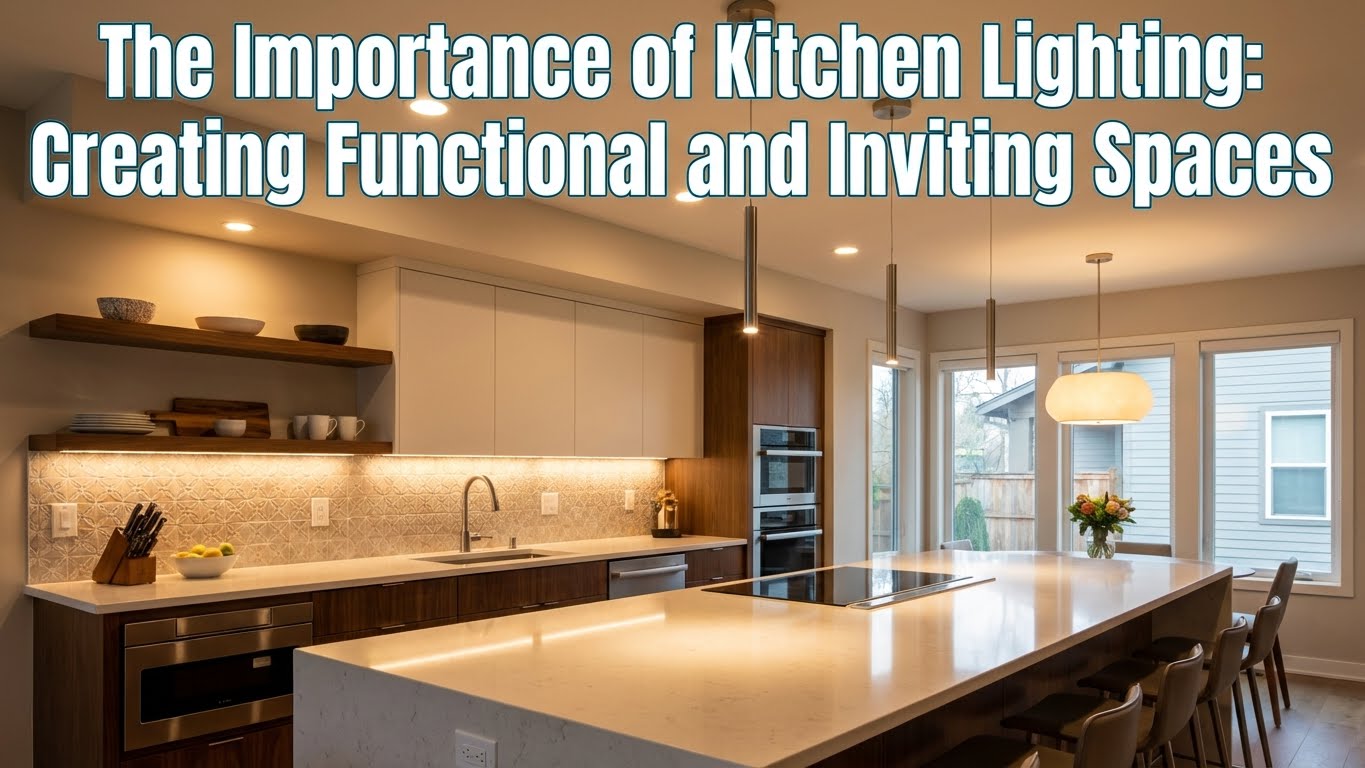
5. Minimalist Under-Cabinet Lighting for Ambiance

Ever struggle to see what you’re doing during evening cooking sessions? Under-cabinet lighting solves that problem while adding a subtle glow that enhances your kitchen’s ambiance. It’s an easy upgrade that makes your space feel warm and inviting without overwhelming the decor. Plus, good lighting can even make your photos look better!
Visualize sleek LED strips installed beneath your upper cabinets, casting a soft, even light onto the countertop. The light highlights the texture of your surfaces and creates a layered, cozy atmosphere. During dinner prep, the glow fills the space with a gentle warmth, making it feel more intimate. When turned on at night, it’s like your kitchen has its own mood lighting.
Choose between warm or cool white LEDs depending on your preferred mood. Flexible strips can be cut to size and installed in hard-to-reach corners. For a modern look, hide the wiring behind the cabinetry or use minimal fixtures. During holidays or special occasions, add dimming features for adjustable ambiance. Consider pairing with decorative light diffusers for a softer glow.
Select high-quality, waterproof LED strips with adhesive backing for easy installation. Measure the underside of your cabinets and cut the strips accordingly. Use a power supply that matches the wattage requirements. Secure the strips with the adhesive backing and connect them to a switch or dimmer. Test the lighting before final installation, and hide wiring for a clean look. Regular cleaning of the strips keeps them shining brightly.
Sync the lighting with smart home systems for voice control or custom schedules. Add color-changing options for parties or mood settings. Use diffusers or frosted covers to soften the light and reduce glare. Pair with decorative textiles or artwork that benefits from subtle illumination, enhancing your overall decor.
Minimalist under-cabinet lighting elevates both the functionality and style of your kitchen. It’s a practical upgrade that adds sophistication and comfort. Once installed, you’ll wonder how you ever cooked without it, turning your kitchen into a warm, inviting space to create and relax.
6. Vintage-Style Pendant Lights as Focal Points
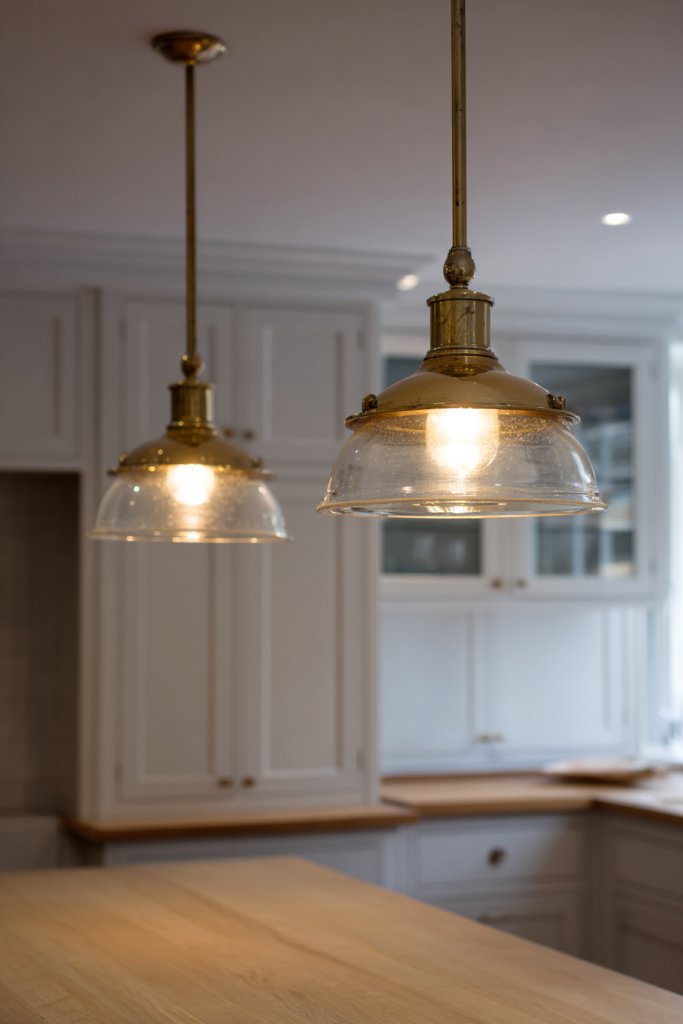
Want to add a dash of charm and personality to your kitchen? Vintage-style pendant lights serve as statement pieces that draw the eye and set the tone. They blend nostalgia with modern functionality, making your space feel both timeless and trendy. Plus, they’re great for creating focused task lighting over islands or counters.
Picture an industrial-inspired kitchen with exposed filament bulbs hanging from twisted cords, casting a warm glow. These pendants sit above a farmhouse table or kitchen island, creating a cozy, inviting atmosphere. The vintage finishes—brass, copper, or matte black—contrast beautifully with neutral cabinetry. The result is a balanced mix of old-world charm and contemporary style.
Choose from various shapes like globe, bell, or cage fixtures to match your decor theme. For a more eclectic look, mix different vintage styles or add decorative chain details. During holidays, swap out bulbs for colored or Edison-style filaments. For small spaces, mini pendants work well, while larger kitchens can support multiple fixtures for symmetry.
Start by selecting fixtures that complement your overall style and scale properly over your workspace. Install electrical wiring securely, ensuring safety compliance. Hang the pendants at an appropriate height—roughly 30-36 inches above counters or tables. Use dimmable bulbs to adjust lighting intensity and avoid glare. Coordinate with existing hardware and finishes for a cohesive look. Regular cleaning and bulb replacement keep the fixtures looking their best.
Incorporate decorative bulbs or vintage filament styles for extra character. Add dimmers for adjustable mood lighting during gatherings. Use decorative shades or geometric cages to enhance the visual impact. Play with symmetry or asymmetry depending on your aesthetic preference, creating a focal point that’s uniquely yours.
Vintage pendant lights inject personality and charm, transforming your kitchen into a space that feels curated and warm. They’re a quick, impactful upgrade that can redefine your entire decor. Get ready for compliments and admiring glances—your kitchen just got a whole lot more stylish!
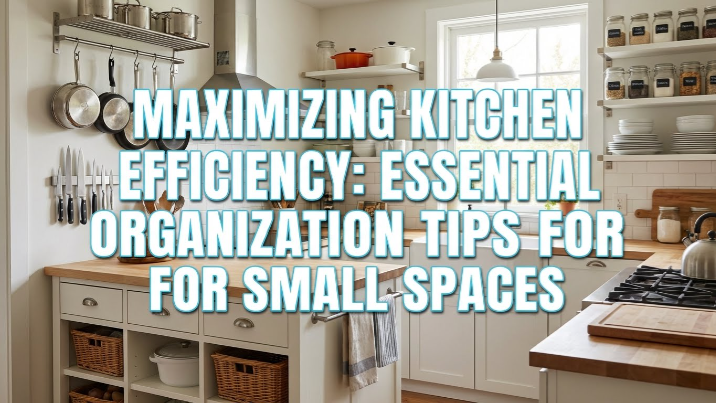
7. Open Storage Bins and Baskets for Organization
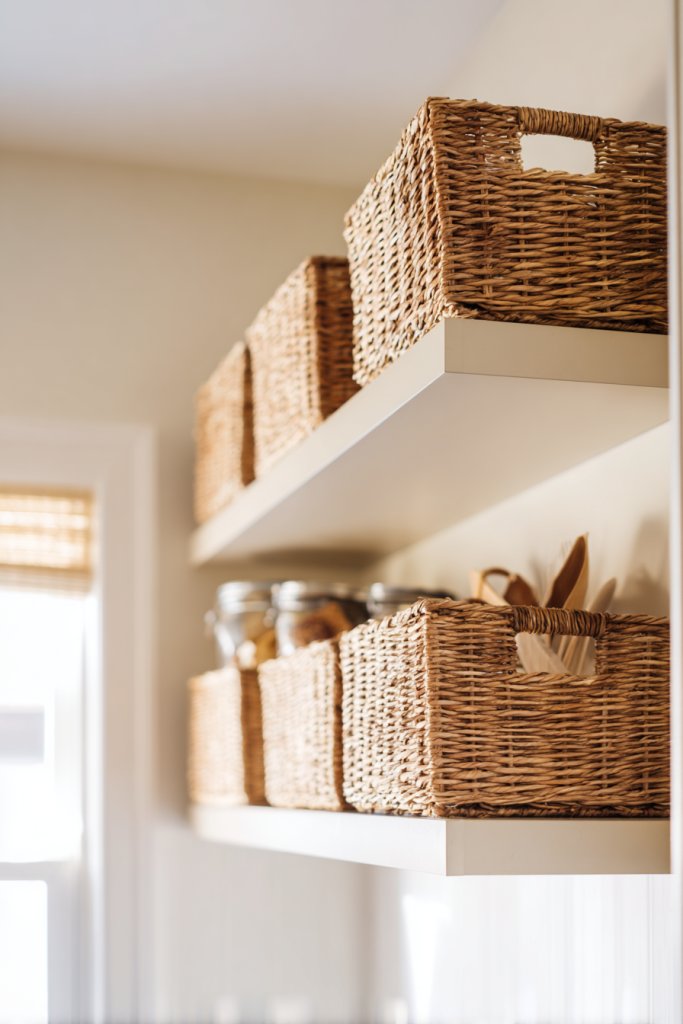
Cluttered counters and overflowing cabinets can make your kitchen feel chaotic. Open storage bins and baskets offer a simple, attractive way to organize dry goods, utensils, or linens. They keep essentials accessible while adding a rustic or farmhouse touch. Who knew organization could look this good?
Visualize a kitchen shelf lined with woven wicker baskets filled with flour, sugar, and coffee beans. Nearby, vintage crates hold utensils or napkins, creating a cozy, lived-in vibe. The natural textures and warm tones of the baskets contrast with sleek countertops, adding visual interest. This setup invites you to grab what you need without fuss.
Use different-sized baskets to accommodate various items, from small spice jars to large baking supplies. For a modern twist, opt for sleek metal or plastic bins in neutral colors. Seasonal decor can be swapped in, like colorful fabric liners or fabric tags. In small kitchens, vertical stacking saves space, while open shelving enhances accessibility.
Choose durable, food-safe materials for the bins—wicker, wood, or sturdy plastic. Label them clearly with labels or chalkboard tags for easy identification. Arrange baskets on open shelves, inside cabinets, or beneath counters for maximum efficiency. Regularly tidy and clean the bins to prevent dust build-up. For added style, coordinate the baskets with your overall color scheme or decor theme.
Customize baskets with fabric liners, personalized tags, or painted patterns. Use decorative labels or stencils to add a personal touch. Incorporate a mix of open and covered containers for variety. Pair with a matching set of utensils or storage jars for a cohesive look. This setup encourages a clutter-free, welcoming environment.
Open storage baskets make organization effortless and stylish, turning chaos into calm. They’re a versatile solution that adapts to your needs and taste. Once you see how much easier it is to find what you need, you’ll wonder why you didn’t start sooner. Get ready to love your organized, charming kitchen!
8. Bright, Colorful Bar Stools for a Pop of Color
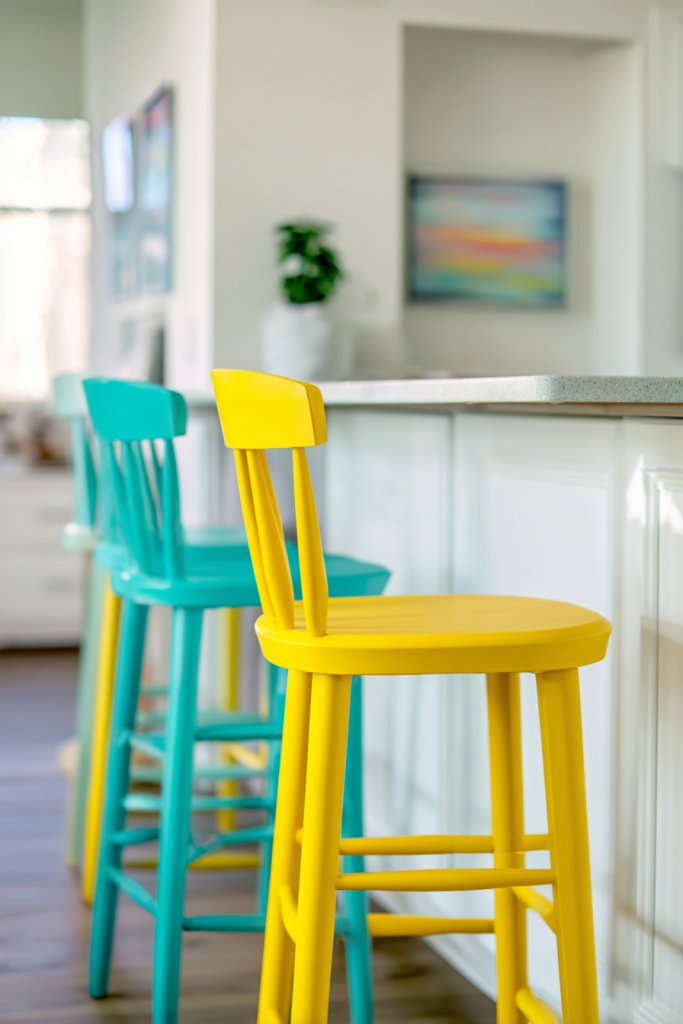
Looking to inject some fun and personality into your kitchen? Bright, colorful bar stools are the perfect way to add a cheerful pop of color and elevate your space. They’re a quick fix for dull, neutral kitchens and encourage casual conversations. Who says functional furniture can’t be playful?
Imagine a row of vibrant turquoise or sunny yellow stools lined up at a sleek marble island. The bold hues contrast with white cabinetry, energizing the entire room. The textured upholstery or painted legs add visual interest, making the seating area a statement feature. It’s a lively, inviting scene that sparks joy every time you walk in.
Opt for stools with removable covers or paintable surfaces for easy customization. Mix and match colors for a playful, eclectic look or keep it monochrome with a single bright shade. During festive seasons, swap covers or add decorative cushions. For small spaces, stackable or foldaway stools save room when not in use.
Choose sturdy, comfortable stools with a durable finish suitable for everyday use. Measure your counter height and select stools with an appropriate seat height—usually 24-30 inches. Secure them firmly to prevent wobbling or tipping. Consider weather-resistant options if your space is open or near outdoor areas. Regularly clean and inspect for wear, touching up paint or upholstery as needed.
Add decorative cushions or removable covers in patterns or textures that reflect your personality. Paint or stencil designs on the legs or backs for a custom look. Incorporate metallic accents or unique shapes to elevate the style. Coordinate with accessories like colorful dish towels or placemats for a cohesive vibe.
Bright stools turn your kitchen into a lively gathering spot, making every meal feel like a celebration. They’re an instant mood lifter and a reflection of your personal style. Don’t be afraid to experiment with colors—you might just love the cheerful new vibe it creates.
9. Patterned Area Rugs for Comfort and Style
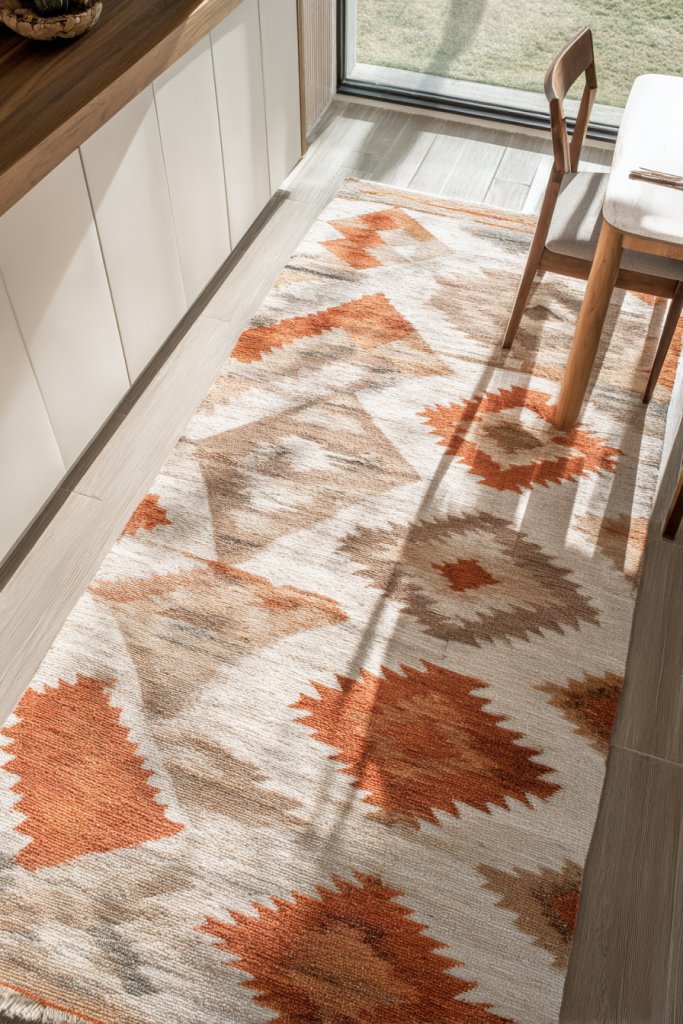
Bare floors or dull rugs can make a kitchen feel cold and uninviting. Patterned area rugs add warmth, comfort, and personality underfoot. They also help define different zones—like the cooking or sitting areas—making your space more organized and cozy. Plus, they’re a simple way to introduce color and pattern without permanent commitment.
Picture a geometric rug with bold black and white shapes placed in front of the sink, or a floral-print rug under a breakfast nook. The textures invite barefoot comfort, while the patterns add visual excitement. Light catches the fibers, highlighting their intricate designs. It’s a perfect balance of style and practicality, making your kitchen feel layered and lived-in.
Choose washable, durable rugs in patterns that suit your decor—think boho, modern, or traditional. Use coordinating colors from your cabinets or countertops to tie the look together. During seasons, swap out rugs to match your mood or decor updates. Small rugs can add charm in front of the sink or stove, while larger ones anchor the space.
Select high-quality, stain-resistant rugs suitable for high-traffic areas. Measure your spaces carefully before purchasing. Use non-slip pads underneath to prevent slipping and bunching. Regular vacuuming and prompt stain removal keep rugs looking fresh. For added durability, choose rugs with a low pile or tightly woven fibers. Layering with smaller mats can add extra comfort and style.
Personalize your rugs with custom embroidery, painted patterns, or fringed edges. Play with contrasting borders or color accents to highlight different zones. Pair with seat cushions or curtains in similar patterns or colors for a cohesive look. Seasonal changes can be made by replacing or layering rugs for variety.
A patterned rug brings life and personality to your kitchen, making it more inviting for family and guests. It’s a simple, affordable upgrade that makes a big visual impact. Once you see how much warmer and more styled your space feels, you’ll wonder why you waited so long to add one.
10. Creative Herb Garden Windowsill or Wall Planters
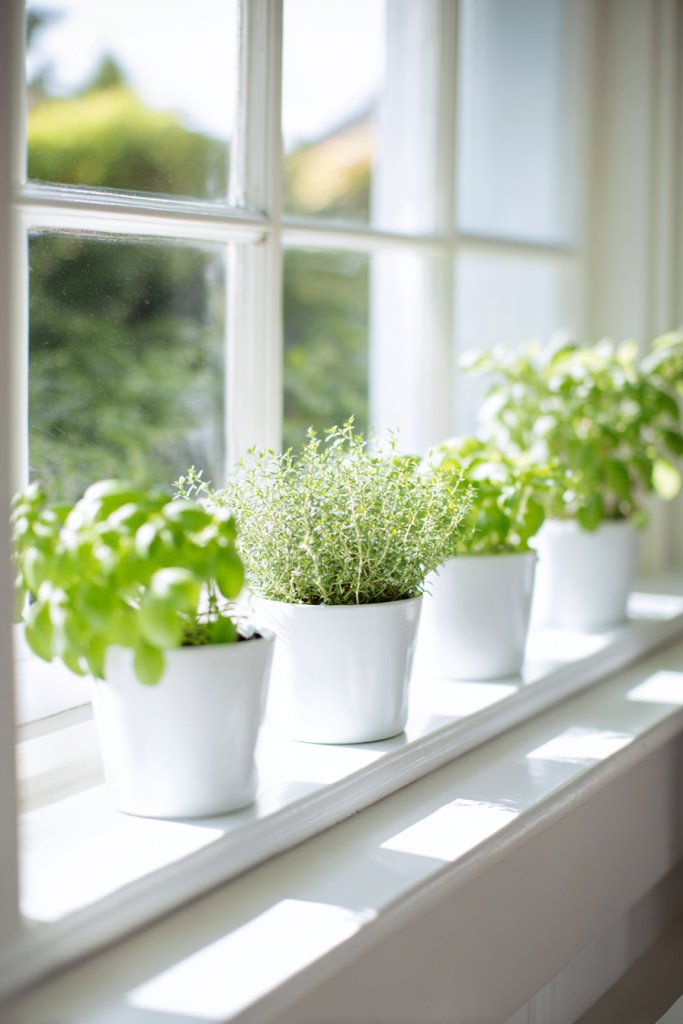
Craving fresh herbs but tired of buying limp, overpriced bunches? A dedicated herb garden in your kitchen makes cooking more fun and flavorful. It also adds a touch of greenery and life without cluttering your counters. Who knew that a small green space could make such a difference?
Visualize a sunny windowsill lined with small, colorful pots filled with basil, thyme, and parsley. The greenery contrasts with the sleek countertops and adds a fresh scent to the space. Alternatively, wall-mounted planters with cascading herbs create a vertical garden that saves counter space. It’s a lively, practical display that’s always within reach.
Use a mix of vintage ceramic pots, modern metal containers, or recycled tins for a personalized touch. Vertical wall planters or hanging baskets work well in limited spaces. During different seasons, swap out herbs or rotate seasonal plants for variety. Incorporate drip trays or decorative stones to enhance aesthetics and functionality.
Choose sunny windows or well-lit walls for your herb garden. Use well-draining pots with good soil, and choose herbs suited for indoor growth. Arrange pots in a line or cluster for visual appeal, ensuring easy watering and harvesting. Consider using a watering can with a narrow spout for precision. Regular pruning promotes healthy growth and prevents overcrowding. Use wall-mounted shelves or hooks to keep the space tidy.
Create labels with handwritten tags or painted stones to identify herbs. Add decorative stones or fairy lights around the pots for a whimsical touch. Incorporate a small, stylish watering can or garden tools for convenience. Rotate herbs based on seasonality or your cooking preferences to keep the garden fresh and inspiring.
A dedicated herb garden makes your kitchen more sustainable and vibrant. It’s an easy way to elevate your culinary game and enjoy fresher flavors. Plus, nurturing your green space boosts your mood and makes cooking feel more like a personal ritual. Ready to grow your own fresh herbs at home?
11. Statement Range Hood with Decorative Cover
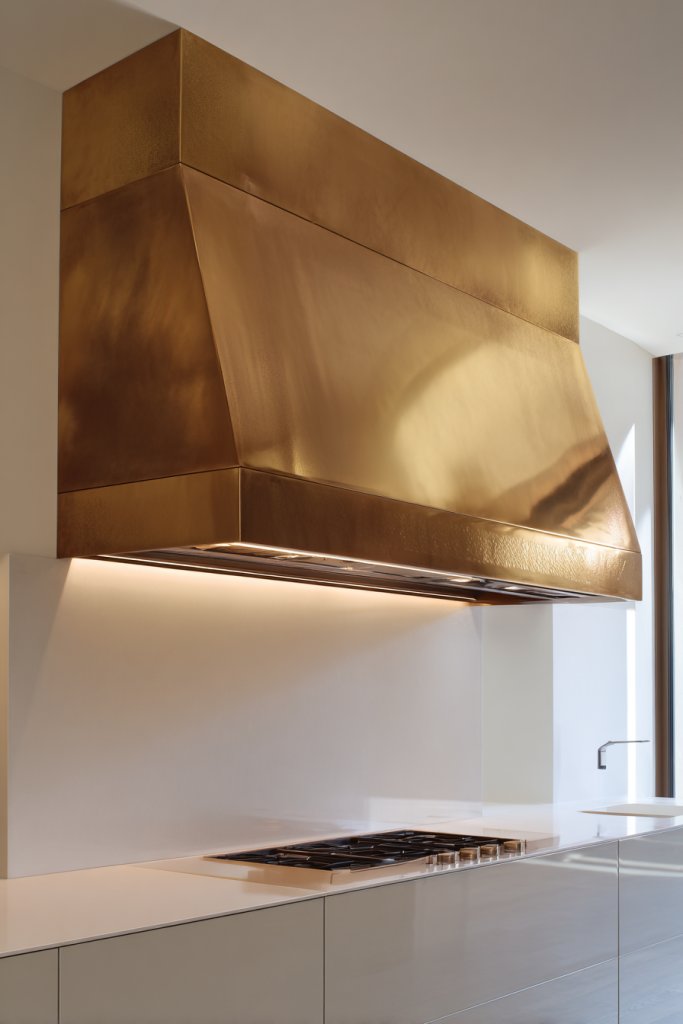
Is your kitchen missing that wow factor? A statement range hood can transform the entire cooking area from dull to dazzling. It’s not just about functionality; it’s a design centerpiece that commands attention. Who knew a vent could be so stylish?
Imagine a custom-crafted wooden or metal range hood with intricate carvings or bold geometric shapes. It hangs majestically above your stove, becoming the focal point of the room. The decorative cover adds texture and dimension, elevating the overall aesthetic. Underneath, sleek appliances and minimalist cabinetry let the hood shine.
Choose a cover that complements your decor—rustic wood, brushed metal, or painted finishes work well with various styles. For a modern look, opt for sleek, streamlined designs with minimal embellishments. Traditional kitchens benefit from ornate, handcrafted covers. During holidays, incorporate seasonal accents or paint details for a personalized touch.
Start by selecting a hood that fits your stove size and matches your style. For custom covers, work with a carpenter or DIY with pre-made panels. Secure the hood properly to the wall and ensure proper ventilation. Finish with paint, stain, or decorative elements to match your theme. Regular cleaning and checking ductwork ensure efficiency and safety.
Add decorative metalwork, stenciled patterns, or faux finishes to enhance the cover. Incorporate LED strip lighting underneath for additional glow. Play with contrasting colors or textures to make the hood a true statement piece. Keep it clean and well-maintained to preserve its striking appearance.
A statement range hood elevates your kitchen’s style instantly, turning a functional element into art. It boosts your confidence in your design choices and makes your space more memorable. With a little effort, your kitchen can become a show-stopping feature everyone admires.
12. Open Concept with a Kitchen Island for Socializing
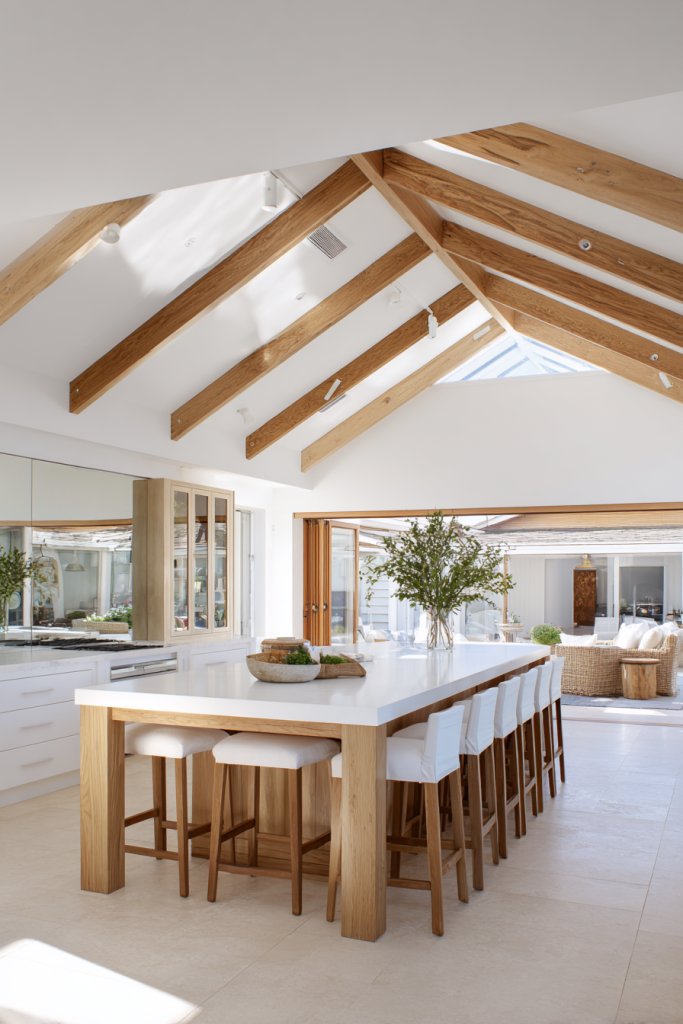
Cramped kitchens can make cooking and entertaining feel disconnected. An open concept with a central island creates a social hub where family and friends can gather comfortably. It’s the perfect setup for casual conversations, meal prep, and even homework sessions. Who doesn’t want a more inclusive kitchen?
Picture a spacious kitchen with a large island in the center, topped with a sleek quartz or wood surface. Bar stools line one side, inviting guests to sit and chat while you cook. The open layout blends seamlessly with living or dining areas, fostering interaction. Warm lighting and neutral tones make the space feel inviting and functional.
Choose an island with built-in storage, a sink, or even a cooktop for versatility. For smaller spaces, a portable or foldable island offers flexibility. Decorate the island with a runner, or leave it clear for a minimalist look. During holidays, add decorative bowls or trays for serving snacks or drinks.
Plan your layout carefully, ensuring enough clearance around the island for movement. Select durable materials that match your decor—wood, quartz, or concrete. Install electrical outlets if needed for appliances or charging stations. Secure the island firmly to prevent wobbling. Keep the design open and accessible to encourage flow and conversation. Regular cleaning maintains its appearance.
Add a pop of color with a vibrant countertop or decorative accents like a fruit bowl or decorative tray. Incorporate different textures, such as a wood top with metal legs. Use pendant lighting above the island for task lighting and style. Personalize it with family photos or a custom engraving for a unique touch.
An open kitchen with an island turns your space into a lively, functional area that’s perfect for gatherings. It makes cooking more interactive and less isolating. Once you experience the social benefits, you’ll wonder how you ever cooked without it. Your kitchen becomes the heart of your home.
13. Bright, Colorful Kitchen Accessories and Utensils
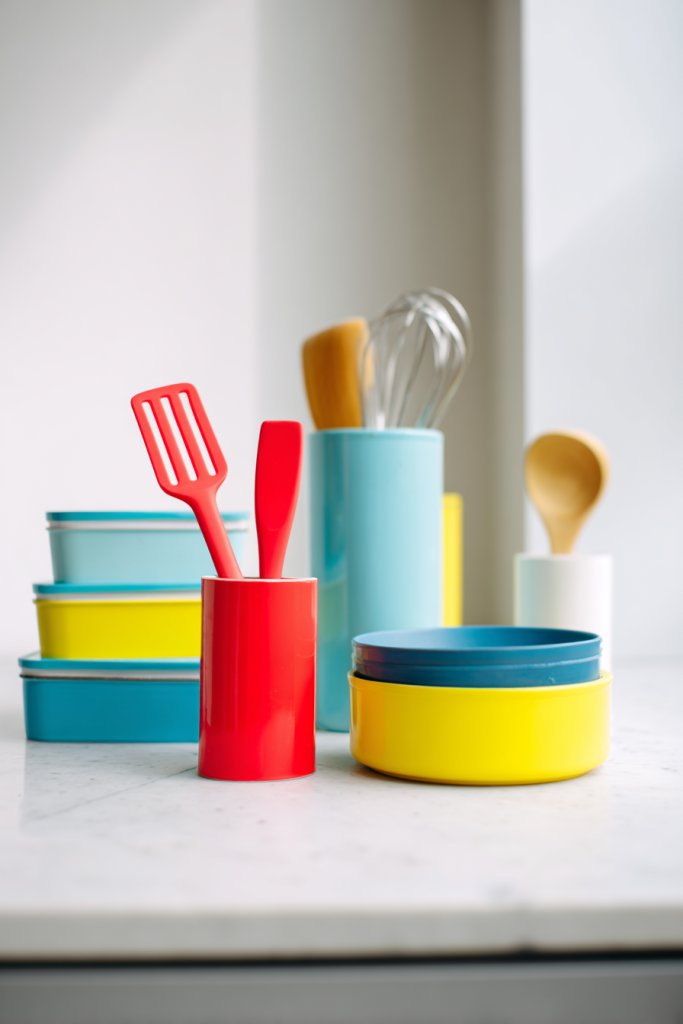
Dull, monochrome kitchens can feel uninspired and lack personality. Bright, colorful accessories and utensils instantly inject energy and fun into the space. They’re a simple way to reflect your style without a full overhaul. Plus, they make cooking more enjoyable when everything’s lively and cheerful.
Imagine a countertop dotted with cheerful red spatulas, turquoise storage jars, and vibrant silicone baking mats. The colors pop against neutral cabinets, creating a playful yet coordinated look. Small appliances like a rainbow-colored toaster or mixer add flair, turning everyday tools into decor. It’s a visual feast that’s both practical and pretty.
Mix and match colors to suit your mood or season—think pastel for spring or bold hues for summer. Use color-coded jars for spices or dry goods to stay organized and add visual interest. During holidays, swap out accessories for themed items. Keep the palette cohesive by choosing a few dominant colors or sticking to a rainbow theme.
Choose durable, easy-to-clean materials and vibrant hues for accessories. Containerize dry goods in matching jars with labels for a tidy look. Display utensils in a colorful holder or hang them on a magnetic strip. Incorporate small appliances with bold colors that complement your overall decor. Regularly clean and replace worn items to keep the look fresh.
Create custom labels or decals for jars and containers. Use patterned or textured handles on utensils for added detail. Coordinate accessories with your tableware or textiles for a harmonious style. Incorporate seasonal colors or special edition items to keep things fun and fresh.
Vivid accessories and utensils make your kitchen feel lively and reflect your personality. They’re an affordable way to upgrade your decor and add a splash of joy to everyday routines. Once you start mixing colors, you’ll wonder how you ever cooked in a dull space!
14. Functional Pegboard for Utensil Storage
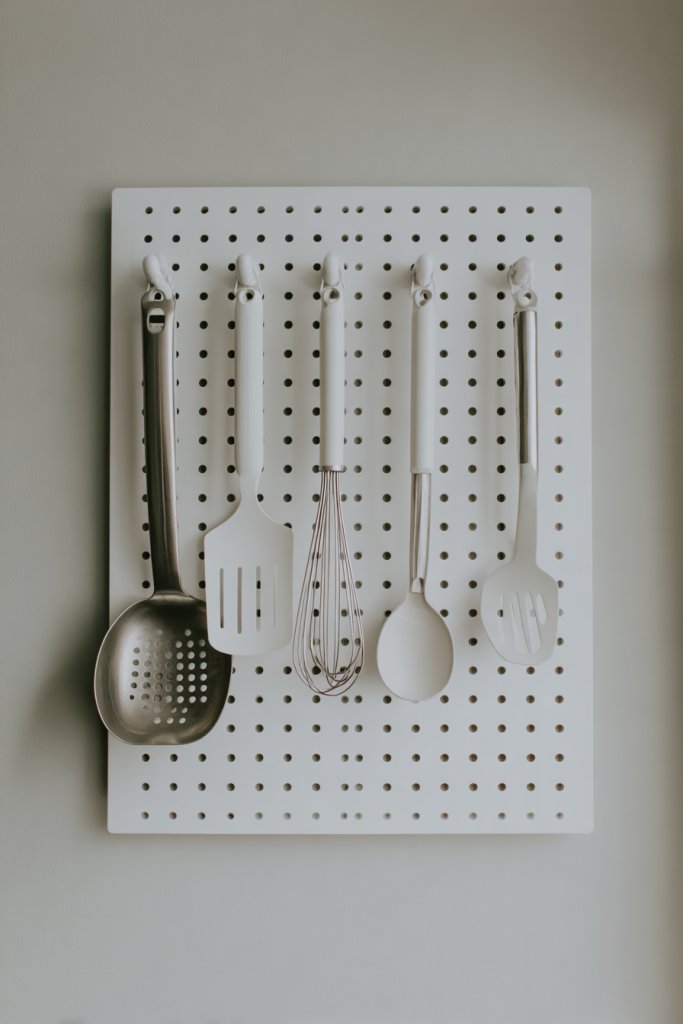
Cluttered drawers and counters make it hard to find what you need quickly. A pegboard offers a smart, stylish solution for organizing utensils, pots, and pans. It keeps essentials within easy reach and adds a modern industrial vibe. Who says organization can’t be cool?
Picture a sleek black metal pegboard mounted on a wall near your stove, holding hanging spatulas, ladles, and measuring cups. Hooks and small baskets keep everything tidy and accessible. It’s a functional display that looks like a mini workshop, but with style. The open design prevents clutter and makes your tools part of the decor.
Choose from various sizes and finishes—matte black, galvanized steel, or painted colors—to match your decor. Use different hooks, baskets, and containers to customize the layout. Incorporate a few decorative elements like a hanging towel or a small chalkboard for notes. For a softer look, pair with wood shelving or decorative trim.
Install the pegboard at a comfortable height, securing it with wall anchors for stability. Arrange hooks and accessories in a pattern that suits your workflow. Use labeled containers for small items like spice scoops or clips. Clean and organize regularly to avoid dust buildup and maintain visual appeal. Optional: add a small shelf to hold frequently used items or decorative touches.
Add custom hooks or paint the pegboard in a color that pops against your wall. Incorporate decorative elements like a monogram or motif that reflects your style. Use a combination of open hooks and closed containers for a mix of display and hidden storage. Keep the setup flexible for changes or upgrades.
A pegboard turns clutter into a curated display, making your kitchen more efficient and stylish. It’s an easy DIY project that pays off by saving time and reducing stress. Once you see everything in order, you’ll wonder why you waited so long to get organized.
15. Use of Warm Metallic Accents (Brass, Copper, Gold)

Your kitchen feels a bit flat or cold? Warm metallic accents like brass, copper, or gold can instantly add sophistication and a touch of luxury. They reflect light beautifully and serve as eye-catching details that elevate your decor. Who doesn’t love a little shimmer?
Imagine sleek cabinet handles, faucet fixtures, and small decor pieces in warm gold or copper finishes. The metallic surfaces catch the sunlight, creating a glow that enhances the overall ambiance. Pairing these accents with neutral cabinetry and marble countertops results in a chic, modern look with timeless appeal. It’s like jewelry for your kitchen.
Mix metals for a layered, eclectic style or keep it monochrome for a streamlined look. Use metallic spray paint to update existing hardware or create DIY accents. During festive seasons, add metallic decor or serveware for extra sparkle. Play with textures—matte, polished, or hammered—to add depth.
Choose high-quality, corrosion-resistant metal finishes for durability. Replace or update cabinet hardware, light fixtures, and small accessories. Balance the metallic elements with softer textures like wood or fabric to prevent a cold feel. Regular cleaning with a soft cloth maintains shine and prevents tarnish. Consider mixing matte and shiny finishes for visual interest.
Create custom signs or trays with metallic accents. Incorporate metallic paint or adhesive foil into DIY projects. Use metallic candle holders or decorative bowls to add layers of shine. Coordinate with your existing hardware and fixtures to keep a cohesive aesthetic.
Warm metallic accents add a luxe touch that’s both trendy and timeless. They make your kitchen look polished and curated without a huge investment. Once you see how these small details transform your space, you’ll be hooked on metallic magic.
16. Creative Use of Open Shelves for Cookbooks and Decor
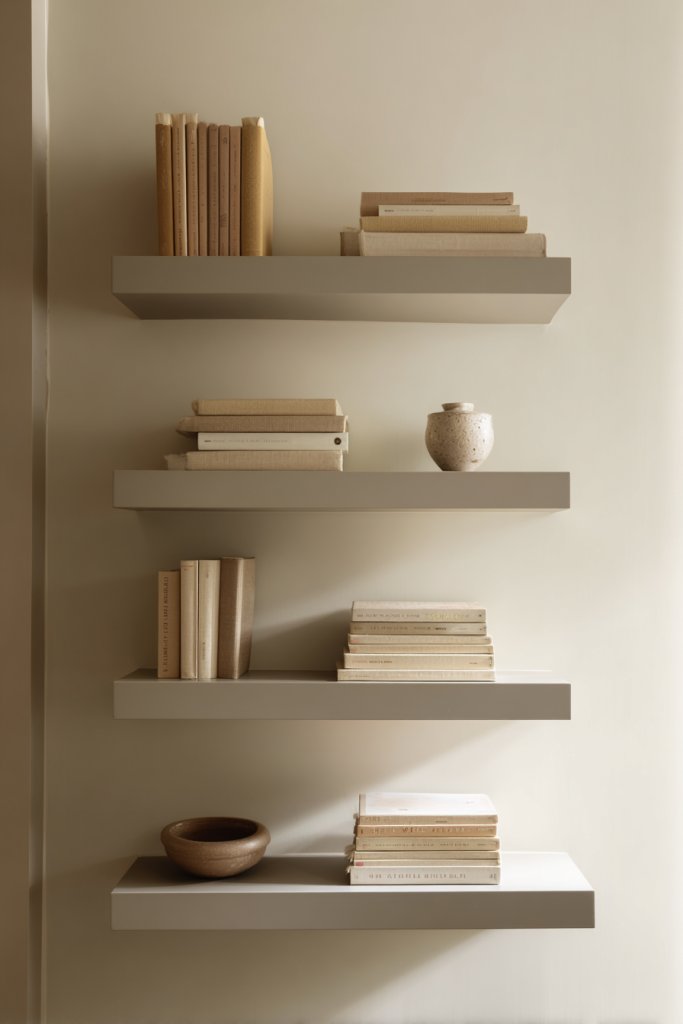
Boring, cluttered countertops and cabinets can make your kitchen feel cramped. Open shelves dedicated to cookbooks and decorative items create a more inviting, personalized space. It’s a chance to showcase your culinary favorites and style your kitchen at once. Who says practicality can’t be pretty?
Envision a wall with a row of open shelves holding colorful cookbooks, vintage kitchen tools, and decorative jars. The mix of textures and heights adds visual interest. The books are arranged with some lying flat and others upright, creating a dynamic display. Light-colored ceramics or wooden accents complement the books, making the space feel curated and warm.
Use a mix of open shelves and closed cabinetry to balance functionality and style. For a minimalist look, keep shelves sparse with only a few carefully chosen items. For a more eclectic vibe, display a variety of vintage tools, baskets, or quirky decor pieces. During holidays, swap out items to reflect the season.
Install sturdy shelving brackets at appropriate heights, considering accessibility and visual balance. Select shelves made of wood, metal, or glass, depending on your decor theme. Arrange your items thoughtfully, prioritizing ease of access for frequently used cookbooks or utensils. Regularly dust and rotate decor to keep the display fresh. Use labels or decorative tags for a personalized touch.
Incorporate decorative elements like framed vintage prints or sculptural pieces among the books. Use matching or contrasting colors for a cohesive look. Add small, functional items like spice jars or utensil holders on the shelves. Create a theme—such as farmhouse or modern—by choosing specific styles or color schemes.
Open shelves for cookbooks and decor turn your kitchen into a stylish, functional space that reflects your personality. They make everyday tasks more enjoyable and inspire culinary creativity. Once you see how easy it is to mix practicality with style, you’ll love designing your own personalized kitchen library.
17. Bright, Airy Window Treatments or Shades
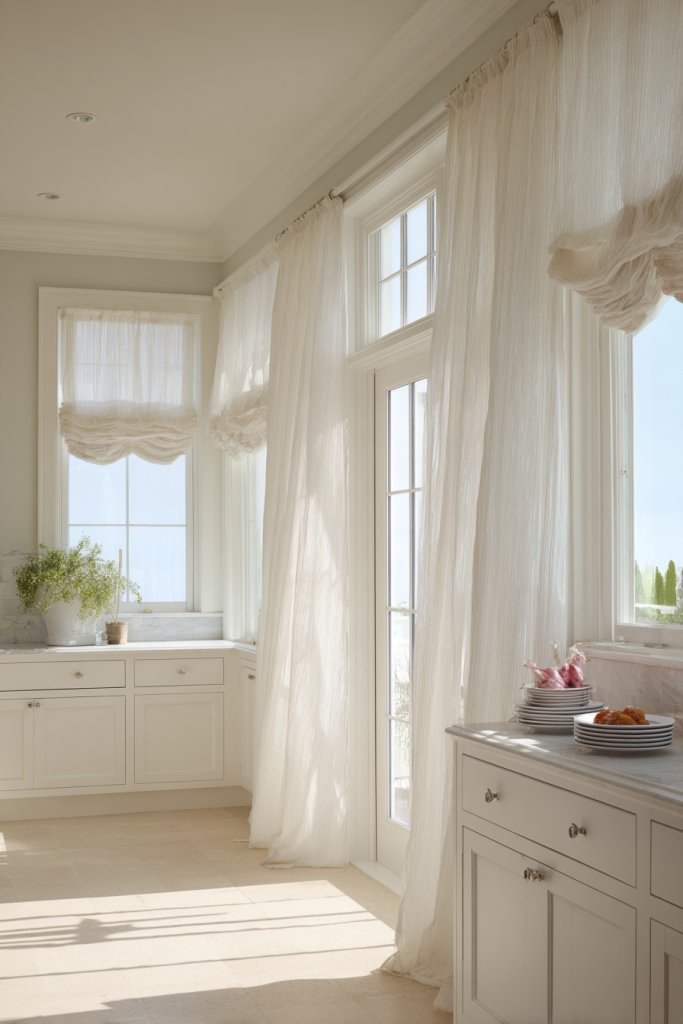
Heavy curtains or dark blinds can block natural light and make your kitchen feel dull. Bright, airy window treatments brighten the space while adding a touch of style. They’re perfect for maximizing sunlight and creating a fresh, open feel. Who doesn’t want a sunny kitchen?
Imagine sheer, white linen curtains gently billowing in the breeze, filtering sunlight softly into the room. Alternatively, light-colored roller shades in a subtle pattern can be rolled up during the day, revealing a view and flooding the space with natural light. The fabrics add texture without overwhelming the decor. The overall effect is a bright, cheerful atmosphere.
Choose from light-filtering fabrics, roman shades, or bamboo blinds for different textures and styles. During colder months, add a layer of thermal curtains that can be drawn for insulation. For a minimalist look, opt for sleek, fabric roller shades in neutral tones. Use colorful or patterned fabrics to add personality or coordinate with your overall color scheme.
Measure your windows carefully and select a treatment that fits well without blocking too much light. Install the mounting hardware securely, ensuring smooth operation. For easy maintenance, choose machine-washable fabrics or simple cleaning methods. Layer treatments with blinds or sheer curtains for versatility and privacy. Regularly wash or dust to keep them looking fresh.
Add decorative trim or tiebacks that match your decor theme. Incorporate subtle patterns or textures to enhance visual interest. Change out fabrics seasonally to keep the look fresh and aligned with your style. Use colorful or patterned tiebacks or tassels for a playful touch.
Bright, airy window treatments make your kitchen feel more spacious and inviting. They’re a simple upgrade that adds natural light and personality. Once you experience how much a little fabric can brighten your space, you’ll be motivated to refresh other windows or areas in your home.
18. Practical yet Stylish Drawer and Cabinet Handles
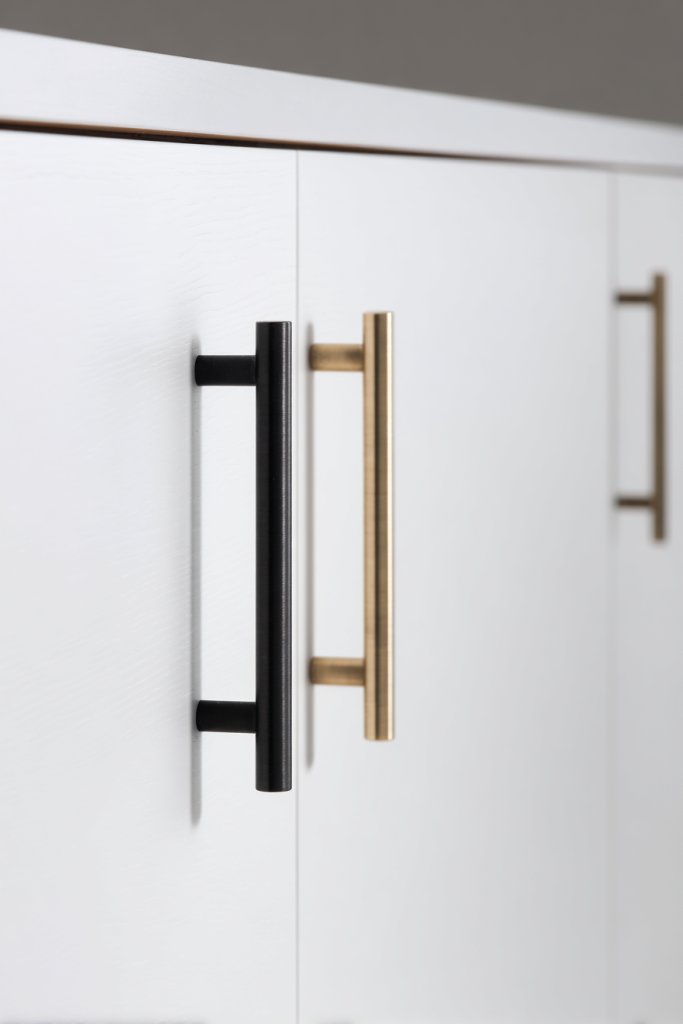
Old, worn-out handles can ruin even the most beautiful cabinetry. Upgrading to practical yet stylish handles can refresh your entire kitchen’s look. It’s a small detail that makes a big impact, instantly elevating your decor. Who knew hardware could be so transformative?
Visualize sleek brushed nickel handles on modern cabinets, or vintage brass pulls on shaker-style doors. The new hardware gleams softly, catching the light and adding a polished touch. The varied shapes—knobs, bar pulls, or ring pulls—add personality and functionality. The consistent hardware creates a cohesive, finished look.
Choose from matte, shiny, or textured finishes to match your overall style. For a rustic look, go for wrought iron or distressed finishes. During holidays, swap handles or add decorative knobs for seasonal flair. Mixing different styles can create an eclectic, personalized vibe—just keep the hardware consistent across cabinets.
Remove existing handles and measure screw spacing before buying new ones. Use a drill to install handles securely, ensuring they’re level and evenly spaced. If replacing vintage hardware, consider refinishing or painting for a custom look. Regularly tighten screws and clean handles to maintain their shine and function. For DIYers, choosing handles with simple mounting systems makes the process easier.
Incorporate decorative hardware with unique shapes or patterns to reflect your personality. Add custom engraving or paint details on plain knobs. Coordinate handle finishes with other metallic accents in your kitchen. Using different handle styles on upper and lower cabinets can add visual interest while maintaining harmony.
New hardware breathes fresh life into your cabinets and improves usability. It’s an affordable update with instant gratification. Once you see how a small change can elevate your entire kitchen, you’ll feel more confident tackling other upgrades. Go ahead, swap those handles and enjoy the transformation.
19. Color-Blocked or Two-Tone Cabinets for Visual Impact
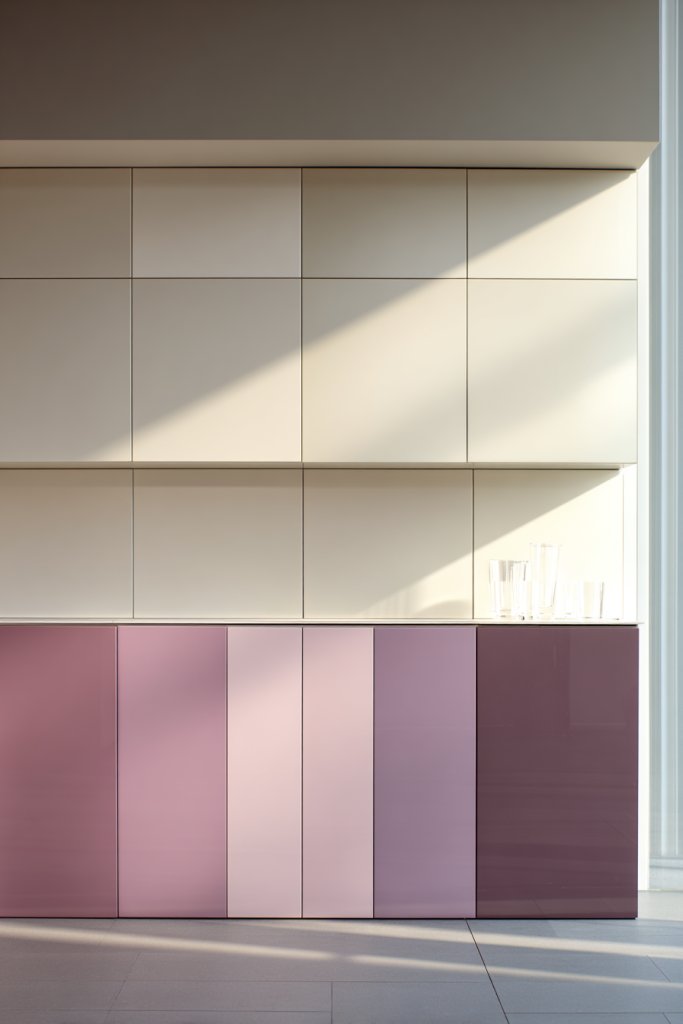
Feeling like your kitchen is missing depth or personality? Color-blocking or two-tone cabinets create a striking visual impact that transforms the space. It’s a bold move that adds dimension and modern flair. Who says kitchens have to be one color?
Imagine upper cabinets painted a crisp white, while lower cabinets are a deep navy or charcoal. The contrast draws the eye and adds architectural interest. The clean lines and sharp color divisions make the kitchen look more dynamic and layered. It’s a simple trick that makes your space stand out.
Combine complementary colors, like soft pastels with darker shades, or keep it monochrome with subtle variations. For smaller kitchens, light upper cabinets with darker bases can create an illusion of height. During seasons, experiment with bold or pastel combinations. Use different finishes—matte, gloss, or satin—to add texture.
Start by choosing a color palette that complements your countertops and flooring. Tape and prime the cabinets thoroughly before painting. Use high-quality, durable paint suitable for cabinetry, and apply in thin, even coats. For a seamless look, consider professional spraying. Let each coat dry completely before applying the next. Seal with a clear protective finish if desired.
Add decorative trims or contrasting edging to enhance the two-tone effect. Incorporate matching or contrasting hardware to emphasize the separation. Use decorative molding or paneling to frame or accentuate the color blocks. Personalize with stenciled patterns or painted motifs on cabinet doors for extra flair.
Color-blocked cabinets are a modern statement that boosts style and personality. They show confidence in your design choices and create a memorable space. Once you see the dramatic difference, you’ll be inspired to experiment with other color tricks and finishes. Your kitchen will become a true reflection of your bold style.
20. Decorative Backsplash with Artistic Elements
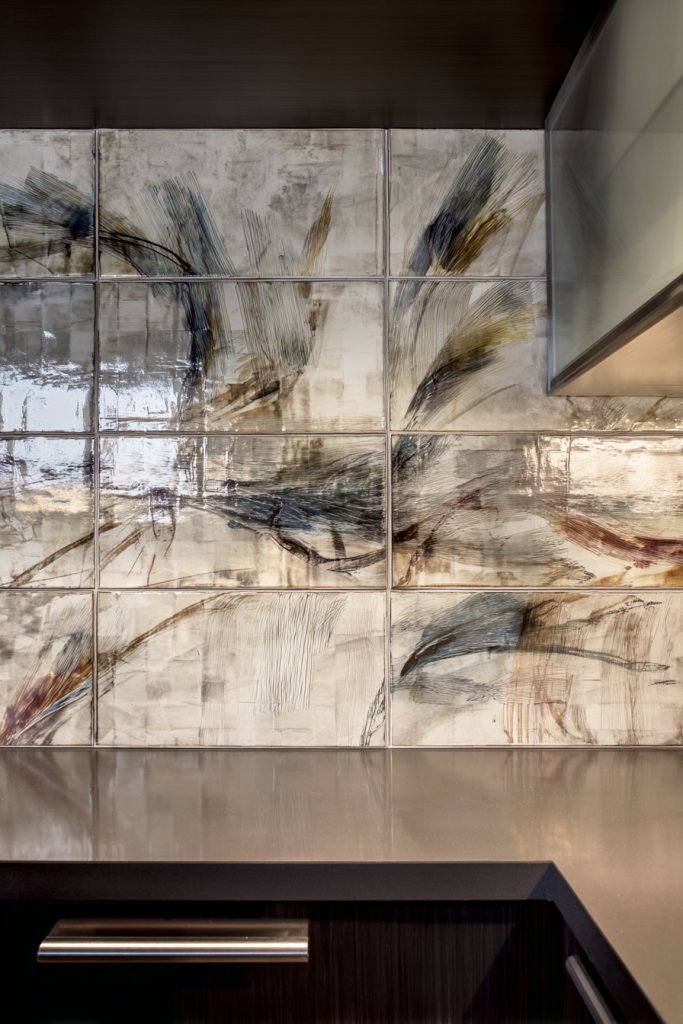
A plain backsplash can leave your kitchen feeling uninspired. Adding artistic elements transforms this space into a personal gallery that reflects your style. Whether hand-painted, metallic, or decal-based, artistic backsplashes make a bold statement. Ready to turn your kitchen into a work of art?
Visualize a hand-painted mural with abstract shapes or a metallic tile with embossed patterns. The artistic design becomes a focal point, drawing attention and sparking conversations. The textures and finishes—glossy, matte, or metallic—add depth and sophistication. It’s a canvas that captures your personality and creativity.
Use peel-and-stick decals for easy updates or hand-painted panels for a truly unique look. Metallic tiles in geometric patterns add a luxe touch. Incorporate hand-drawn motifs or motifs that match your decor theme, like botanical or abstract designs. Seasonal or holiday motifs can be added temporarily for variety.
Select materials that suit your style and cleaning needs—ceramic, glass, or metallic tiles. Prepare the wall surface thoroughly, then apply adhesive or grout carefully for a smooth finish. For painted designs, use high-quality paint and seal with a protective coat. Regular cleaning with gentle solutions maintains the artistic look. Consider framing the artistic panels for a gallery-like effect.
Incorporate your favorite colors or themes, like ocean blues or botanical greens. Add textured elements such as embossed tiles or layered decals for visual interest. Customize with initials or symbols painted into the design. Coordinate the backsplash with other decorative elements for a cohesive aesthetic.
An artistic backsplash elevates your entire kitchen’s aesthetic and showcases your personality. It’s a creative project that pays off visually and emotionally. Once completed, you’ll love how it turns your everyday cooking space into a piece of personal expression. Get ready for a wow factor!
21. Multipurpose Kitchen Nook or Breakfast Corner
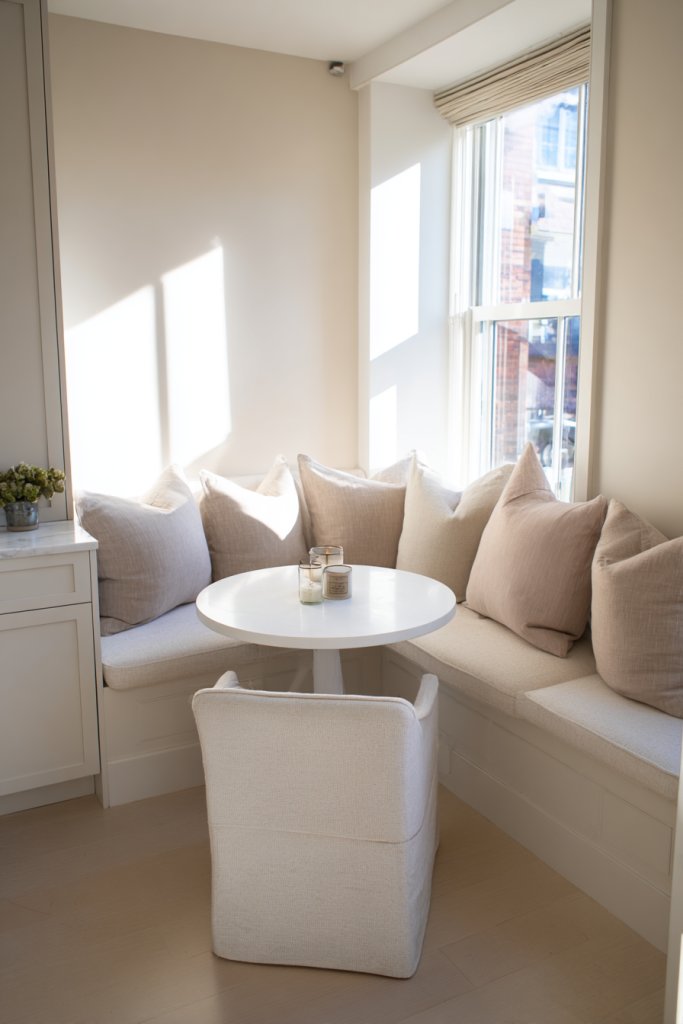
Limited space for casual dining or cozy mornings? A multipurpose kitchen nook or breakfast corner creates an inviting spot for quick meals and relaxed conversations. It maximizes small spaces by combining functionality and comfort. Want to make your kitchen feel more like a home?
Picture a corner with built-in bench seating upholstered in a soft fabric, paired with a small round table. Decorative cushions and a warm throw add comfort and personality. The space is framed with windows that flood it with natural light, making it perfect for mornings. A pendant or wall-mounted light enhances the cozy vibe.
Built-in seating can be customized with storage drawers underneath. Use a fold-down table for smaller spaces, or a fixed, custom-built nook for a permanent feature. Swap cushions seasonally for a fresh look. During holidays, add decorative touches like seasonal pillows or table runners for special occasions.
Design your nook to fit your space, ensuring enough room for comfortable seating and movement. Choose durable, easy-to-clean fabrics for cushions. Secure the bench to the wall if necessary, and select a table that complements the overall style. Install lighting that provides ample brightness without overwhelming the space. Regular maintenance includes cleaning cushions and refreshing decor.
Personalize your nook with decorative pillows in patterns or textures you love. Add a small shelf or hooks above for extra storage or display. Use a themed tablecloth or placemats to match your decor style. Incorporate artwork or photos nearby to make it more inviting.
A dedicated nook turns everyday meals into special moments and adds charm to your kitchen. It’s a space that encourages relaxation and socializing. Once you create your cozy corner, you’ll enjoy every sip and bite even more. Your kitchen just became the heart of your home.
Conclusion
With a diverse range of decor ideas, you now have the tools to create a kitchen that reflects your personality and enhances your cooking experience. Whether you’re drawn to cozy, rustic vibes or sleek modern designs, these ideas can be tailored to fit your space and style. Don’t wait—start experimenting with these concepts today and turn your kitchen into a beautiful, inspiring haven that you’ll love spending time in!