Imagine the perfect open kitchen where socializing and cooking come together seamlessly—sounds ideal, right? Open kitchen partition ideas are gaining popularity because they create a sense of spaciousness while still defining distinct areas, making your home feel both functional and inviting.
In this article, you’ll find a variety of creative and stylish partition ideas that can transform your kitchen into the ultimate social hub. From sleek sliding panels to charming decorative screens, these concepts cater to different tastes and spaces, helping you craft a welcoming environment for family and friends alike.
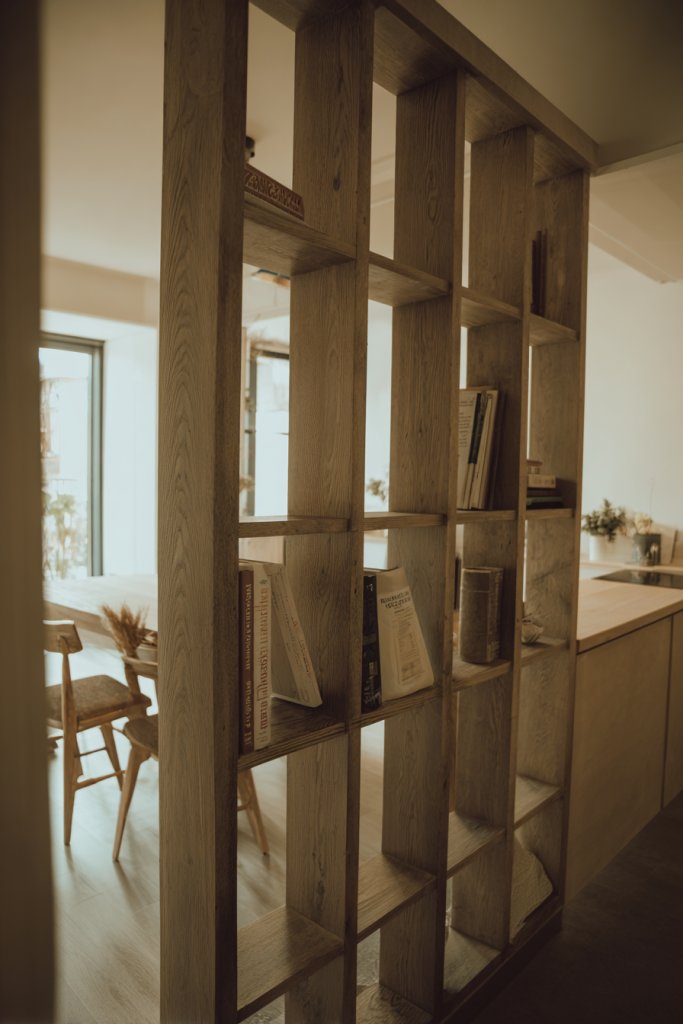
1. Freestanding Bookshelf Dividers to Create Cozy Zones
Ever feel like your open kitchen turns into a chaotic, sprawling space that lacks intimacy? Maybe you want cozy zones without sacrificing the airy feel. Finding a balance between separation and openness is tricky, especially when you crave both social interaction and privacy. The solution? A clever way to carve out distinct areas without full walls.
Imagine a tall, open-back bookshelf standing proudly between your cooking and dining zones. Its warm wood finish adds a homey vibe, while the open design invites light to flow through. Decorative baskets and books spill onto the shelves, adding personality and function. The whole setup creates a cozy nook perfect for relaxing or entertaining guests.
For a modern look, opt for sleek metal frames with glass shelves. In a rustic space, distressed wood works wonders. You can also paint the shelves in bold colors to add visual interest or use them as a backdrop for artwork or decorative items. Adjust the height or add wheels for versatility. Seasonal accents like soft throws or decorative pillows can also refresh the zones.
Start by measuring your space and choosing a bookshelf that fits comfortably. Look for open-back designs that don’t block sightlines. Secure the unit to the wall for safety, especially in homes with kids. Fill the shelves with a mix of books, baskets, and decorative objects to keep things functional and attractive. Position it where it naturally divides the space but allows easy movement.
Personalize with themed decor—like vintage kitchen tools or modern art pieces—that reflect your style. Use fabric bins to hide clutter and keep the look clean. For a softer touch, drape a cozy blanket over the side. You might also add a small reading lamp on the shelf for a warm glow during cozy evenings.
This simple addition transforms your open layout into inviting, functional zones. It encourages social gatherings while maintaining a sense of privacy. Plus, it’s easy to change up as your tastes evolve. Ready to create your own cozy corner? The possibilities are endless and totally customizable!
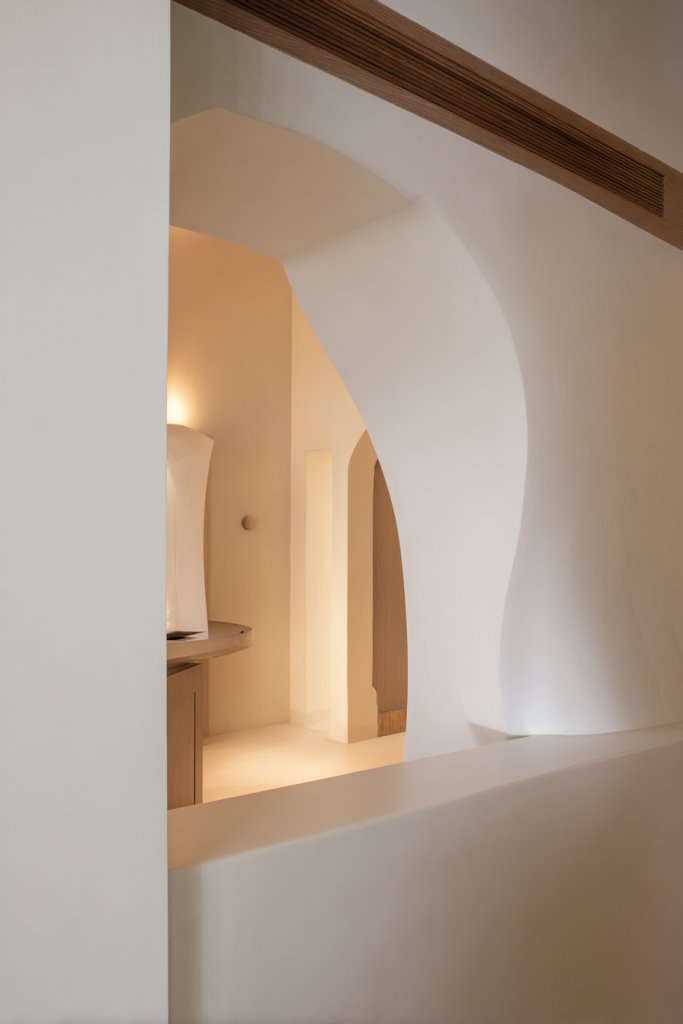
2. Half-Wall with Open Archway for an Elegant Flow
Ever wish you could define spaces without cutting off sight or natural light? Traditional walls feel heavy and restrictive, especially in open-concept layouts. What if you could create a subtle boundary that still invites conversation and interaction? Enter the half-wall with an open archway—an elegant solution.
Picture a low, sturdy wall topped with a graceful arch carved from smooth plaster or wood. It separates the kitchen from the dining area but leaves the top open for visibility. The arch adds a touch of classic elegance, while the open space underneath keeps the flow uninterrupted. Lighting fixtures or decorative trim can accentuate the arch, making it a focal point.
Choose materials that match your decor—smooth plaster for a sleek modern look, reclaimed wood for rustic charm, or painted drywall for versatility. The height of the wall can vary depending on how much separation you desire. Incorporate built-in shelves or ledges on the wall for decorative or functional purposes. Seasonal decor like string lights or fabric drapes can add a cozy or festive touch.
Begin by planning the wall’s dimensions and selecting a suitable material. Construct the half-wall with sturdy framing, then finish with drywall or wood paneling. Form the arch with a template or custom mold, ensuring smooth curves. Finish with paint or stain to match your style. Ensure the structure is stable and secure, especially if placing it on a load-bearing surface. Incorporate electrical or lighting features if desired.
Add decorative molding or trim around the arch for a refined look. Use contrasting paint colors to highlight the arch shape or keep it monochrome for subtlety. You can also install a small ledge or shelf on top of the wall for plants, candles, or artwork—just avoid cluttering the space. Consider adding a built-in bench or seating area at the base for extra functionality.
This design creates a delicate balance between separation and openness, perfect for social homes. It adds architectural interest without overwhelming the space. With a few simple steps, you can elevate your layout into a stylish, functional zone. Ready to define your space with elegance? You’re only a few steps away from the perfect flow!
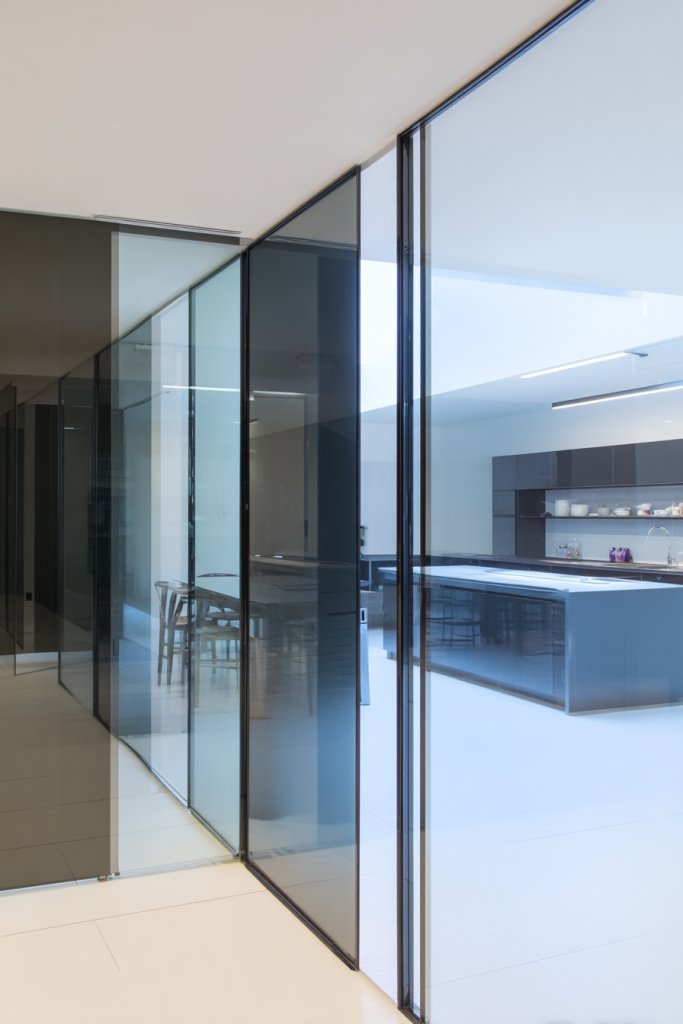
3. Glass Panel Partitions for a Modern, Transparent Look
Want to separate your kitchen and dining areas but hate the idea of blocking natural light? Glass panels offer a sleek, modern solution that keeps your space feeling open and airy. They create a subtle boundary without sacrificing visibility or brightness. Who says you need solid walls to define spaces?
Imagine clear glass panels stretching from floor to ceiling, framed with slim metal or minimalist trim. The transparency allows light to pass freely, illuminating both zones. Frosted or textured glass adds privacy while still maintaining a contemporary vibe. The sleek surface reflects light, making your space feel larger and more sophisticated.
Choose from frameless, semi-framed, or fully framed options depending on your style. Incorporate sliding or swinging doors for flexibility. Decorate the glass with subtle etching or decals for privacy and personality. The panels can be fixed or operable, allowing you to open up or close off spaces easily. Match the framing to your hardware and fixtures for a cohesive look.
Start by measuring the area and selecting the appropriate glass thickness and style. Hire professionals for precise installation, especially if opting for large panels. Prepare the surfaces by cleaning and marking where the frames will go. Install the frames securely, ensuring they are level and stable. Seal edges properly to prevent drafts or moisture ingress. Consider adding a track system for sliding panels if flexibility is desired.
Add decorative film or tinting to the glass for a custom look or additional privacy. Incorporate sleek handles or pulls that match your hardware. For a softer touch, pair the glass with textured or fabric curtains that can be drawn when needed. Use lighting behind or along the panels to emphasize their modern appeal.
Glass partitions blend function with style, creating a spacious, bright environment. They’re perfect for contemporary homes that value openness without sacrificing separation. With minimal maintenance and maximum impact, they make your space feel luxe and inviting. Ready to upgrade your layout with a transparent touch? You won’t regret it.
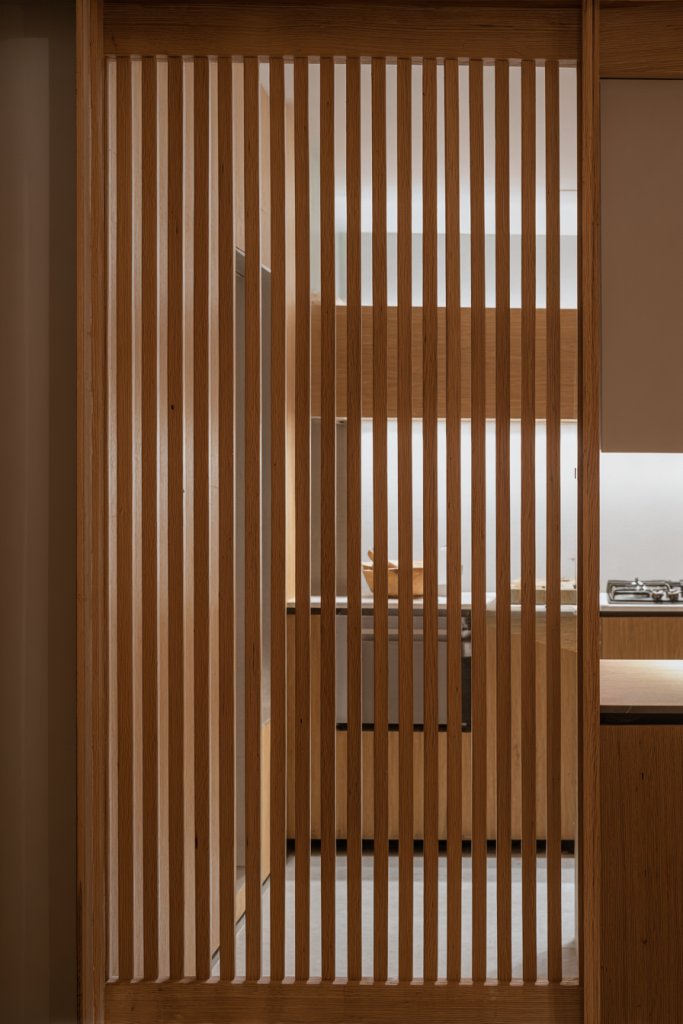
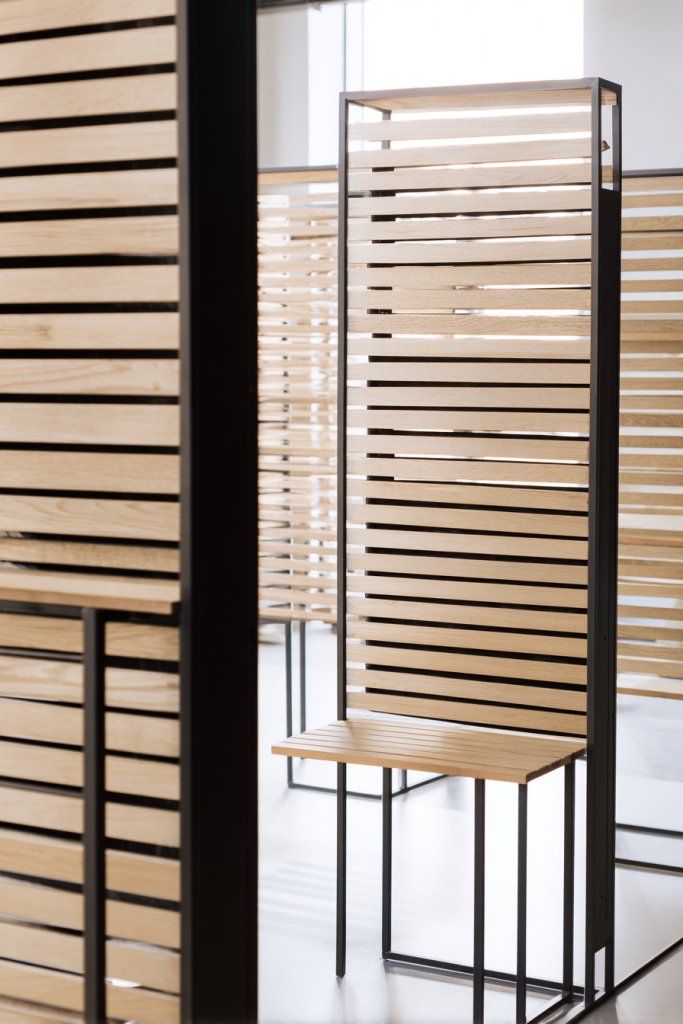
4. Wooden Slat Screens for Warm, Textured Separation
Looking for a way to add warmth and texture to your open kitchen? Wooden slat screens are an eye-catching solution that creates visual separation without feeling heavy. They introduce natural elements that make your space feel cozy and inviting. Plus, they work well with a variety of decor styles from rustic to modern.
Picture a vertical array of evenly spaced wooden slats forming a semi-private barrier. The natural wood grain varies from light oak to dark walnut, adding depth and character. When light filters through the gaps, it creates playful shadows on the floor and walls. The slats serve both aesthetic and functional purposes, defining zones with subtle elegance.
Opt for different wood types, finishes, or orientations—vertical, horizontal, or diagonal—to match your decor. You can make the slats fixed or adjustable for flexibility. Incorporate LED lighting behind the panels for a warm glow at night. To soften the look, drape textiles or add decorative trim at the ends. For a more industrial feel, pair with metal frames or hardware.
Begin by choosing durable, high-quality wood suited for indoor use. Measure your space and determine the panel height and width. Secure a sturdy frame or track system to hold the slats in place. Attach the slats with screws or brackets, ensuring even spacing and stability. Finish with a protective sealant or stain to enhance durability and color. Consider modular options for easy removal or reconfiguration.
Customize with different wood stains or paints, from natural finishes to bold colors. Add decorative accents like carved patterns or embedded LED strips for extra flair. Incorporate planters or small shelves between the slats for functional decor—just avoid overloading to keep the light flowing. You can also extend the slats to create partial walls or ceiling-high screens.
Wooden slat screens bring a natural, textured element into your open space, making it feel warm and layered. They’re versatile and customizable to match your style, adding architectural interest. This simple feature can elevate your decor while maintaining the open, social vibe you love. Ready to introduce warmth and texture? It’s easier than you think!
5. Movable Room Dividers for Flexible Social Spaces
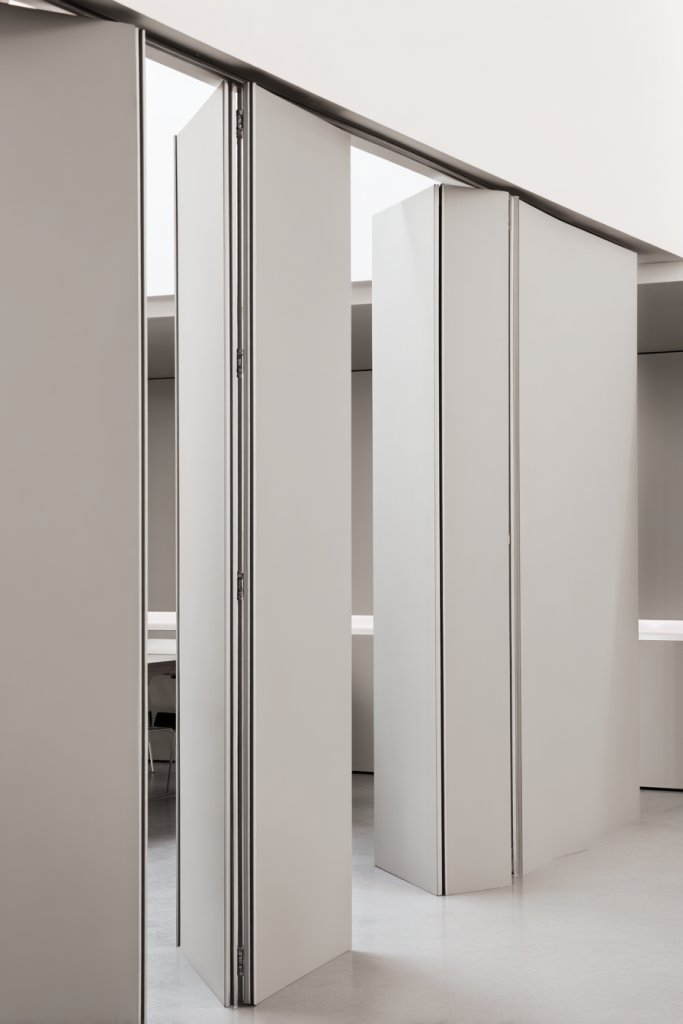
Ever wish your space could adapt on the fly? Fixed walls and partitions often feel limiting, especially when hosting or rearranging for different occasions. Movable room dividers offer a flexible way to create private zones or open up the layout instantly. They’re perfect for dynamic households that need versatile spaces.
Visualize lightweight folding screens or sliding panels that can be pushed aside when not needed. They come in various materials—fabric, wood, or even lightweight metal—each adding its own style. When closed, they form a colorful or textured barrier; when open, they disappear into a closet or corner. The ease of movement makes your space adaptable for any event.
Choose from accordion-style fabric panels for softness or wooden slats for a natural look. Use wheels or tracks to facilitate smooth movement. Decorate the dividers with fabric covers, decals, or paint to match your decor. For a more upscale vibe, opt for lightweight glass panels that can be easily moved or stored. You can even combine different materials for a custom look.
Start by selecting lightweight, durable materials that suit your style and frequency of use. Install tracks or hinges that allow for easy sliding or folding. Make sure the dividers are stable and won’t tip over easily—adding locks or stoppers can help. Keep storage in mind—choose a corner or closet to tuck away the dividers when not in use. Regular cleaning and maintenance will keep them looking fresh.
Personalize with fabric patterns, colors, or painted designs to reflect your personality. Use curtain hooks or magnetic attachments for quick changes. Incorporate storage pockets or hooks for keys and small items to boost functionality. You can even add lightweight decorative elements like tassels or trims for a playful touch.
Movable dividers transform your space into a multi-functional hub, perfect for socializing or quiet moments. They’re adaptable, affordable, and easy to install—no need for major renovations. With just a little creativity, your home can be as flexible as your lifestyle. Ready to make your layout more versatile? The choice is yours!
6. Open-Frame Metal Partitions with Geometric Patterns
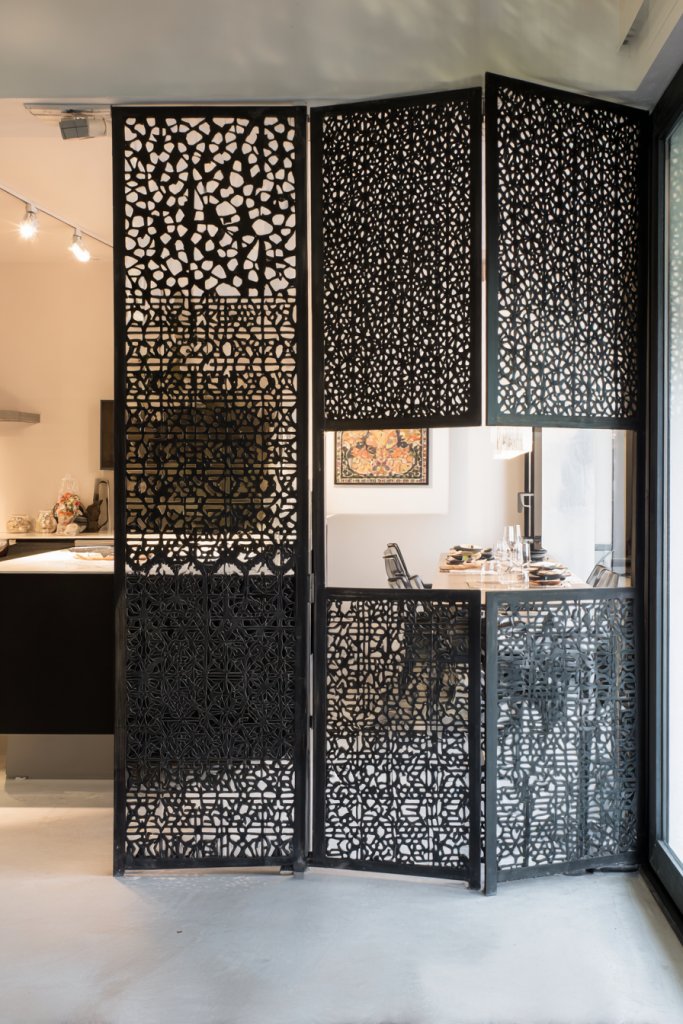
Want to add an industrial chic vibe to your open kitchen without sacrificing openness? Metal partitions with geometric cutouts are the perfect blend of style and function. They create visual interest, define spaces, and keep that modern edge alive. Who says partitions have to be boring?
Think of a sleek black metal frame with intricate geometric patterns—triangles, hexagons, or abstract shapes—that act as a stylish divider. When light passes through the cutouts, it creates captivating shadows on the floor. The open frame maintains sightlines while clearly marking boundaries. It’s a statement piece that elevates your entire space.
Opt for powder-coated finishes in matte black, brushed nickel, or even brass to match your hardware. Use different pattern densities—more-open designs for airy feel, denser patterns for privacy. Incorporate glass inserts within the frames for a mix of transparency and texture. Adjust the height for a subtle or bold statement, depending on your needs.
Start by designing or sourcing a custom metal frame with your preferred pattern. Measure your space carefully and ensure the frame is securely anchored to the ceiling or floor. Use professional welders or fabricators for precise cuts and sturdy construction. Attach the frame with strong brackets and ensure smooth operation if it’s a movable panel. Seal all edges for safety and durability.
Customize by adding LED backlighting behind the panels for a dramatic effect at night. Paint the metal in contrasting or metallic finishes for extra flair. Mix and match patterns or combine with other materials like wood or glass for a layered look. Keep maintenance simple by wiping down the metal surfaces regularly.
Geometric metal partitions are a bold way to introduce modern sophistication and artistic flair. They’re durable, low-maintenance, and endlessly customizable. Your space will feel more curated and stylish, impressing guests and elevating your decor game. Ready to add an industrial touch with a twist? The design possibilities are endless!
7. Counter-Height Bar or Breakfast Bar as a Functional Divider
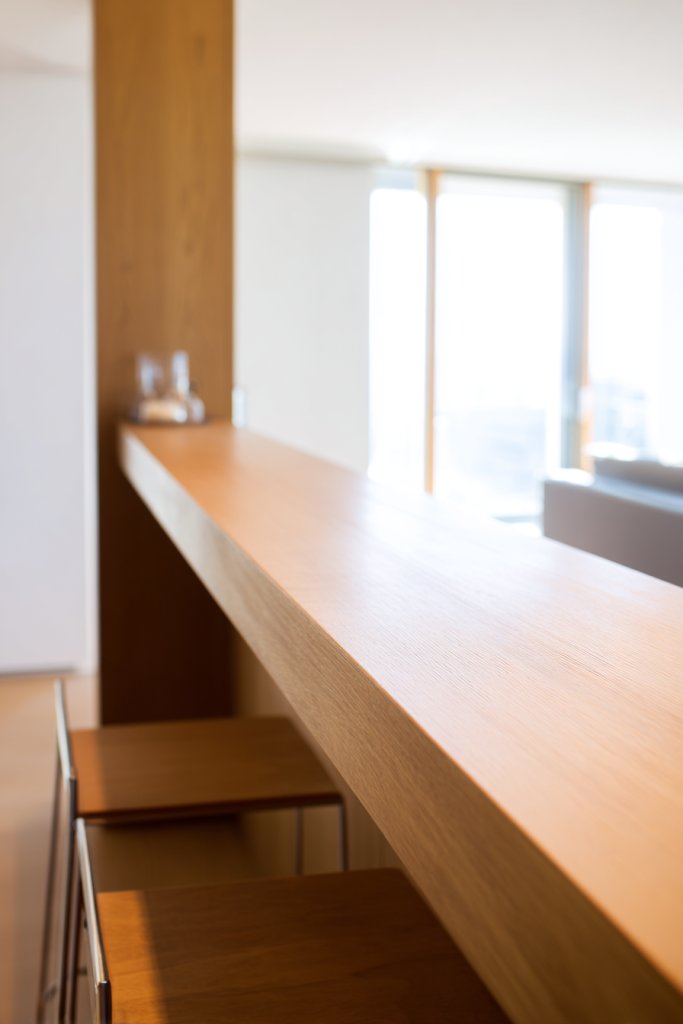
Looking for a practical way to separate your kitchen from your dining or living space? A counter-height bar or breakfast bar can do double duty—serving as a divider and a social hub. It promotes interaction while defining zones, all without losing the open feel. Who says boundaries can’t be functional and fun?
Imagine a sleek, elevated counter running along the edge of your kitchen, topped with a durable surface like granite or wood. It’s lined with stylish stools that invite casual chats or quick bites. The bar creates a natural visual break, yet remains part of the overall flow. Pendant lights or decorative fixtures above enhance its presence.
Choose materials and finishes that complement your decor—industrial metal, warm wood, or polished stone. Adjust the height and length to fit your space and needs. You can also incorporate storage underneath or add a built-in wine rack or shelves for extra functionality. For a cozy vibe, add cushions or upholstered stools.
Start by measuring your space and deciding on the bar’s dimensions. Build or purchase a sturdy base, ensuring it’s level and securely anchored. Finish with a countertop material that’s resistant to spills and heat. Attach decorative or functional elements like hooks or small shelves. Ensure enough clearance for comfortable seating and movement.
Add decorative trim, paint, or staining to match your style. Personalize with custom cushions, themed decor, or lighting accents. If you love entertaining, install a small wine fridge or prep station behind the bar. Keep it clutter-free with hidden storage for utensils and accessories.
A breakfast bar isn’t just functional—it becomes a social centerpiece. It encourages casual gatherings and makes everyday routines more enjoyable. With simple materials and a bit of flair, it’s easy to create a stylish, practical divider that boosts your space’s vibe. Ready to elevate your layout? The bar is set!
8. Plant Stand Walls with Potted Greenery for a Natural Barrier
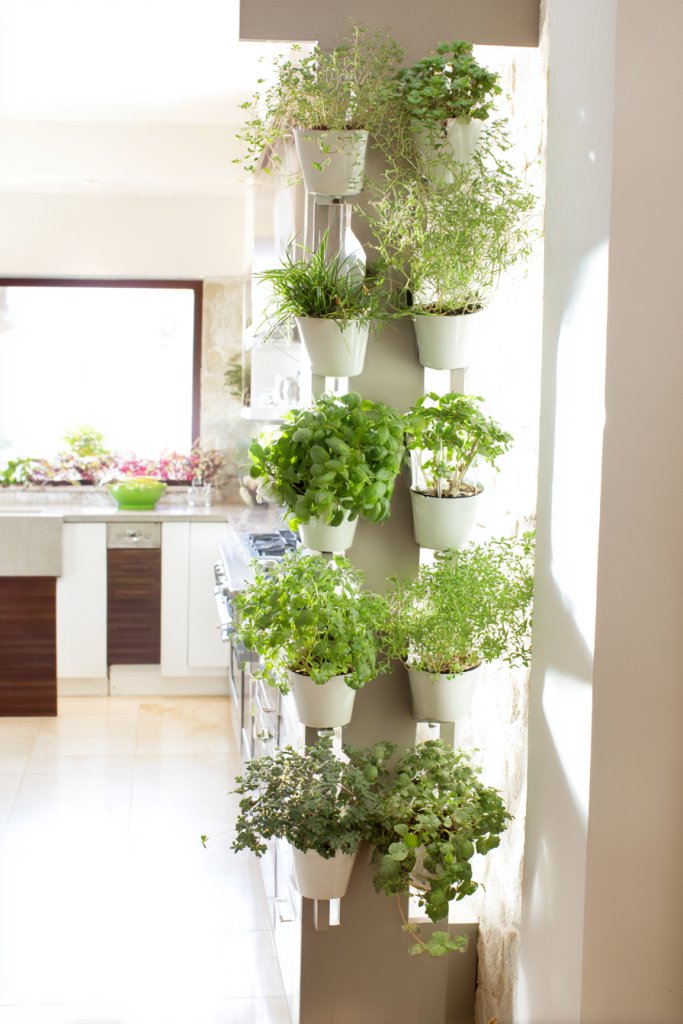
Want to infuse your open kitchen with fresh energy and a touch of nature? While plants are fantastic, they often get overlooked as part of the decor. A vertical plant stand wall creates a lively, natural barrier that’s both beautiful and functional. Who says you need walls to bring the outdoors in?
Envision a series of tall, narrow plant stands or shelves filled with lush potted greenery—ferns, succulents, or trailing vines. The vibrant green contrasts beautifully against neutral walls, making the space feel alive. Hanging or cascading plants soften the boundary, creating a lush curtain that invites curiosity and calm. The sound of rustling leaves adds to the ambiance.
Use different heights and types of planters—ceramic, woven baskets, or minimalist metal containers. Incorporate a mix of tall and trailing plants for visual interest. Seasonally, swap out plants to suit sunlight and humidity. You can also add decorative stones or pebbles for a finished look. To keep maintenance easy, opt for low-maintenance varieties or self-watering planters.
Choose sturdy, adjustable plant stands or wall-mounted shelves. Arrange them in a pattern that allows for easy watering and care. Position the stands near natural light sources, but avoid direct sun for delicate plants. Use waterproof trays or mats underneath to protect surfaces. Regularly prune and water to keep the greenery healthy and vibrant. Combine with other natural decor elements like textured baskets or wooden accents.
Incorporate decorative plant pots in various styles and colors to reflect your personality. Add small fairy lights or subtle string lights around the plants for evening ambiance. Use decorative stones or shells at the base for a personal touch. You might also include small sculptures or natural ornaments among your plants to create an artistic display.
A plant stand wall turns your space into a refreshing oasis, boosting mood and air quality. It’s a natural, cost-effective way to define zones with style. With a little effort, you can craft a lush, green backdrop that’s uniquely yours. Ready to embrace your inner gardener? It’s easier than you think!
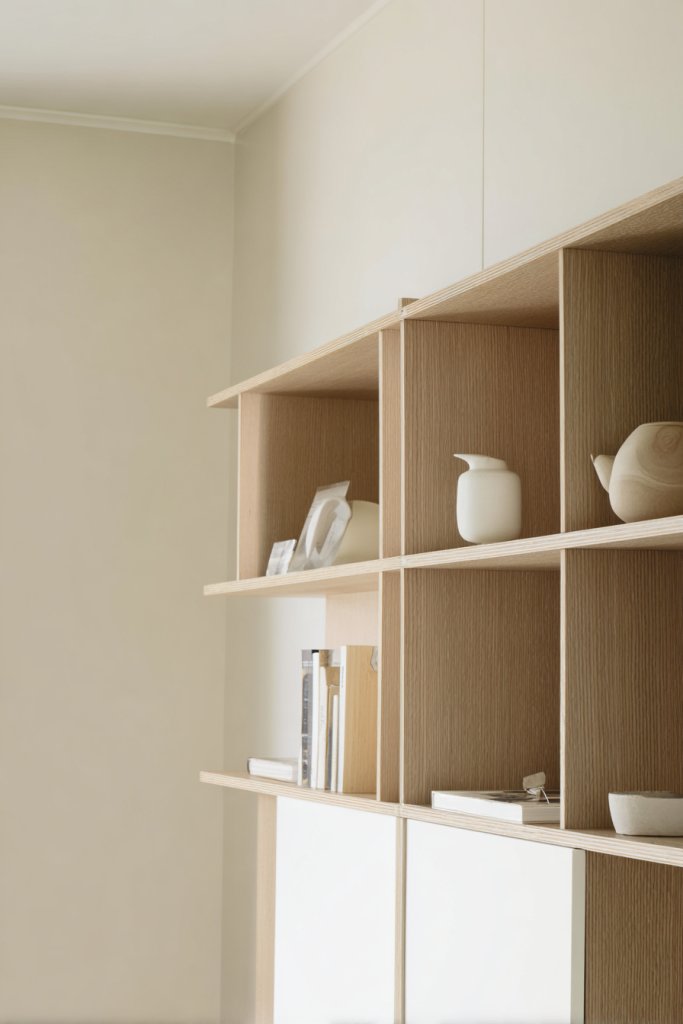
9. Low Storage Cabinets with Open Shelves for Practicality
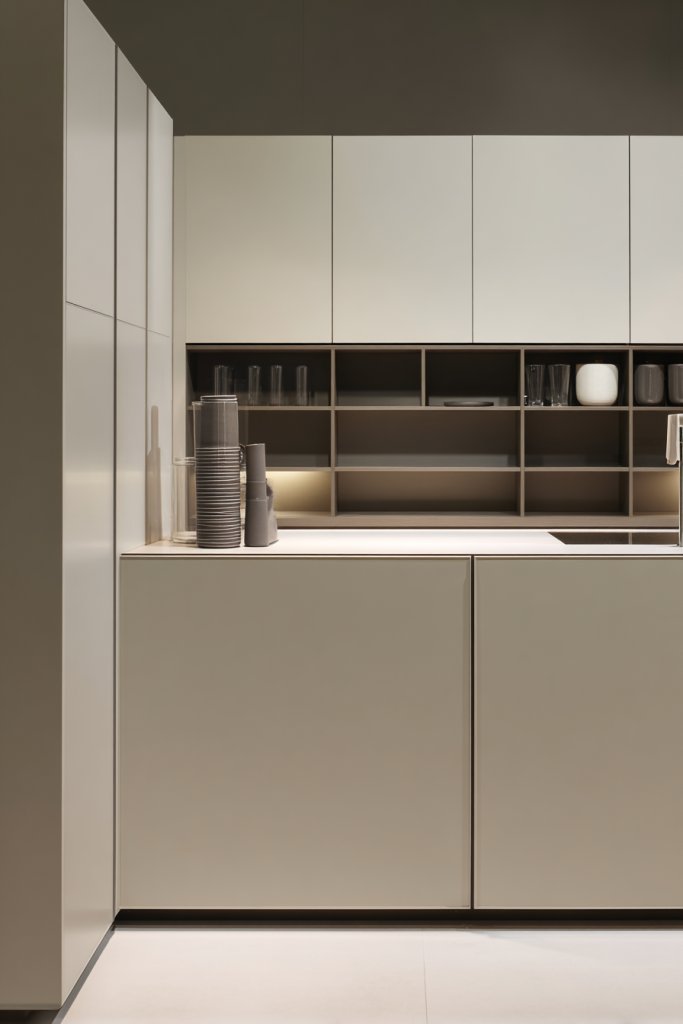
Need a functional yet stylish way to organize your kitchen and dining zones? Low storage cabinets topped with open shelves strike the perfect balance. They hide clutter while displaying your favorite dishes or decorative items. Who says practical can’t be pretty?
Imagine a sleek, low-profile cabinet with a smooth finish, topped with open shelves displaying colorful plates, bowls, or glassware. The combo creates a clean, organized look that’s easy to access. The open shelves brighten the space and add a layer of visual interest, breaking up the solidity of the cabinets below. It’s both a storage solution and a design feature.
Opt for closed cabinets in modern, minimalist styles or vintage-inspired wood finishes. Use open shelving for everyday items or decorative pieces that reflect your personality. Incorporate baskets or boxes for hidden storage inside the cabinets. Adjustable shelves allow customization based on your storage needs, while colorful or textured backs on the open shelves add depth.
Select low cabinets that fit your space and style. Install sturdy wall brackets or legs, and ensure the cabinets are level. Mount the open shelves securely above the cabinets, leaving enough space for easy access. Use matching hardware for a cohesive look. Fill the cabinets with everyday essentials, and decorate the open shelves with a curated selection of dishes or decors. Keep the layout flexible for future updates.
Personalize with decorative knobs or handles, perhaps in metallic or colorful finishes. Mix in decorative containers or jars on the open shelves for a curated feel. Incorporate seasonal or themed decor to keep things fresh. Use fairy lights or LED strips under the shelves for a warm glow in the evenings.
This combination of storage and display keeps your space organized and inviting. It makes everyday routines more efficient while adding visual charm. With a few simple choices, you can create a versatile, stylish boundary that adapts to your needs. Ready to boost your space’s practicality and style? It’s closer than you think!
10. Curved or Rounded Partial Walls for Soft Segmentation
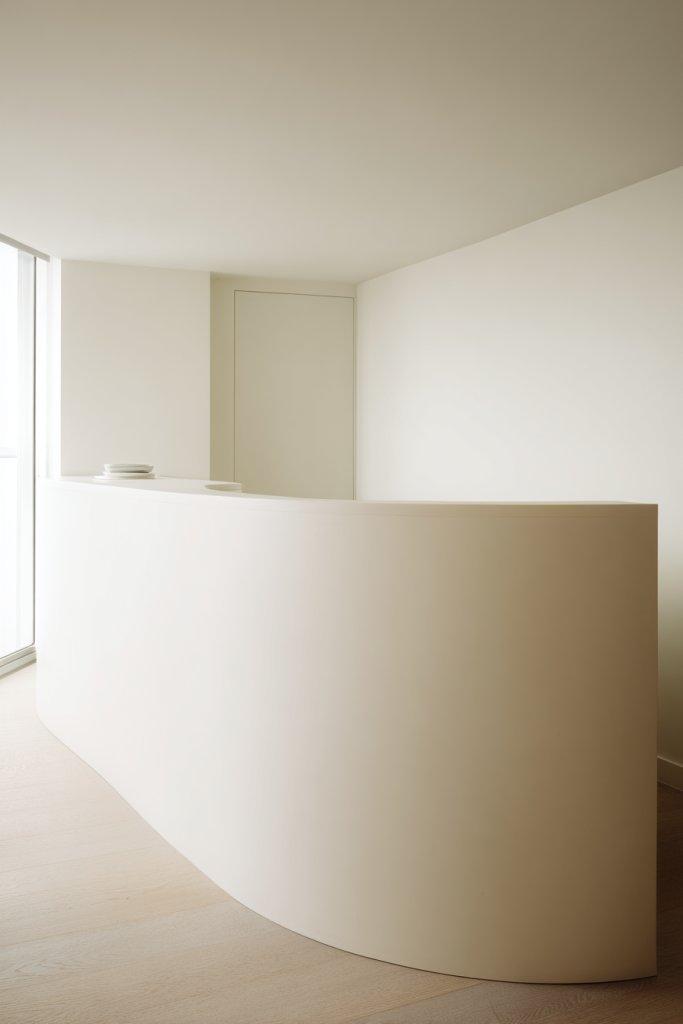
Looking to add a bit of softness and flow to your open kitchen? Straight lines can sometimes feel harsh or rigid, especially in cozy spaces. Curved or rounded partial walls introduce gentle contours that create a more inviting and dynamic environment. Who says boundaries have to be straight?
Visualize a smooth, rounded wall section that curves naturally into your space, finished in warm plaster or painted in a soothing color. Its gentle arc guides the eye and encourages movement. When light hits the curve, it casts soft shadows, adding depth and interest. This design element creates a harmonious transition between zones.
Choose materials that match your decor—smooth plaster, textured stucco, or painted MDF for versatility. The radius of the curve can be subtle or pronounced, depending on your space. Incorporate built-in niches or small shelves along the curve for decorative accents. Keep the design simple for a minimalist look or add decorative trim for elegance.
Begin by sketching the curved layout and choosing your materials. Build a framework that follows the arc, then finish with drywall, plaster, or other suitable materials. Sand and smooth the surface for a polished look. Paint or finish in your desired color, ensuring seamless transitions with adjoining walls. Consider lighting accents like LED strips along the curve for a subtle glow.
Decorate the curve with textured wall coverings or subtle patterns that complement your overall decor. Add small, curved niches to display plants, art, or functional items—just avoid clutter. For a more dramatic effect, use contrasting colors or finishes on the inner and outer surfaces of the curve. Keep the design simple to maintain a calm, flowing vibe.
Curved walls soften the overall aesthetic and introduce a sense of movement. They’re a tasteful way to break up space without heavy barriers. With a little planning and finesse, you can craft a flowing, elegant environment that invites exploration. Ready to embrace gentle curves? The design potential is limitless!
11. Open-Back Modular Partitions for Customization
Ever wished your space could adapt to different gatherings or moods? Fixed partitions limit flexibility, but open-back modular panels offer a customizable solution. They let you tailor your layout on the fly, whether for intimate dinners or large parties. Who says your space can’t be versatile?
Picture lightweight, freestanding panels with open backs that can be rearranged or removed as needed. Made from wood, metal, or fabric, they come in various sizes and patterns. When assembled, they form a flexible barrier that can transform your space instantly. During the day, they stay tucked away; during entertaining, they become the perfect divider.
Choose panels with different patterns or textures—lattice, slats, or fabric-covered screens—to match your decor style. Use lightweight materials for easy movement, or heavier ones for added stability. Mix and match panels to create unique configurations. Incorporate wheels or hinges for effortless reorganization. Customize with decorative finishes or colors to suit your aesthetic.
Start by designing your ideal layout and selecting the panel sizes. Install sturdy bases or tracks that allow for easy movement. Secure panels with connectors or hinges if you want more stability. Test different configurations to find what works best for your space. Keep storage in mind—set aside a corner or closet for panels when not in use. Regularly check for wear and tear.
Decorate panels with paint, fabric, or decals to reflect your personality. Add hooks or small shelves for functional storage. Incorporate subtle lighting behind or along the panels for ambiance. Use contrasting colors or patterns to create visual interest. Change configurations seasonally or for special occasions to keep things fresh.
Modular partitions give your home a dynamic, personalized feel. They’re easy to adapt without major renovations, making your space truly yours. With a little effort, you can craft a flexible environment that suits any occasion. Ready to customize your layout? The possibilities are endless!
12. Industrial Pipe and Wood Screen for Rustic Charm
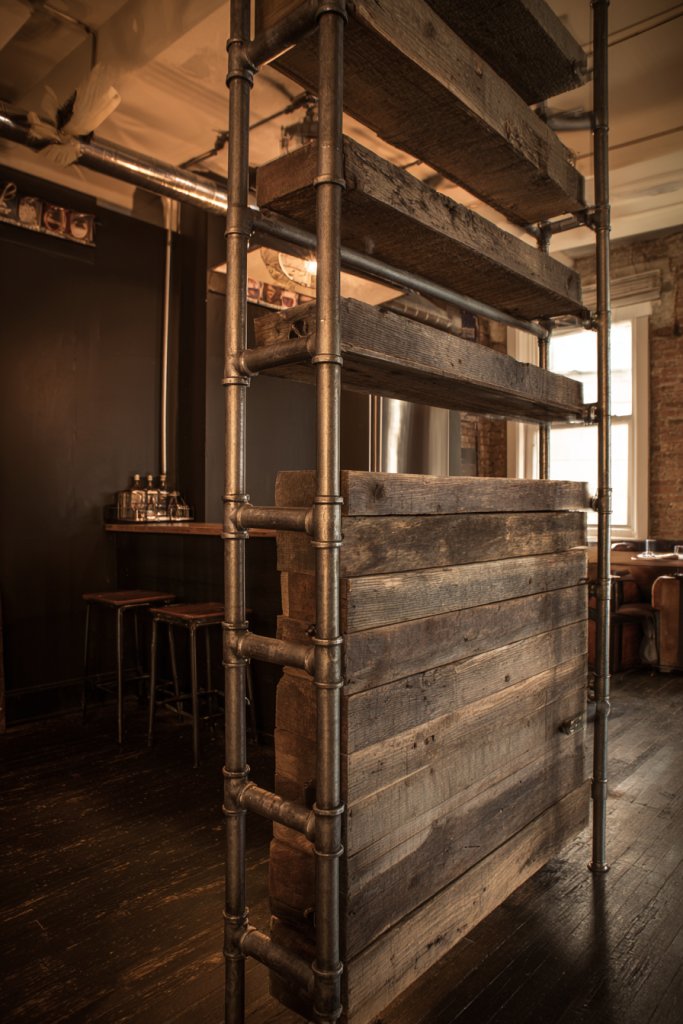
Seeking a rustic, industrial vibe that also functions as a partition? Combining raw metal piping with reclaimed wood creates a striking focal point that separates spaces with style. It’s rugged, charming, and endlessly customizable. Who says your open kitchen can’t have a bit of edge?
Picture heavy black metal pipes forming a frame, with reclaimed wood planks filling in the gaps. The combination exudes rugged charm, with visible bolts and welds adding to the industrial aesthetic. When light hits the wood, it highlights its grain and imperfections, emphasizing authenticity. The structure acts as a semi-permanent divider that adds character.
Choose different pipe diameters or finishes—matte black, brushed nickel, or antique brass—to match your decor. Incorporate shelves or hooks within the pipe framework for added function. Use reclaimed or weathered wood for a vintage look or smooth stained wood for a polished finish. Adjust the height and width according to your space and style preferences.
Start with detailed measurements and sourcing quality pipes and wood. Connect the pipes securely with elbows, tees, and flanges, ensuring stability. Attach the wood panels with screws or brackets to the pipe frame. Seal the wood with protective finishes to prevent damage. Anchor the entire structure securely to the floor and ceiling if necessary. Consider adding lighting or hooks for extra flair.
Personalize with decorative elements—metal numbers, vintage signs, or custom engravings. Mix in different wood tones or finishes for a layered look. Add small potted plants or LED strip lights behind the frame to enhance ambiance—just avoid actual greenery if restricted. Keep maintenance simple by wiping down metal surfaces regularly.
This industrial pipe and wood screen bring rugged elegance and functional separation. It’s durable, stylish, and flexible enough to suit various spaces. With a bit of DIY effort, you can craft a statement piece that elevates your entire decor. Ready to embrace rustic charm? The industrial look is more attainable than you think!
13. Hanging Pendant or Bead Curtains for a Boho Touch
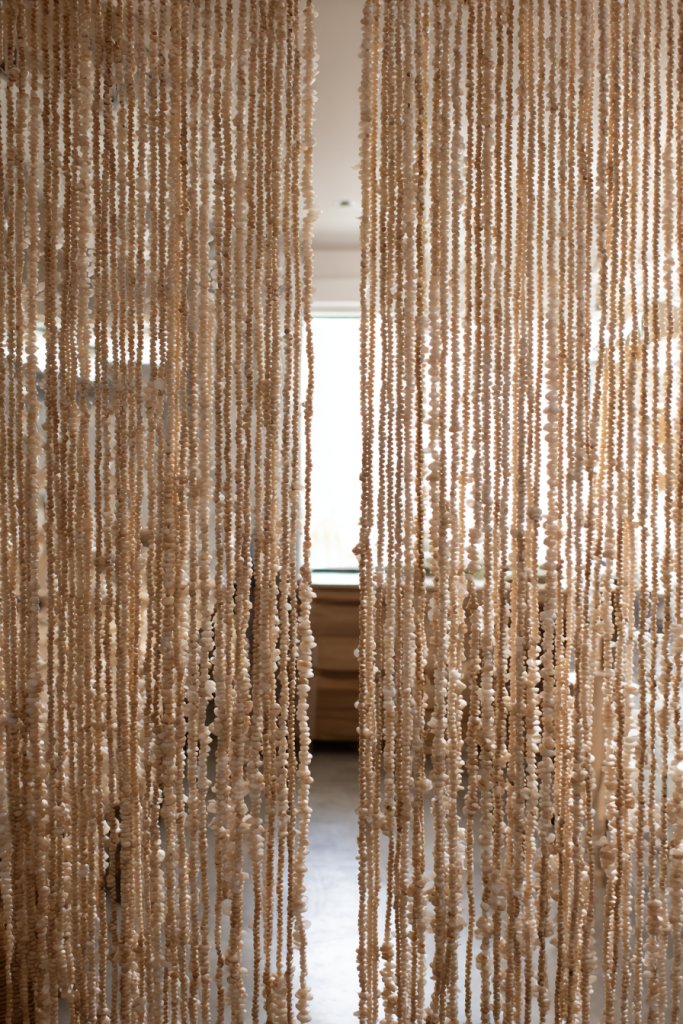
Want a quick, stylish way to add a boho vibe and flexible separation? Hanging curtains made of beads or pendant fixtures bring texture and movement to your space. They’re easy to install, affordable, and instantly transform an open area into a cozy retreat. Who says you need solid walls to create privacy?
Visualize long strands of wooden beads, glass, or fabric hanging from a decorative rod or ceiling hook. These curtains sway gently with airflow, creating a soft barrier that invites curiosity. When drawn aside, they reveal an open, welcoming space. The natural textures and warm tones add a relaxed, bohemian charm that’s perfect for casual gatherings.
Choose between beads, shells, or fabric strips for different textures. Customize lengths for partial or full coverage. Mix colors and materials for a layered, eclectic look. Pair with decorative rods, hooks, or even mobile chains. For seasonal updates, swap out the curtains for different styles or colors.
Install a sturdy ceiling hook or rod at the desired height. Hang the curtains using durable loops or hooks, ensuring they are evenly spaced. Adjust the length to suit your needs—shorter for partial separation, longer for full coverage. Keep the curtains clean by dusting regularly or washing fabric options. You can also add small charms or decorative elements to personalize.
Decorate with personalized charms, tassels, or mini lanterns for added charm. Use color schemes that complement your decor—earth tones, metallic accents, or bright hues. Incorporate LED fairy lights behind the curtains for a cozy glow at night. Update the look seasonally with new beads or fabrics.
Hanging curtains are a playful, easy way to define space with style. They add texture and warmth, creating a relaxed, inviting atmosphere. With minimal effort, you can switch up the look whenever you like. Ready to add a boho touch? The options are endless and fun to experiment with!
14. Multi-Level Platforms as a Subtle Divider
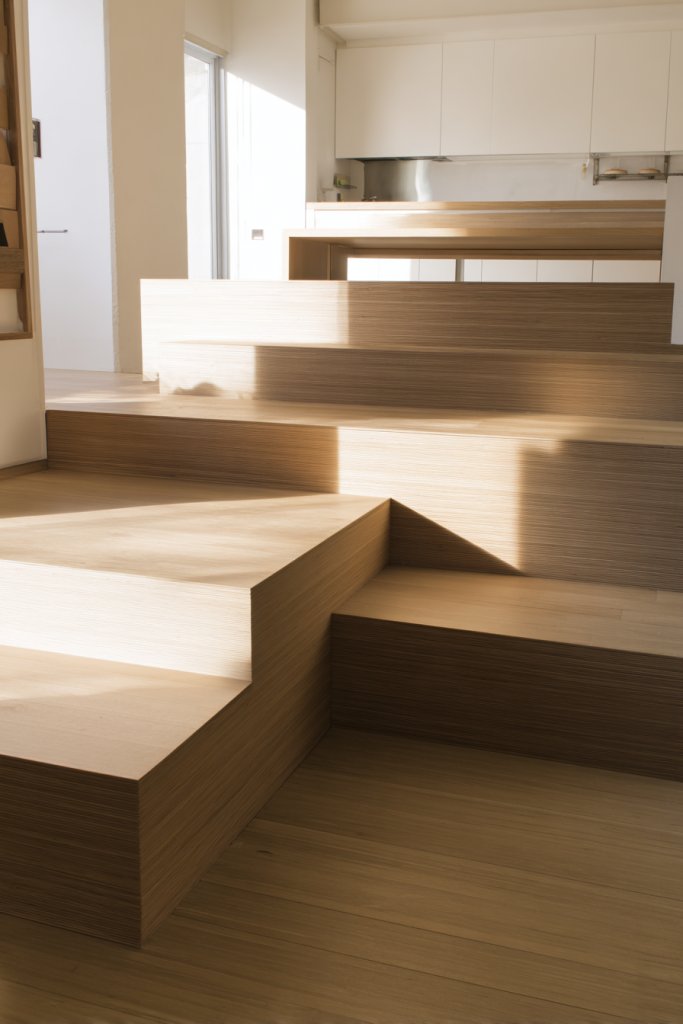
Looking for a way to add dimension and separation without heavy walls? Multi-level platforms create visual interest and define zones subtly. They elevate parts of your space, making it feel dynamic and layered. Who says you can’t have a little elevation in an open layout?
Imagine a small step-up platform in the cooking area, topped with a soft rug or textured flooring. It visually separates the space while maintaining flow. When you step onto the platform, it feels like entering a dedicated zone. The difference in height creates a natural boundary that’s both functional and stylish.
Use different flooring materials—wood, tile, or carpet—to create varied levels. Design the platform with rounded or straight edges to suit your aesthetic. Incorporate built-in storage or seating on the lower or upper levels. Seasonal accessories like cushions or throws can make the platform inviting and cozy.
Start by measuring your space and planning the height differences. Build sturdy platforms with appropriate supports and framing. Finish with your chosen flooring material, ensuring safety and slip resistance. Connect the levels seamlessly, and add safety features like handrails if necessary. Use decorative borders or trim to enhance the look.
Add textured rugs or mats to define each level further. Incorporate built-in storage or seating for extra functionality. Decorate with cushions, small tables, or lighting fixtures to create cozy corners. Change accessories seasonally or for different occasions.
Multi-level platforms bring a sense of architecture and purpose to open spaces. They’re a simple way to create zones that feel natural and inviting. With thoughtful design, you can craft a space that’s both practical and visually captivating. Ready to elevate your layout? The possibilities are endless!
15. Built-In Seating with Backrests as a Functional Barrier
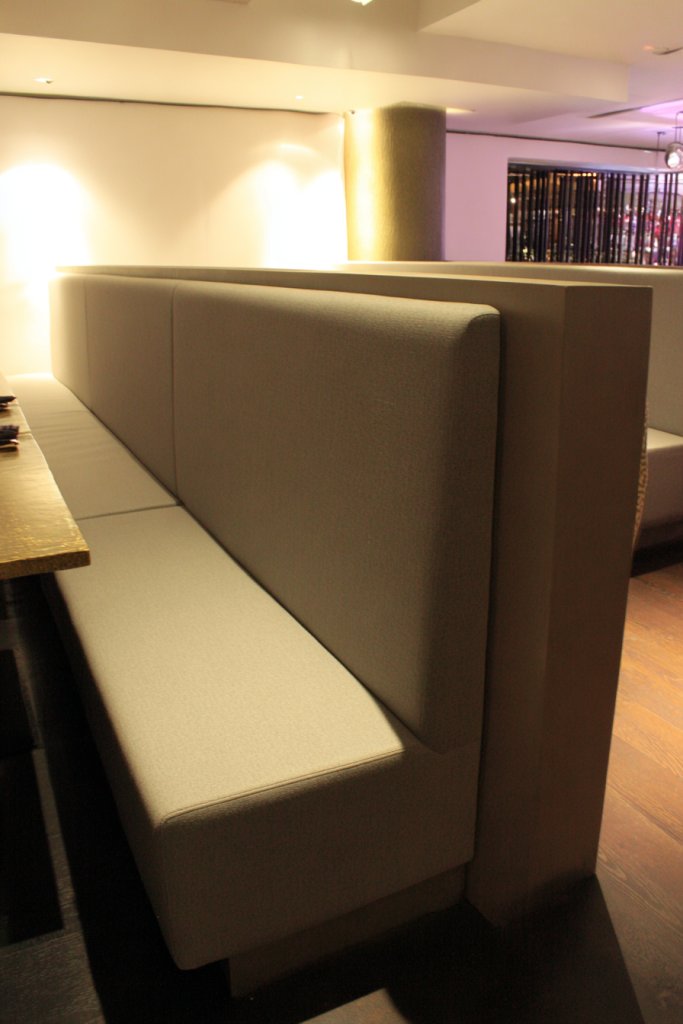
Want a space that combines seating comfort with visual separation? Built-in banquettes or benches with backrests serve as a functional barrier that’s also inviting. They encourage socializing and make your space feel cozy without closing it off. Who says boundaries can’t be comfortable?
Visualize a long, upholstered bench along one side of your kitchen or dining zone, with a high backrest for support. It creates a natural barrier that defines the space while offering a dedicated seating area. Cushions in coordinating fabrics add personality and comfort. When paired with a dining table or a lounge area, it becomes a multi-purpose feature.
Choose materials and fabrics that match your decor—neutral linen, bold velvet, or patterned upholstery. Incorporate storage underneath the bench for extra practicality. Adjust the height and length to fit your space. For a casual look, add throw pillows or decorative cushions that can be changed seasonally.
Start by planning the dimensions and selecting durable, comfortable materials. Build a sturdy frame with proper supports and attach the seat and backrest securely. Finish with upholstery or paint to match your style. Install the built-in seating along a wall or partition, ensuring easy access and comfort. Add cushions or fabric covers for a polished look.
Personalize with decorative pillows, throws, or custom fabric choices. Use contrasting piping or trim to add detail. Incorporate hidden storage or drawers beneath the seats for extra utility. Change decor seasonally or for special occasions to keep the look fresh.
Built-in seating with backrests transforms an ordinary space into a cozy gathering spot. It provides comfort and defines zones naturally. With a few strategic choices, you can create a stylish, functional feature that enhances your home’s flow. Ready to sit back and relax in style? It’s easier than you think!
16. Artistic Metal Screens with Intricate Cutouts
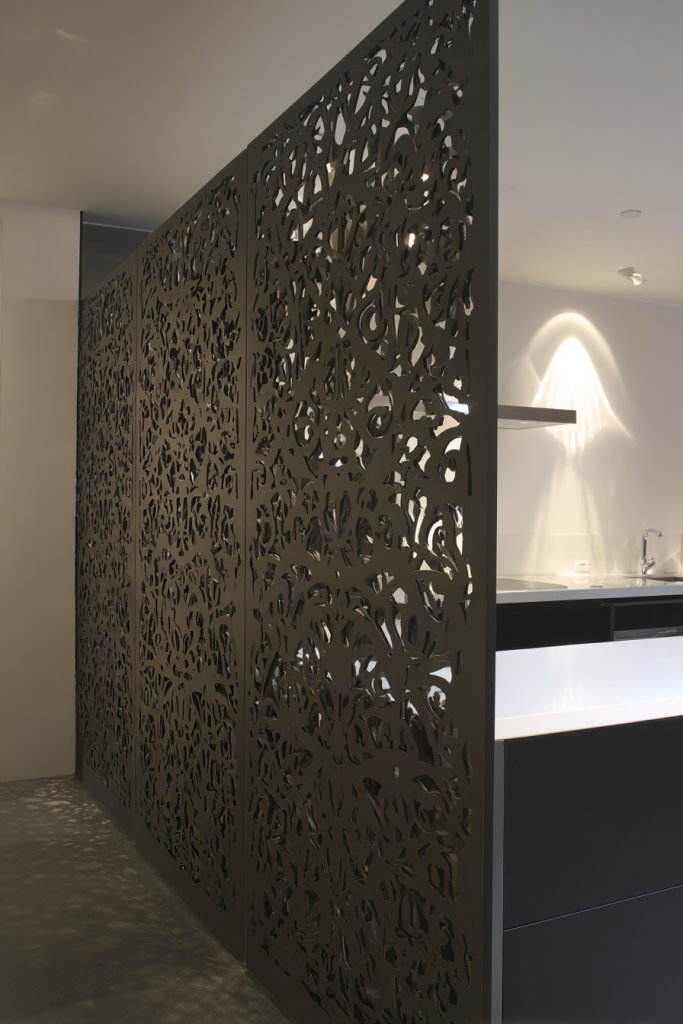
Craving a focal point that’s both functional and artistic? Metal screens with intricate cutouts add a bold, decorative element that separates spaces with style. They bring personality and craftsmanship into your open layout. Who says partitions need to be plain?
Imagine a large metal panel featuring detailed geometric or floral cutouts, finished in matte black or metallic tones. The intricate patterns cast delicate shadows when backlit or illuminated, creating a mesmerizing effect. When placed strategically, they define a zone while serving as a piece of art. The blend of form and function elevates your entire space.
Opt for different metal finishes—brushed, polished, or painted—to match your decor. Play with pattern density—more open for light and airflow, denser for privacy. Incorporate lighting behind the panels to enhance visual interest. Use modular designs for flexibility or fixed pieces for permanence. They can serve as standalone features or part of a larger partition system.
Begin by designing or sourcing a custom metal panel with your preferred pattern. Securely mount the panel to walls or free-standing bases, ensuring stability. Use professional welders or fabricators for precise cuts and finishes. Install lighting behind or around the panel to highlight the design. Regularly clean and maintain to preserve the intricate details and finish.
Add colored accents or contrasting finishes for a personalized look. Incorporate LED strip lighting or uplights to dramatize the patterns at night. Mix with other textures like wood or glass for layered effects. Keep the design fresh by swapping panels or updating lighting accents seasonally.
Artistic metal screens turn a simple partition into a piece of artwork that enhances your decor. They bring a sense of craftsmanship and elegance. With the right design, your space becomes truly unique and captivating. Ready to make a bold statement? The art is in the details!
17. Partial Glass Block Walls for Privacy and Light
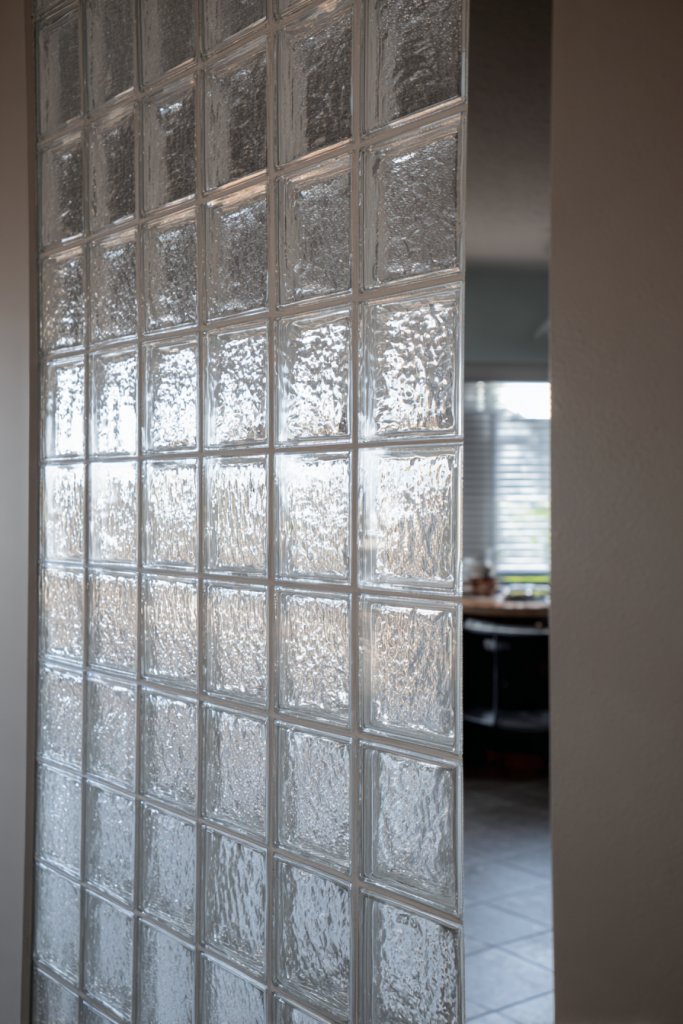
Want to create privacy without sacrificing light and openness? Glass block walls offer a retro-modern solution that defines spaces subtly. They diffuse natural or artificial light beautifully, maintaining brightness while adding visual interest. Who says privacy can’t be stylish?
Imagine a wall of textured glass blocks arranged in a geometric pattern, shimmering softly as light passes through. The blocks blur the view, providing privacy while still inviting light in. Their chunky, tactile surface adds a distinctive architectural element that complements contemporary or vintage decor. When illuminated from behind, they glow warmly, creating a cozy atmosphere.
Choose from different textures—smooth, frosted, or patterned—to match your style. Vary the height and layout—full wall or partial sections—depending on your needs. Incorporate decorative grout or colored glass for a customized touch. Combine with other materials like wood or metal for layered designs. Use in bathrooms, kitchens, or as decorative accents.
Start by measuring the space and selecting the appropriate glass blocks. Prepare a sturdy base with a mortar bed or prefabricated frame. Install the blocks carefully, ensuring level and secure placement. Seal joints with grout or silicone for durability. Connect the wall to electrical fixtures if backlit lighting is desired. Regular cleaning keeps the textured surface looking pristine.
Add LED lighting behind the blocks for a luminous glow at night. Incorporate colored or tinted glass for a unique effect. Mix textures or embed decorative elements like tiles or metallic accents within the grout. Keep the design simple or ornate—your choice.
Glass block walls offer a timeless look that balances privacy and openness. They’re easy to maintain and highly customizable. With the right design, your space will radiate sophistication and warmth. Ready to explore the luminous potential? The light’s the limit!
18. Open Shelving Units with Decorative Items for Visual Interest
Looking to add personality and practicality to your open kitchen? Open shelving units serve as both storage and display, giving your space an inviting, lived-in feel. They’re perfect for showcasing your favorite dishes or decorative accents. Who says shelves have to be boring?
Picture sleek wooden or metal open shelves mounted on the wall, filled with colorful bowls, vintage jars, and chic cookware. The arrangement adds visual layers, making the space feel curated and warm. When styled thoughtfully, these shelves become a focal point that reflects your unique taste. The open design also promotes easy access and organization.
Mix and match materials—wood, metal, glass—for variety. Use decorative brackets or hidden supports for a seamless look. Arrange items in groups or asymmetrically for visual interest. Incorporate baskets or decorative containers to hide clutter. Change the display seasonally or when you update your decor for fresh appeal.
Select sturdy, wall-mounted shelves that suit your weight needs. Securely install brackets or supports, ensuring level placement. Arrange your decorative items with balance—height, color, and style—to create harmony. Keep frequently used items within reach and reserve the top shelves for accent pieces. Regularly dust and rotate items for variety.
Add decorative touches like small sculptures, vintage collectibles, or themed items to personalize the space. Use contrasting colors or textures to make each shelf pop. Incorporate lighting—LED strips or puck lights—to highlight your displays at night. Keep the look fresh by swapping out items or reorganizing periodically.
Open shelving transforms a plain wall into a personalized gallery that’s both functional and beautiful. It showcases your style and makes daily routines more enjoyable. With a little planning, your space will feel curated and inviting. Ready to style your shelves? The creative journey starts now!
19. Sliding Barn Door or Track System for a Rustic Feel
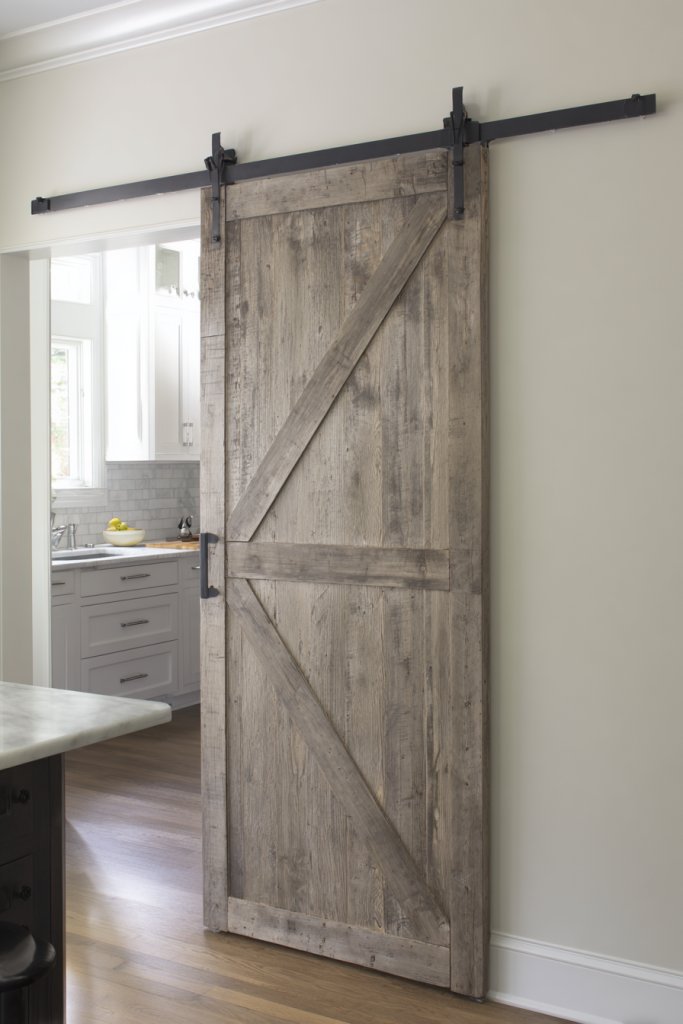
Want to add a rustic, charming touch while maintaining flexibility? Sliding barn doors or track systems are perfect for creating a stylish partition that can be tucked away when needed. They bring character and practicality, especially in open-concept layouts. Who says functional can’t be fabulous?
Imagine a large wooden barn door mounted on a sleek black metal track, sliding smoothly aside to reveal or conceal your space. The reclaimed wood finish adds warmth and texture, instantly elevating your decor. When open, it creates a seamless connection; when closed, it provides privacy and separation. It’s a statement piece that commands attention.
Choose from weathered wood, stained finishes, or painted options to match your style. Add decorative hardware or metal accents for extra authenticity. The system can be installed on wide openings or narrow passages. For a more modern twist, opt for glass panels with metal frames. Adjust the track height and length for perfect fit.
Measure your opening carefully and select a sturdy sliding hardware kit. Mount the track securely to ceiling or wall joists, ensuring it can handle the door’s weight. Attach the door with rollers or hangers, and test for smooth operation. Add stops or soft-close mechanisms for functionality. Finish with protective coatings or paint to enhance durability.
Decorate the door with stenciled patterns, painted motifs, or distressed finishes for a personalized look. Incorporate handles or pulls that match your decor theme. Use contrasting hardware finishes—black, brass, or matte nickel—for added flair. Keep the system well-maintained to ensure smooth sliding over time.
A sliding barn door adds rustic charm and functional flexibility, transforming your space effortlessly. It’s a perfect blend of style and practicality that impresses guests and elevates your decor. With a bit of DIY or professional help, you can create a standout feature that’s both beautiful and useful. Ready to slide into style? The choice is yours!
20. Tonal Color Blocks in Paint or Wallpaper for Visual Separation
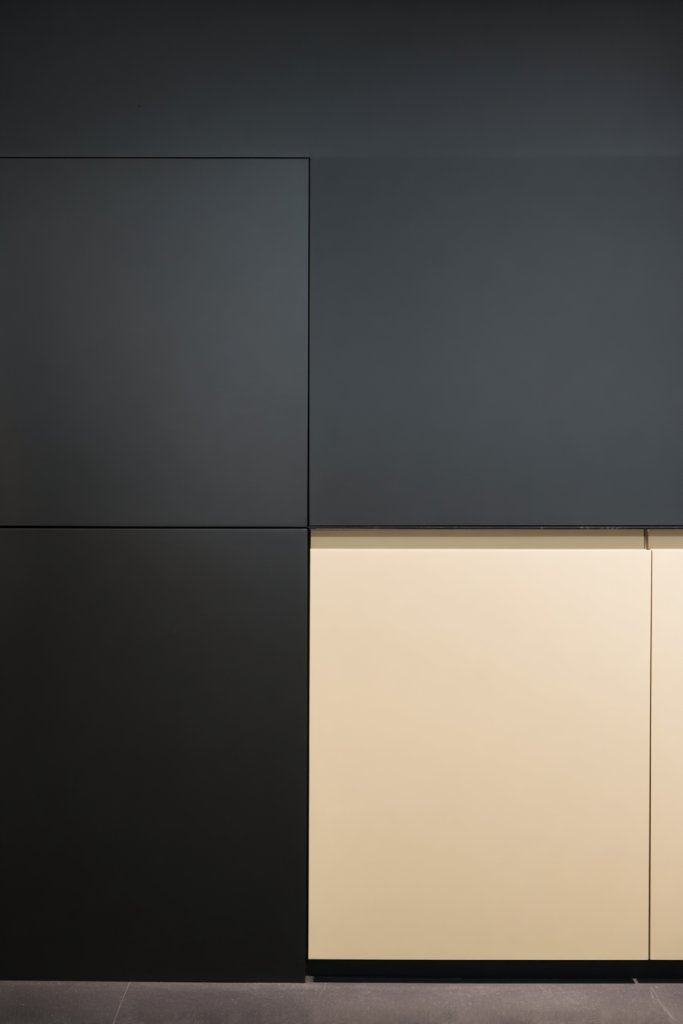
Looking to create a bold yet subtle separation in your open kitchen? Tonal color blocks using paint or wallpaper can define zones without heavy or bulky dividers. They add depth and interest, making your space feel intentional and stylish. Who says boundaries can’t be colorful?
Visualize a wall painted with a contrasting tone—darker or lighter—forming a large rectangle or abstract shape. Alternatively, textured wallpaper with a subtle pattern creates a layered effect. When used strategically, these blocks draw the eye and delineate areas while maintaining an open feel. The different tones can also highlight architectural features or furniture.
Mix matte and gloss paints or textured wallpaper for added dimension. Use contrasting but harmonious colors for a sophisticated look or bold hues for a playful vibe. Apply the color blocks on full walls or as accents—around islands, dining areas, or entry points. Combine with decorative moldings or trim to frame the blocks for a polished finish. Seasonal color updates can refresh the look.
Start by choosing your color palette and measuring your wall sections. Prepare surfaces by cleaning and priming. Use painter’s tape to create clean edges for paint blocks or install wallpaper with precision. Consider using stencils or masking techniques for geometric shapes. Finish with a clear protective coat if necessary. Lightly touch up as needed for sharp edges.
Incorporate metallic or contrasting trims to frame the color blocks. Add decorative wall decals or patterns within the blocks for extra flair. Use lighting, like sconces or spotlights, to highlight the color zones at night. Change colors seasonally or for special occasions to keep your space feeling fresh and vibrant.
Color blocks are a simple yet impactful way to define your space with personality. They allow for creative expression and can be easily updated. With a little patience and a steady hand, you can craft a visually stunning environment that feels both cohesive and lively. Ready to make a colorful statement? Let your walls speak!
21. Sculptural Partition Elements for a Statement Piece
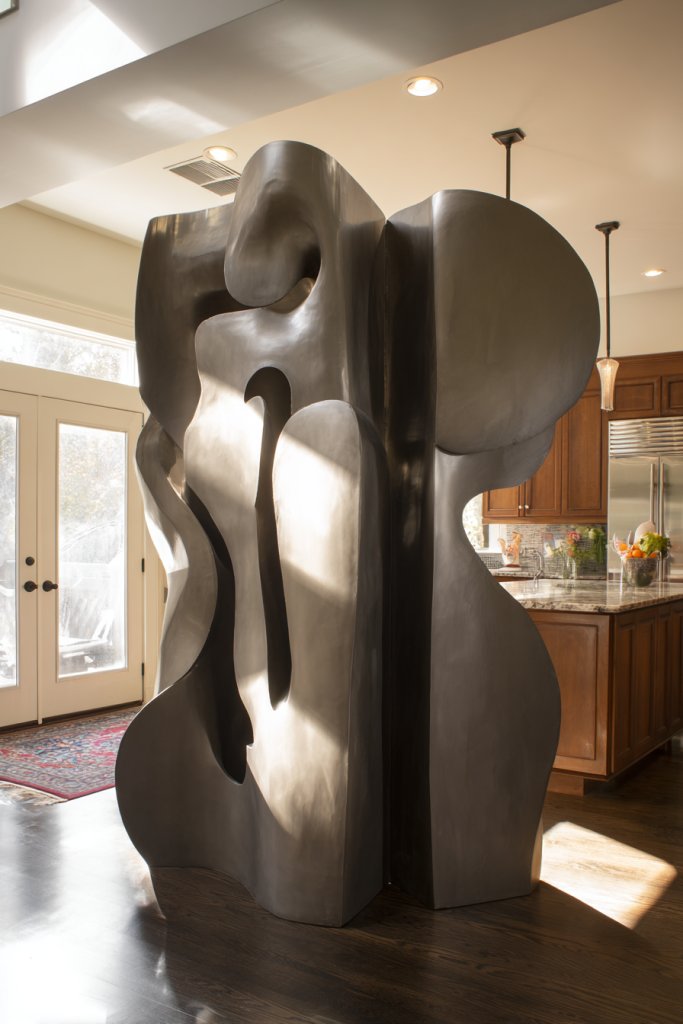
Craving a unique focal point that also separates your space? Sculptural partition elements—like freestanding art pieces or abstract structures—serve as functional art. They add personality and sophistication, turning a simple divider into a statement. Who says your partitions can’t be breathtaking?
Imagine a large, freestanding sculpture composed of geometric shapes or flowing curves crafted from concrete, metal, or resin. Positioned strategically, it creates a partial barrier while drawing attention. The artwork’s texture and form add depth, inviting admiration and conversation. When lit well, it becomes a captivating centerpiece.
Opt for bold, modern sculptures or softer, organic forms depending on your decor style. Use materials like metal, stone, or composite to match your aesthetic. Incorporate movable or modular pieces for flexibility. Pair with lighting or water features for extra impact. Keep the design balanced to avoid overwhelming the space.
Select a sculptural piece that complements your decor and fits your space. Secure it on a sturdy base or position it as a freestanding element. If necessary, anchor it to the floor or wall for safety. Ensure proper lighting to highlight its textures and details. Regular cleaning and maintenance will keep it looking pristine. Consider scale and proportion carefully.
Customize with paint or finishes that match your color scheme. Add lighting elements—spotlights, uplights, or LED strips—to enhance the sculpture’s visual appeal at night. Incorporate other decorative elements like planters, textured panels, or water features nearby for an integrated look. Keep it fresh by rotating or updating pieces over time.
A sculptural partition elevates your space from ordinary to extraordinary. It’s a bold way to showcase your style and passion for art. With thoughtful selection, it becomes both a functional divider and a captivating focal point. Ready to turn your space into a gallery? The art is in your hands!
Conclusion
With a diverse array of open kitchen partition ideas showcased, you now have plenty of inspiration to elevate your space. Whether you prefer modern glass dividers, rustic wood screens, or minimalist metal frames, these solutions can be tailored to suit your style. Don’t hesitate to experiment and bring your dream social kitchen to life—your home is the perfect canvas for creativity!