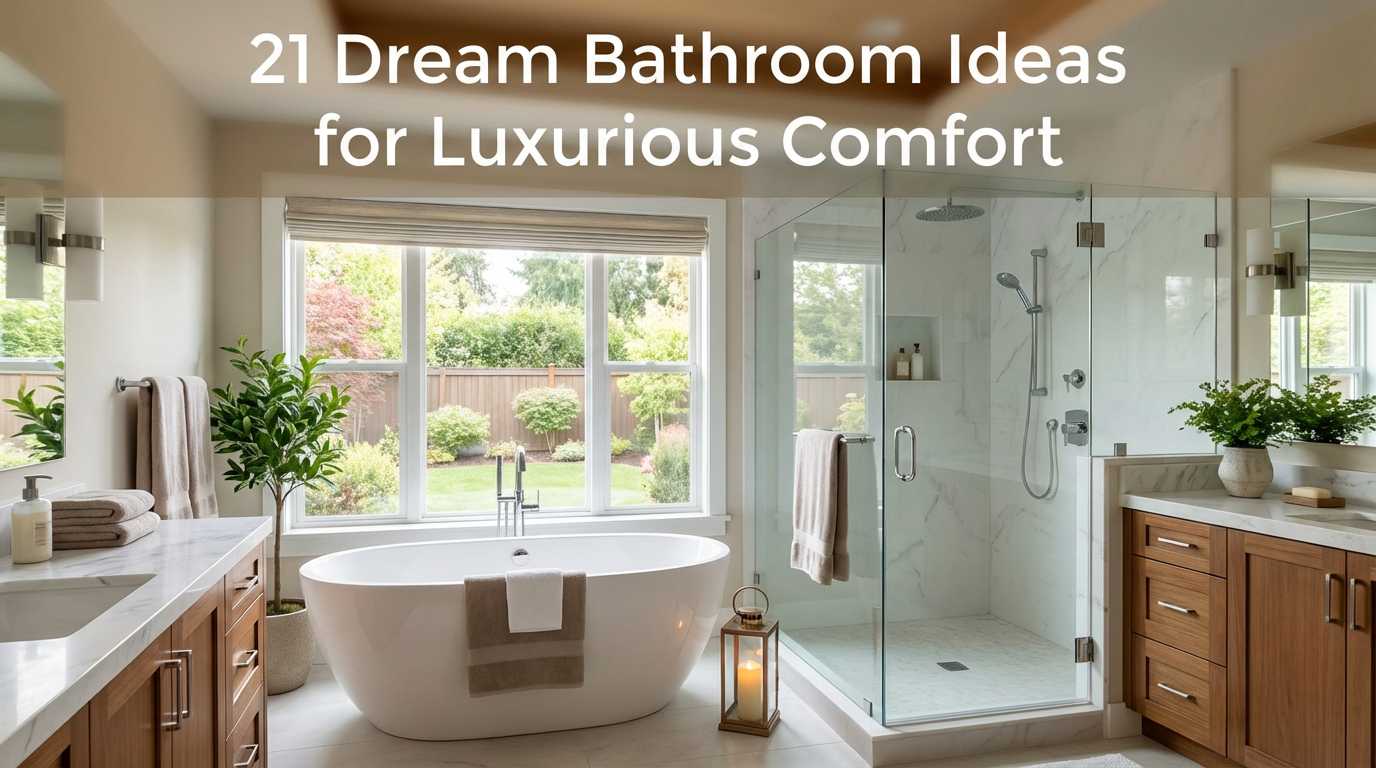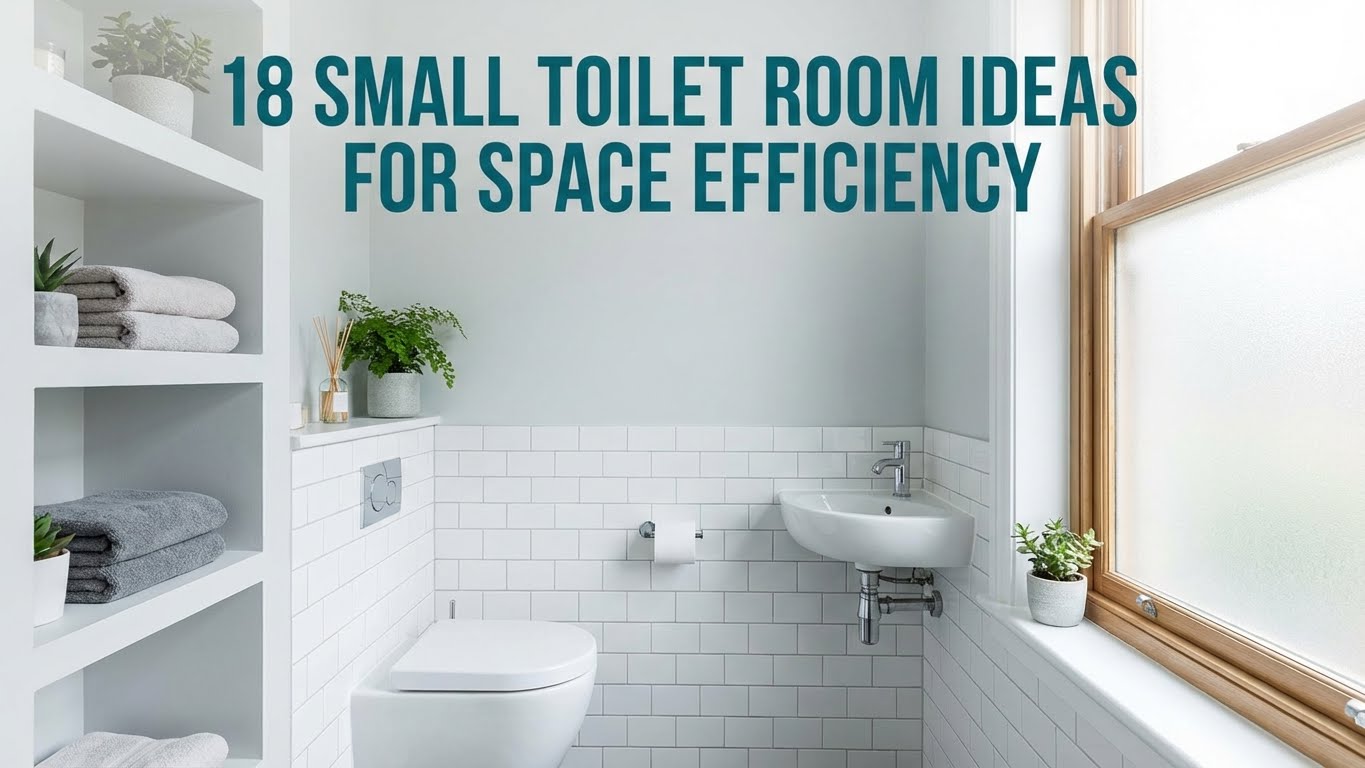
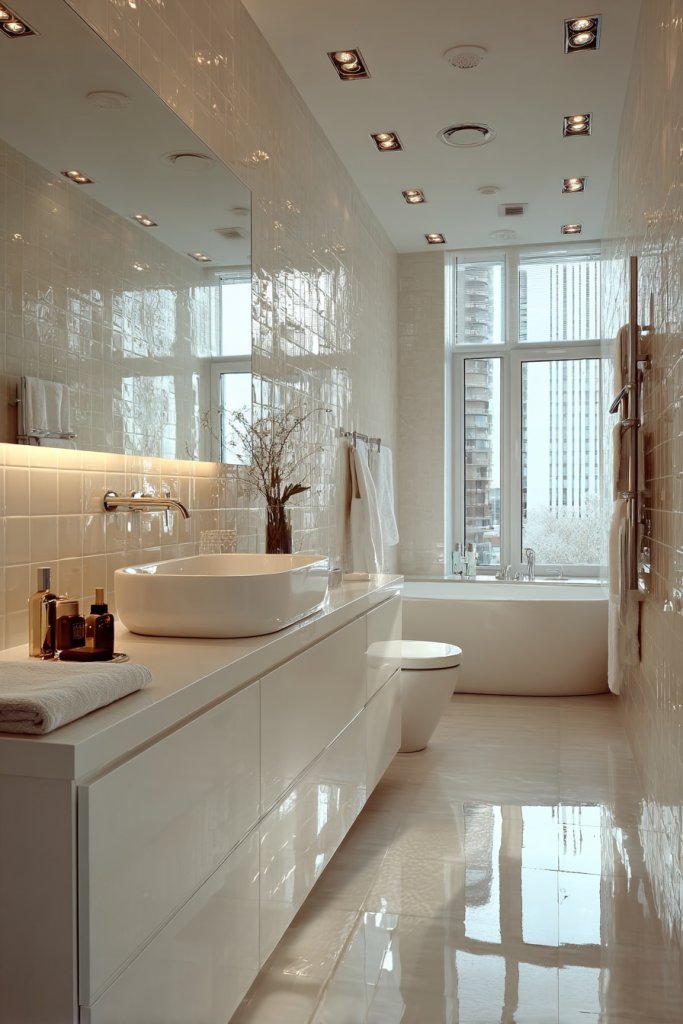
Ever walked into a tiny bathroom and wondered how to make the most of every inch? Small toilet rooms are incredibly popular right now because they combine practicality with clever design, proving that you don’t need a large space to create a functional and stylish bathroom.
In this article, you’ll find a variety of creative ideas to maximize your space, from smart storage solutions to space-saving fixtures. Whether you’re renovating or just looking for simple updates, these ideas will inspire you to turn your small toilet room into a chic, efficient retreat that feels larger and more organized.
1. Install a Compact Wall-Mounted Toilet to Save Floor Space
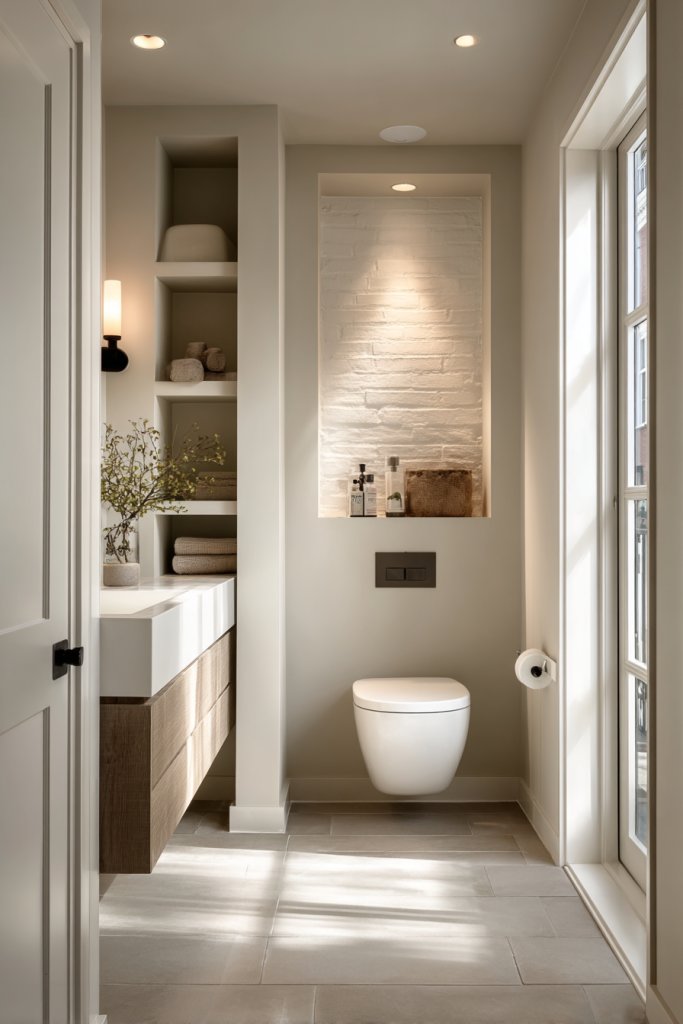
Ever tried squeezing into a tiny bathroom and felt like your only escape route is a game of Tetris? Small toilets might just be your new best friend if you crave more space and less clutter. They’re perfect for maximizing every inch without sacrificing functionality. Plus, nobody wants to navigate around a bulky fixture when they’re just trying to do their business.
Imagine a sleek, wall-mounted toilet with a smooth, concealed tank tucked behind the wall. The minimalist design creates an open, airy feel, making the room look bigger than it really is. The soft sheen of the ceramic reflects light, adding brightness to the space. When you step in, it feels like the bathroom has doubled in size, all thanks to smart space planning.
Choose a modern, streamlined model for a contemporary vibe or a classic shape with subtle curves for a timeless look. For a more rustic touch, opt for matte finishes or textured ceramic options. If space is tight, consider a one-piece design that combines tank and bowl seamlessly. Seasonal themes can be incorporated through accessories, but avoid clutter to keep the minimalist aesthetic.
Start by measuring your available space precisely. Select a wall-mounted toilet with a compact footprint and ensure your wall can support it. Installation involves anchoring the unit to the wall studs and connecting the concealed tank to plumbing lines. You might need a professional unless you’re handy, but it’s worth the effort to save significant floor space. Finish with wall panels or tiles to hide the tank and create a clean look.
Add a soft-close seat with a color that complements your walls for a cohesive look. Consider installing a small, hidden shelf behind the toilet for essentials like toilet paper or wipes. Play with textures—combine matte fixtures with glossy tiles for contrast. Incorporate a heated seat or bidet attachment for extra comfort, making your small bathroom feel like a luxury retreat.
A wall-mounted toilet transforms your tiny bathroom into a spacious sanctuary. It’s a simple upgrade that makes a big difference in daily comfort and style. Once installed, you’ll wonder why you waited so long to go sleek and space-efficient. Small bathrooms can be both functional and fabulous—just like your new, compact throne.
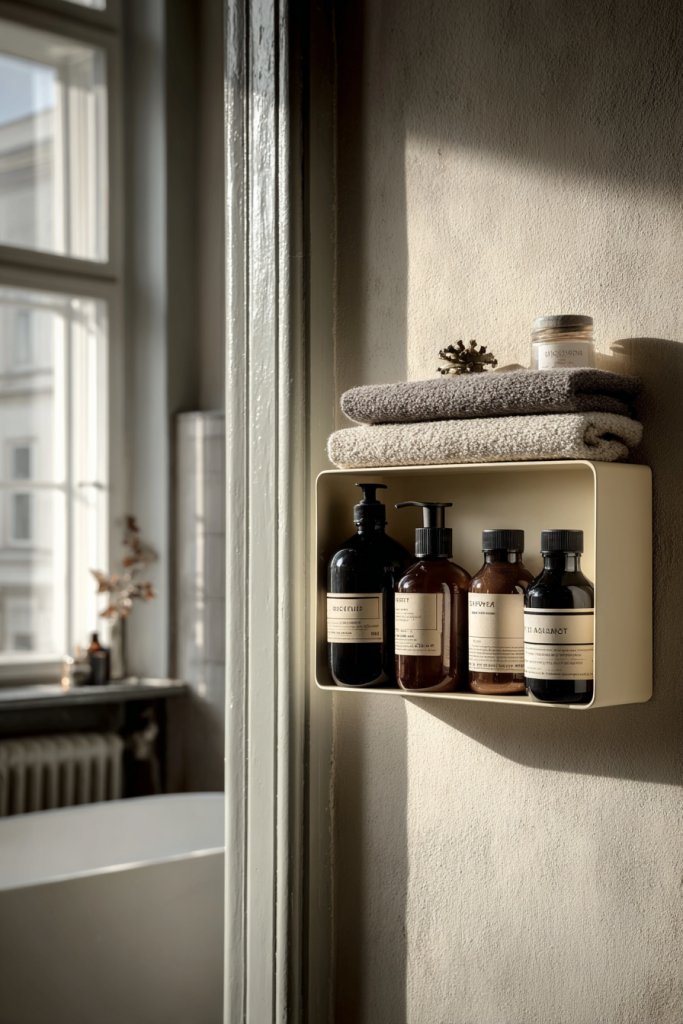
2. Incorporate Vertical Storage with Over-the-Toilet Shelves
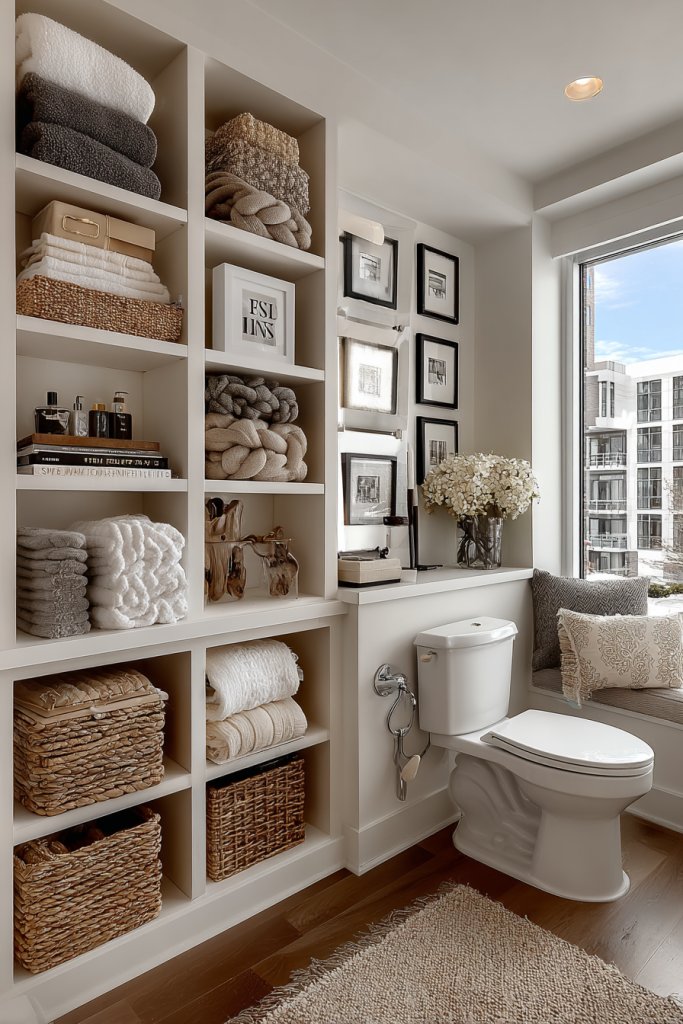
In small toilet rooms, every inch counts, and incorporating vertical storage with over-the-toilet shelves is a game-changer. Ever felt like your toiletries are taking over the tiny surface space, making the room feel cluttered and cramped? This clever solution helps you maximize your vertical real estate, keeping essentials within reach without sacrificing style. It’s perfect for those who want an organized, streamlined look but don’t want to clutter their limited space with bulky cabinets or clutter. Plus, it offers a chance to add a touch of personality—without turning your bathroom into a storage warehouse.
Visualize a sleek, open shelf system mounted directly above your toilet, painted in a light, neutral hue to blend seamlessly with the walls. These shelves can be made from wood, metal, or even sturdy acrylic—whatever matches your aesthetic and budget. They create a tidy, intentional look, offering just enough space for neatly folded towels, small baskets for toiletries, or decorative containers. Think of it as a mini display area that keeps your essentials accessible but out of sight, helping your tiny bathroom feel more open and less chaotic.
Styling these shelves can be done in many ways to suit different tastes. For a minimalist look, stick to monochrome baskets and sleek containers that hide clutter and create a clean, uniform appearance. Want a touch of warmth? Incorporate textured baskets or woven boxes that add a cozy vibe. For a more modern or industrial feel, go for metal brackets with open shelving, paired with ceramic or stone containers. The key is to keep the arrangement simple and functional while using the vertical space creatively to reflect your personality.
Implementation is straightforward but requires some planning. Start by measuring the space above your toilet to determine the shelf width and height—no one wants to bump their head or have shelves that look like they’re about to fall off. Next, choose sturdy brackets or wall-mounted rails that can handle the weight of your stored items. Use anchors if you’re drilling into drywall, and ensure the shelves are level—nothing ruins a sleek look faster than crooked storage. Keep in mind, heavy items should be stored on lower shelves to avoid accidents, and always secure brackets tightly to prevent wobbling.
Personalization comes into play once your shelves are installed. Use them to display colorful storage bins, add a small decorative tray for your toothbrush holder, or even hang a tiny, functional towel rack on the side for hand towels. Since decorative items are restricted, focus on utilitarian objects that add a pop of color or texture—like a soft microfiber cloth or a textured ceramic jar. This approach keeps your bathroom looking tidy, functional, and uniquely yours without overloading it with unnecessary decor. It’s all about making your vertical space work for you and keeping everything within easy reach.
When you think about space-saving ideas for small bathrooms, over-the-toilet shelves stand out as a practical, stylish, and customizable option. They turn the often dead space above your toilet into a smart storage zone, freeing up counters and floors. Plus, they’re adaptable to any style—from sleek and modern to warm and rustic—making it easy to create a space that feels personalized and organized. So, if you’re tired of the clutter and want to make your tiny bathroom feel bigger and more functional, this is the upgrade that truly pays off. Give it a try, and watch your space transform from chaos to calm!
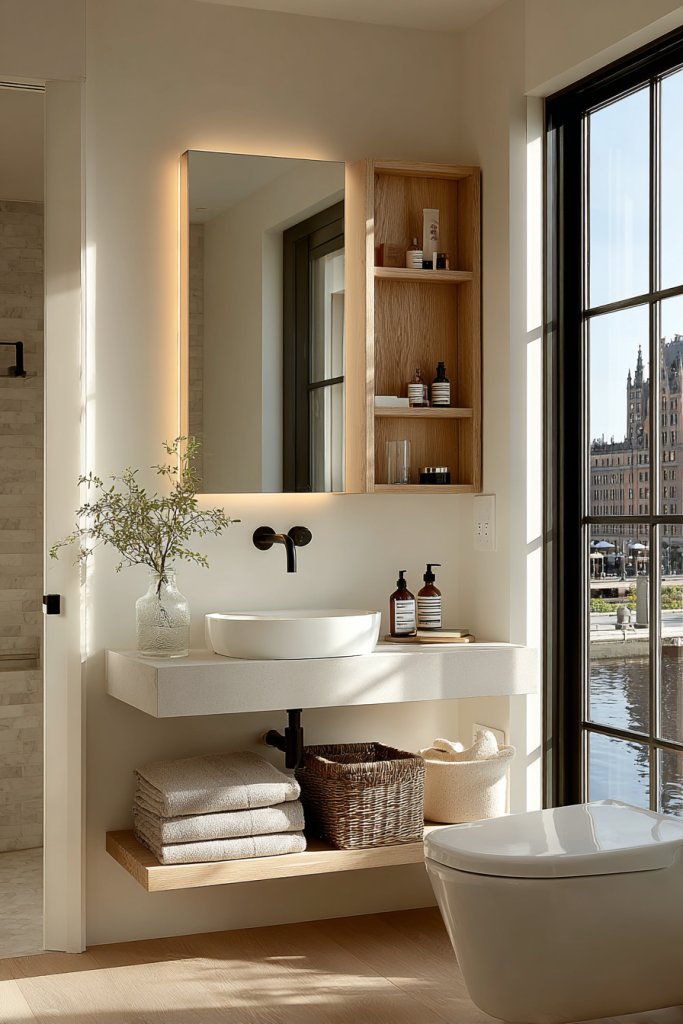
3. Use Slim Profile Vanity or Pedestal Sink for a Minimalist Feel

Ever feel like your bathroom sink is stealing the spotlight in a tiny room? Heavy, bulky vanities can make a small space feel even smaller. Opting for a slim profile vanity or a classic pedestal sink can free up tons of room, making your bathroom feel more open and less claustrophobic. It’s all about creating that sleek, minimalist vibe.
Picture a slender, wall-hugging vanity with a smooth surface and clean lines. Or imagine a timeless pedestal sink with a curved basin and slender pedestal base, creating a sense of height and openness. The minimalist design showcases your bathroom’s proportions, with open space underneath that invites your eye to wander freely. A glossy white finish reflects light, amplifying the airy feel.
Choose a floating vanity with hidden storage for a clutter-free look or a vintage-style pedestal for a touch of charm. For a more industrial feel, opt for metallic finishes and concrete textures. When space is tight, go for a corner vanity or a compact wall-mounted model. Seasonal accessories, like colorful towels or artful soap dishes, add personality without crowding.
Measure your available space carefully, especially height clearance. Select a slim vanity or pedestal that fits comfortably, leaving enough room to move freely. For vanities, install wall brackets and connect plumbing efficiently, hiding pipes behind the wall or inside cabinetry. Pedestal sinks require less setup but ensure the base is sturdy. Finish with sleek fixtures and a mirror to complete the minimalist look. Keep surfaces clean and clutter-free for maximum impact.
Add a pop of color with a vibrant soap dispenser or a textured hand towel. Consider a decorative backsplash made of tiles or patterned wallpaper for visual interest. Use a statement mirror with a unique frame or integrated lighting for added flair. Incorporate a small shelf above for decorative storage, like a sculptural object or a simple plant substitute.
A minimalist sink setup instantly elevates your small bathroom’s style while keeping it functional. It’s a straightforward upgrade that makes the space feel bigger and more refined. When your sink isn’t fighting for attention, the entire room feels calmer and more inviting. Go sleek, and enjoy a fresh, modern vibe that’s easy to maintain.
4. Choose Light, Neutral Wall Colors to Enhance Perceived Space
Tired of feeling boxed in every time you step into your tiny bathroom? Dark, bold walls can make a small space seem even more cramped. Light, neutral colors are your best friends here—they reflect light and trick your eyes into perceiving more space. Ready to make your bathroom feel twice as big with just a splash of paint?
Imagine soft cream or blush pink walls that bounce light around the room. The subtle hue creates a calm atmosphere, while the reflective surface of glossy tiles amplifies the effect. A minimalist mirror and sleek fixtures add to the sense of openness. The overall ambiance feels serene and expansive, despite the limited square footage.
Stick with monochromatic palettes for a cohesive look or add a touch of pastel for warmth. In colder months, you might choose shades of soft grey or icy blue to keep things fresh; in summer, light beige or sandy tones evoke a beachy vibe. If you prefer a bit more contrast, incorporate textured wall panels or painted stripes in similar hues to add depth without reducing space perception.
Begin by prepping your walls with a good primer to ensure even color. Use high-quality paint with a satin or semi-gloss finish to maximize light reflection. Keep colors neutral but lively enough to prevent the space from feeling sterile. Brighten the room further with well-placed lighting fixtures—think sconces or recessed lighting—to enhance the colors. Avoid heavy, dark accents that could absorb light and shrink the space visually.
Add textured textiles like a soft, neutral-colored rug or plush towels to create cozy contrasts. Incorporate subtle decorative elements, such as a small tray or container in natural materials like wood or rattan, to add warmth. Keep clutter minimized, allowing the colors and textures to shine. Seasonal updates can be as simple as swapping out towels or art prints in complementary shades.
Choosing light, neutral tones transforms your bathroom into a bright, welcoming retreat. It’s a simple yet effective way to visually expand your space without major renovations. With the right colors, your small bathroom can feel like a luxurious spa—calm, open, and inviting. Just a fresh coat of paint can change everything.
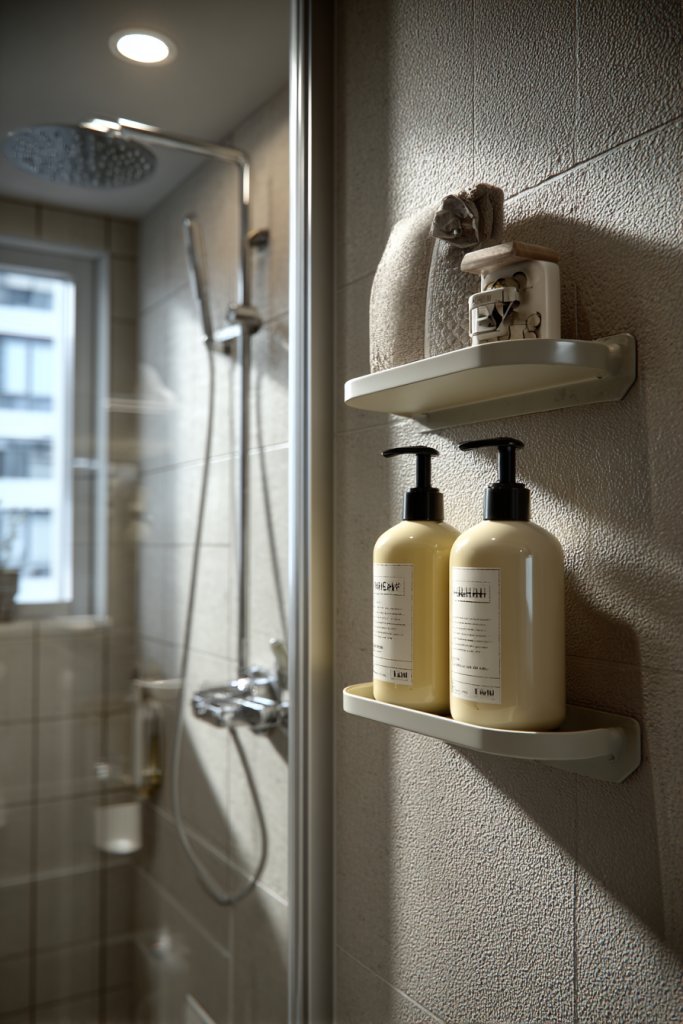
5. Install Recessed Wall Niche for Storage Inside the Shower Area
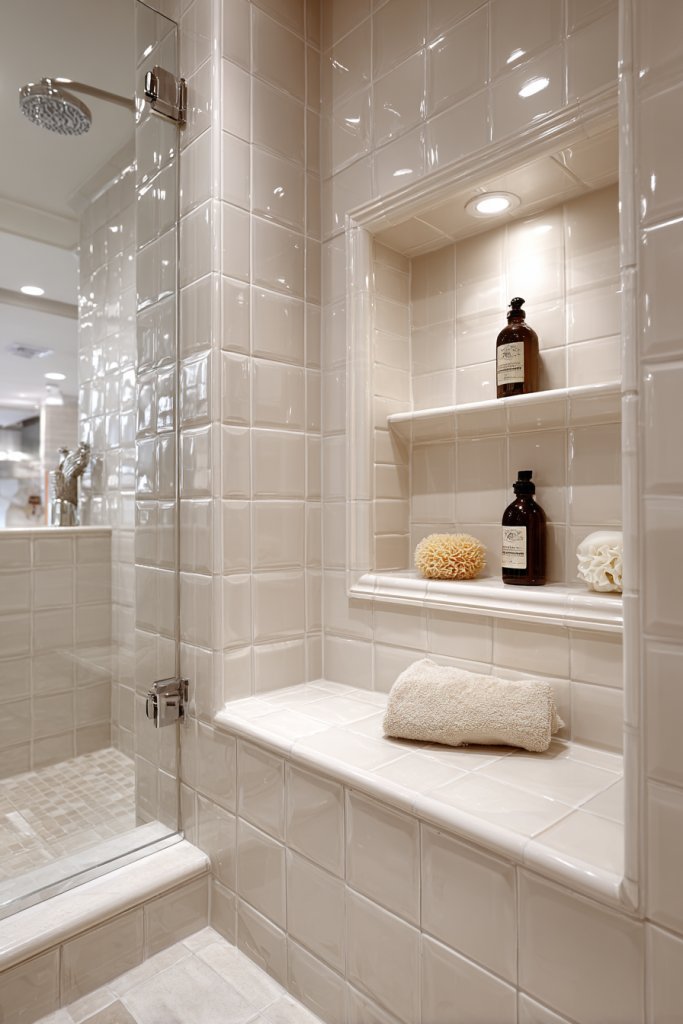
Ever notice how shower caddies turn your sleek shower into a cluttered mess? Small bathrooms need smart storage ideas that don’t intrude on precious space. Recessed wall niches are a game-changer—they keep your toiletries hidden yet easily accessible. Who wants a cluttered shower when you can have a streamlined oasis?
Visualize a built-in rectangular niche carved into the wall, with smooth edges and a simple finish. It’s tiled seamlessly with the rest of the shower wall, creating a uniform look. Inside, neatly arranged bottles, soaps, and scrubs sit tidy, with no bulky holders to get in the way. The niche adds depth and dimension, making the shower look taller and more spacious.
Opt for multiple small niches or a large one, depending on your storage needs. Use contrasting tile colors or textures inside the niche to add visual interest. For a rustic vibe, choose natural stone or textured tiles; for a sleek modern look, go for glass or polished ceramic. Position the niche at a height that’s comfortable for reaching without stretching or bending. Seasonal decor isn’t necessary here—simplicity is key.
Start by planning the placement and size of your niche during wall framing. Cut an opening into the wall, and install waterproof backing to prevent moisture damage. Tile the interior of the niche with the same or contrasting tiles, and seal all edges properly. Use waterproof grout and sealant to prevent water infiltration. Finish with a smooth, clean grout line and ensure the niche is level and sturdy. It’s a subtle upgrade that pays off big time.
Add a small ledge inside the niche for a decorative element like a candle or a sculptural piece. Use textured or patterned tiles for the interior to make it pop subtly. Keep products organized in matching containers to maintain a tidy look. Seasonal change can be as simple as swapping out the products stored here, keeping your shower fresh and functional.
A built-in niche elevates your shower from cluttered to sleek and organized. It’s a discreet solution that maximizes utility without sacrificing style. Once you see how much tidier your shower becomes, you’ll wonder how you ever managed without it. Small changes like these make your bathroom feel more luxurious and thoughtfully designed.
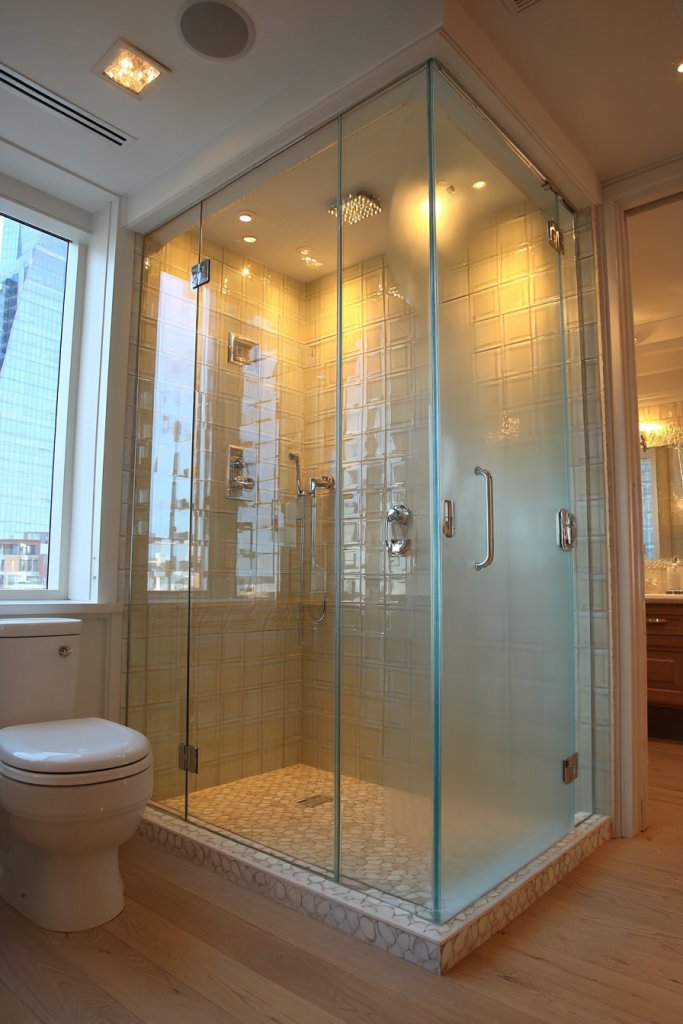
6. Opt for Clear Glass Shower Doors to Maintain an Open Look
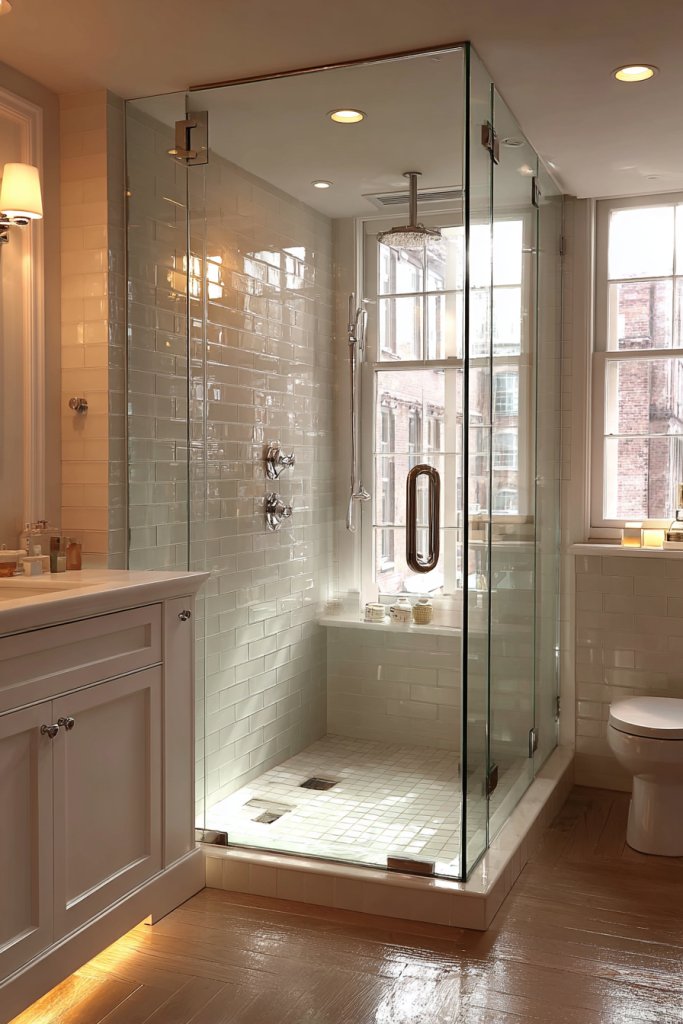
Does your bathroom feel like a cave because of heavy, opaque shower curtains or bulky doors? Glass shower doors are the solution for small spaces—they visually open up the room and make it appear larger. Plus, they add a modern, sleek touch that instantly upgrades your bathroom’s style. Who says you need a big bathroom to have a big feel?
Imagine a frameless, transparent glass door that stretches from wall to wall, creating a seamless boundary. The clear surface reflects ambient light, bouncing it around the space to brighten every corner. The minimalist hardware blends into the background, letting the tiles and fixtures shine. Inside, the shower area looks expansive and inviting, with no visual barriers to break the flow.
Choose frameless, tempered glass for a clean look or semi-frameless options for a more affordable choice. Incorporate sleek chrome or matte black hardware to match your fixtures. For a softer, more textured appearance, opt for frosted or textured glass only on certain panels, but keep the main panel clear. Seasonal decor isn’t necessary here—simplicity keeps the space feeling open.
Ensure your shower opening is wide enough for the glass panels and that the wall is prepared for secure mounting. Use professional installers to handle the glass, especially for frameless designs, to prevent mishaps. Seal all edges with waterproof silicone to prevent leaks. Consider a low-profile threshold to keep the floor level and avoid trip hazards. Regular cleaning with a glass-specific cleaner maintains clarity and shine.
Add a decorative towel rack or a small shelf outside the shower for essentials. Use subtle coloring on the hardware to match your fixtures, or go for a sleek metallic finish for a contemporary look. Seasonal towels and textured bath mats can add warmth without cluttering the visual flow. Keep accessories minimal to preserve the open feel.
Glass shower doors brighten and expand your bathroom instantly, creating an elegant, spacious atmosphere. They’re a smart investment that pays off in style and function. Once installed, your bathroom will feel more luxurious and less confined. It’s a simple upgrade with a big impact—dare to go transparent.
7. Add a Slim Vertical Mirror to Enhance Height and Brightness
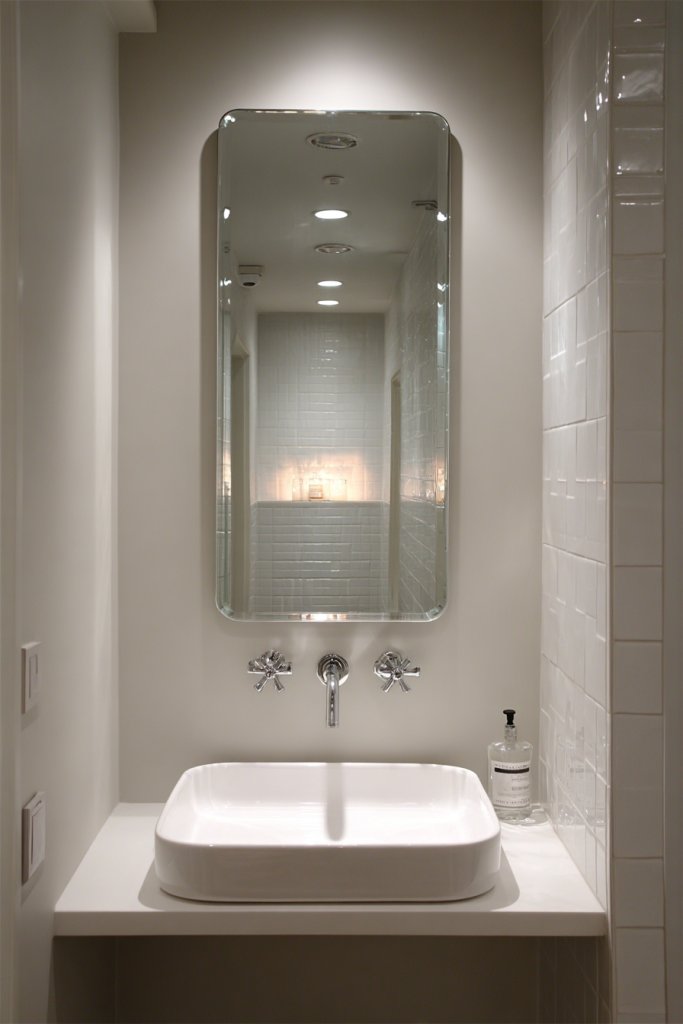
Feeling like your small bathroom is shrinking every time you look in the mirror? Mirrors are more than just functional—they can dramatically influence your space’s perception. A tall, narrow mirror adds height, making ceilings seem higher and rooms appear larger. Want a quick fix to boost brightness and spaciousness? This is it.
Picture a sleek, floor-to-ceiling mirror with a subtle frame, mounted vertically beside the sink or in an empty corner. The mirror catches natural light through a nearby window or artificial lighting, bouncing it around the room. The reflected space doubles the visual depth, creating an illusion of openness. Its slim profile keeps the room feeling uncluttered, emphasizing vertical lines.
Choose frameless mirrors for a seamless look or add a thin metal frame for a touch of elegance. For a more eclectic vibe, opt for a textured or beveled edge. Mount the mirror at eye level or slightly above to maximize height perception. Seasonal updates can include adding a decorative sconce or LED strip lighting behind the mirror for extra glow.
Select a sturdy mounting system that anchors into wall studs for safety. Measure carefully to ensure the mirror spans the full height of the wall or desired area. Use appropriate hardware and ensure it’s level for a clean, professional look. Clean the wall surface thoroughly before installation to prevent gaps. Avoid placing heavy objects directly on the mirror to prevent stress or damage.
Frame the mirror with a slim metallic or wooden border that complements your fixtures. Add a decorative trim or textured backing for a unique look. Incorporate LED backlighting for a modern glow that also helps during nighttime routines. Keep the surrounding space minimal—let the mirror be the star.
A tall mirror not only makes your bathroom feel bigger but also adds a touch of elegance. It’s an easy, affordable upgrade that can completely transform your space. Seeing your reflection in a bright, expansive mirror can boost confidence and make daily routines more enjoyable. Brighten, elevate, and enjoy your new perspective.
8. Use Over-the-Door Hooks and Racks for Additional Storage
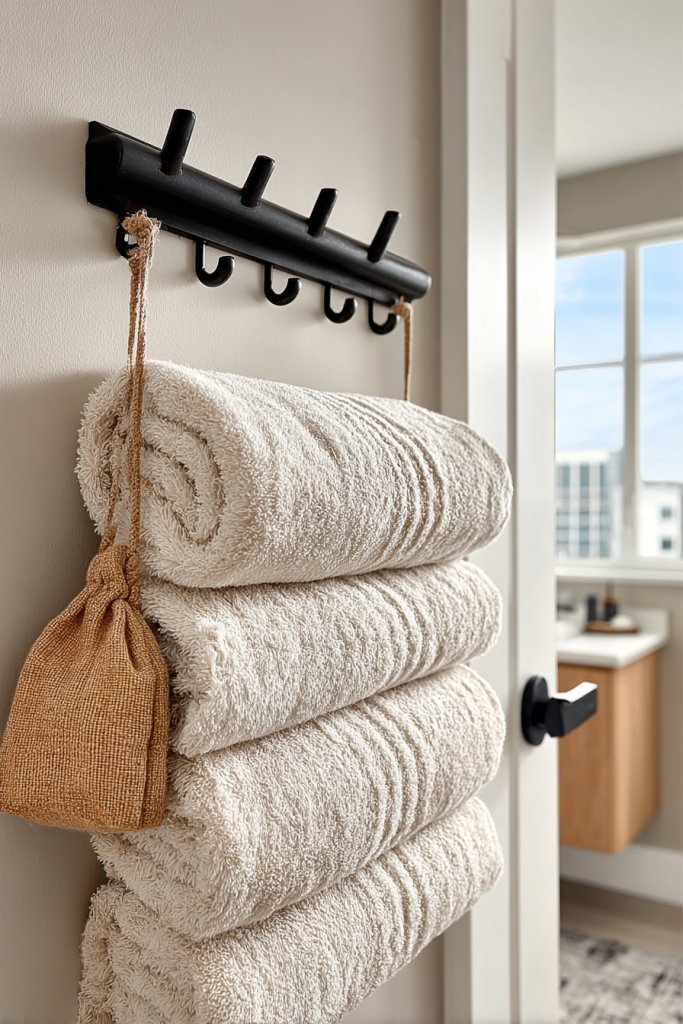
Cluttered counters and cramped closets? Small bathrooms struggle with storage, and adding more furniture isn’t always an option. Over-the-door hooks and racks offer an easy, inexpensive way to add extra hanging space. Want to keep towels, robes, or accessories within arm’s reach without sacrificing floor or wall space? This trick is your friend.
Imagine a series of sleek hooks lined up on the back of your bathroom door, each holding a towel or robe. Or picture a slim, over-the-door rack with multiple bars, neatly organizing your essentials in one place. These simple additions keep your space tidy and functional, with everything hanging in plain sight. The hooks blend into your door’s design, maintaining a clean, uncluttered aesthetic.
Choose hooks in finishes that match your fixtures—chrome, matte black, or brushed nickel. For a more decorative look, opt for hooks with intricate designs or textured details. Use a hanging organizer or caddies for small items like brushes or toiletries. Seasonal swaps can include different towel colors or decorative hangers to match your mood.
Select hooks or racks that fit your door thickness and weight capacity. Install with screws or adhesive strips based on your preference—screws are more secure, but adhesive is less invasive. Position hooks at varying heights for easy access or to accommodate different items. Keep the installation level and test the weight before hanging heavy towels or robes. Regularly check hooks for stability and tighten if needed.
Decorate hooks with themed hangers or fabric wraps for a personalized touch. Use color-coordinated towels or accessories to create a cohesive look. Consider adding a small decorative mirror or art piece above the hooks for visual interest. Keep it simple but stylish—these little touches elevate everyday routines.
Over-the-door hooks are a simple, clever way to maximize space and organization. They’re perfect for renters or anyone wanting a quick upgrade without remodeling. Once you see your bathroom stay tidy and clutter-free, you’ll wonder why you didn’t do this sooner. Small changes lead to big improvements in daily comfort.
9. Incorporate Fold-Down or Hidden Toilets for Maximum Flexibility
Ever wish your tiny bathroom had a secret weapon against clutter? Fold-down or hidden toilets are the ultimate space-saving heroes. They hide away when not in use, freeing up floor space for other activities or just making the room feel less crowded. Who wouldn’t want a bathroom that’s both functional and cleverly discreet?
Picture a sleek wall panel that conceals the toilet when folded up. When needed, simply lower it into place, revealing a modern, compact fixture. The smooth surface of the panel blends into the wall, maintaining a clean, uninterrupted look. When closed, the bathroom looks more like a stylish closet than a restroom.
Choose a fold-down model with a minimalist seat and contemporary finish for a sleek vibe. For more rustic spaces, consider hidden toilets with wood or stone paneling. Some designs include a small sink or countertop on top of the panel for added utility. Seasonal decor options are limited here—focus on the quality of materials and seamless design.
Installing a fold-down toilet requires precise wall framing and sturdy hinges. Start by selecting a model that fits your space and weight capacity. Ensure the wall is reinforced to support the fixture when lowered. The panel must be flush with the wall when closed for a seamless appearance. Connect plumbing carefully, sealing all joints for water tightness. Regular maintenance is needed to keep hinges functioning smoothly.
Add a decorative handle or textured wall paneling to make the hidden panel a feature. Use contrasting paint or wallpaper around the panel to accentuate the design. Keep cleaning products and accessories stored nearby for convenience. Seasonal touches like a fabric cover or decorative latch can personalize the look.
Fold-down toilets are a futuristic, stylish solution for small bathrooms. They make your space more flexible and hide clutter behind a sleek façade. Once installed, you’ll love how effortlessly your bathroom transforms from functional to fashionable. The future of tiny bathrooms is here—discreet, smart, and space-efficient.
10. Select Narrow or Corner Shelving Units for Extra Storage
Running out of space for your toiletries without turning your bathroom into a cluttered mess? Narrow or corner shelving units are perfect for squeezing storage into those tight spots. They make use of otherwise wasted space, giving you room for everything without overwhelming the room. Want extra storage without sacrificing style?
Imagine a tall, slender shelf tucked into a corner, holding neatly arranged bottles, jars, and folded towels. Or visualize a narrow wall-mounted unit beside the sink, providing quick access to daily essentials. Textured wood or glossy finishes add visual interest, making even small shelves a design feature. The vertical lines draw the eye upward, creating an illusion of height.
Choose open shelving for easy access or enclosed units to hide clutter. Use colorful baskets or decorative containers inside the shelves for a personalized touch. Adjust shelf heights to accommodate taller bottles or bulkier items. For seasonal updates, swap out accessories or reorganize for new aesthetics. Keep the design aligned with your overall bathroom style.
Measure the available corner or wall space carefully. Mount the shelving units securely into wall studs or use heavy-duty anchors if needed. Use waterproof materials to prevent damage from humidity. For a cohesive look, match the shelf finish with existing fixtures or tiles. Keep the installation level and spaced appropriately for accessibility. Regularly dust and reorganize to maintain a tidy appearance.
Decorate shelves with small sculptural objects or textured containers to add personality. Incorporate seasonal or themed accessories for a fresh look. Use labels for organized storage of small items like cotton balls or brushes. Enhance visual appeal with textured baskets or layered textiles nearby. These simple touches elevate your storage from functional to fashionable.
Corner and narrow shelves are a smart way to turn tiny spaces into tidy zones. They boost your bathroom’s functionality without sacrificing style. With a little organization, your space will feel more open and inviting. Small updates like these can make your bathroom feel brand new—compact, clever, and chic.
11. Install a Space-Saving Towel Warmer or Rail on the Wall
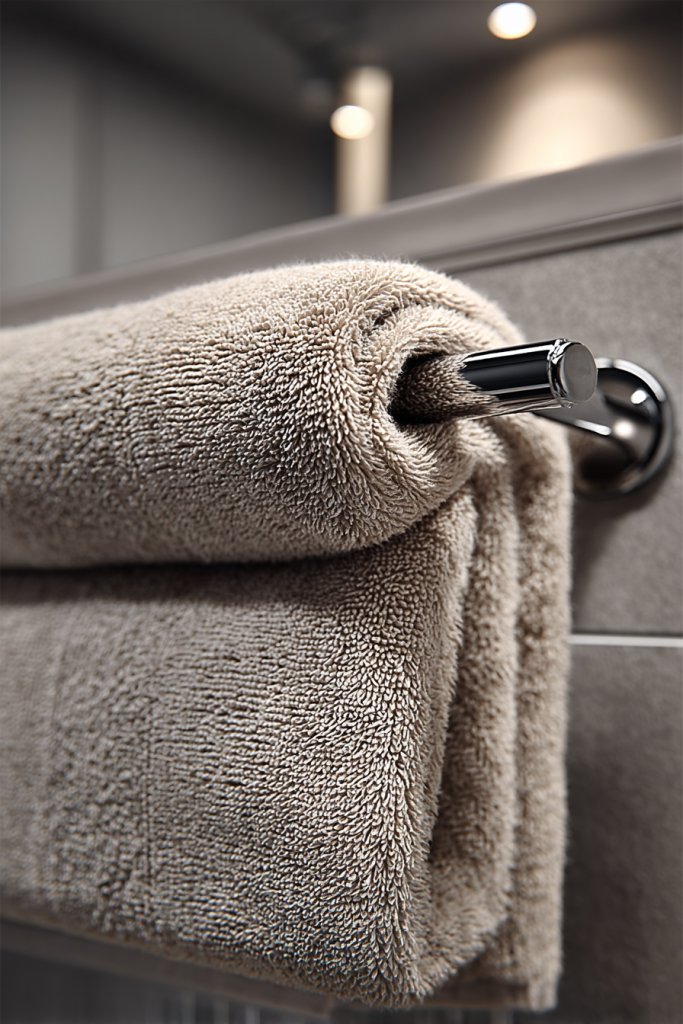
Nothing beats the feeling of wrapping up in a warm towel after a shower—especially in a small bathroom where space is tight. Wall-mounted towel warmers or rails are perfect for keeping towels dry, warm, and within reach without cluttering your limited space. Want to add a touch of luxury and practicality?
Picture a sleek, vertical heated towel rack mounted on the wall, with plush towels draped over it. The metallic finish gleams softly, complementing your fixtures. When turned on, the towels heat up gently, offering instant comfort. The vertical design keeps the floor clear, and the overall look adds a modern, spa-like vibe to your bathroom.
Choose from various finishes—chrome, matte black, or brushed nickel—to match your decor. For a rustic look, opt for a wrought iron or antique brass finish. Some models include multiple bars for more towels or a combination of hooks and rails. Seasonal updates can be as simple as swapping towels or adding decorative textile layers.
Install the towel warmer or rail at a comfortable height, ensuring proper electrical or plumbing connections. Use wall anchors to secure it into studs or solid backing for safety and stability. Keep wiring away from moisture and ensure proper grounding. Turn on the unit to test heat distribution, and clean regularly to prevent dust buildup. Keep towels from overloading the bars for even heating.
Add colorful or textured towels to match your bathroom’s palette. Use decorative hooks or clips to hang small accessories nearby. For a cozy touch, pair with a soft, textured bathmat that complements your towels. Seasonal accents like patterned or embroidered towels can refresh the look easily.
A wall-mounted towel warmer elevates your bathroom’s comfort and style effortlessly. It’s a small upgrade that makes a big difference, offering daily indulgence and practicality. Once you experience warm towels every day, you’ll wonder how you ever managed without one. Cozy, functional, and space-efficient—your bathroom’s new best friend.
12. Use Multi-Functional Fixtures like a Combined Sink and Storage Cabinet
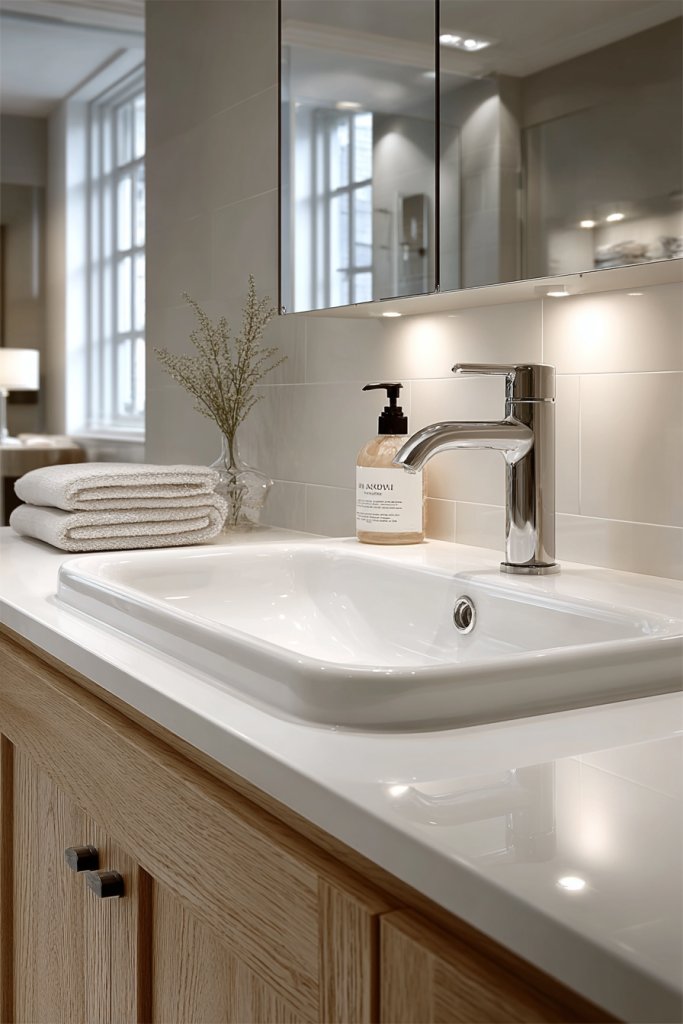
Limited bathroom space often means sacrificing storage for style, or vice versa. Multi-functional fixtures that combine a sink with storage are a smart way to kill two birds with one stone. They let you keep essentials close at hand without cluttering your tiny space. Who says practicality can’t be stylish?
Imagine a sleek vanity with a compact sink sitting atop a built-in cabinet or drawers. The cabinet’s clean lines and minimal hardware blend seamlessly into the wall, offering hidden storage for toiletries and cleaning supplies. The glossy surface and modern handles give it a fresh, contemporary appeal. It looks tidy, organized, and thoughtfully designed—all in a small footprint.
Select a unit with open shelving for quick access or enclosed cabinets for a minimalist look. Materials vary from water-resistant wood composites to glossy ceramics and sleek metals. For a rustic or industrial vibe, choose textured finishes like concrete or reclaimed wood. Seasonal accessories, like colorful towels or decorative containers, can add personality without clutter.
Measure your available space carefully and choose a fixture that fits comfortably. Connect plumbing lines efficiently, hiding pipes behind panels or within cabinetry. Secure the unit to the wall for stability, ensuring the weight is supported properly. Use waterproof sealants around fixtures and joints. Regular cleaning of surfaces and hardware ensures longevity and maintains a fresh appearance.
Add a decorative backsplash or textured countertop to elevate the look. Incorporate personalized handles or knobs for a unique touch. Use organizational accessories inside the cabinets—like baskets or trays—to keep everything tidy. Seasonal updates, such as changing the hardware finish or adding decorative textiles, can refresh the overall vibe.
A combined sink and storage unit maximizes utility in small bathrooms, proving less is more. It streamlines your space while offering ample storage for daily essentials. Once you see how organized and spacious your bathroom becomes, you’ll be inspired to keep it that way. Practical, stylish, and efficient—your new favorite upgrade.
13. Incorporate Light-Reflecting Finishes and Surfaces for Brightness
Brightening a small bathroom isn’t just about adding more lights—it’s about making every surface work for you. Light-reflecting finishes and surfaces bounce light around, creating a sense of openness and airiness. Want your tiny space to feel twice as big without knocking down walls? This is your secret weapon.
Picture glossy white tiles that shimmer with every movement, bouncing natural and artificial light throughout the room. A high-shine faucet and fixtures catch reflections, adding sparkle and depth. The mirror’s reflective surface amplifies the light, making the entire space glow. The combined effect transforms a cramped bathroom into a bright, inviting retreat.
Choose polished porcelain or glass tiles for walls and floors. Metallic fixtures, like chrome or brushed nickel, reflect light beautifully. For a softer glow, incorporate textured or matte surfaces sparingly, balancing shine with subtlety. Seasonal decor can include light-colored textiles or delicate accessories that enhance the reflective theme.
Prioritize high-gloss or reflective finishes during renovation. Use light-colored grout and sealants to enhance the brightness of tiles. Incorporate layered lighting—overhead, sconces, or under-cabinet LEDs—to maximize reflectivity. Keep surfaces clean and streak-free to maintain their luminous effect. Regular polishing of fixtures helps sustain the shine.
Add decorative, reflective accessories like metallic soap dishes or textured glass jars (avoid vases, per restrictions). Use light-colored or metallic textiles to amplify brightness. Incorporate a large, frameless mirror to double the visual space. Seasonal updates might include shiny metallic accents or light-reflecting artwork, but keep it minimal.
Bright, reflective surfaces instantly elevate your small bathroom’s style and spaciousness. They make the space more cheerful and welcoming, encouraging you to enjoy your daily routines. With just a few surface upgrades, your bathroom will feel open, fresh, and more luxurious than it actually is. Shine on!
14. Apply Clear or Frosted Glass Partitions to Divide Zones Without Clutter
Trying to separate shower from toilet without sacrificing space? Heavy, opaque partitions can make a tiny bathroom feel even smaller. Clear or frosted glass partitions are the perfect compromise—they define zones while maintaining an open, airy feel. Want privacy without the claustrophobia?
Imagine a transparent glass panel that encloses your shower area, almost disappearing into the background. The frosted option offers privacy with a textured surface that diffuses light, creating a soft glow. The sleek frame or frameless design blends seamlessly into your decor, making the space feel larger and less confined. The subtle division adds style without visual bulk.
Choose frameless panels for a modern, minimal aesthetic or framed glass for a more traditional look. Frosted or textured glass offers privacy, perfect for shared bathrooms. Install panels at the edge of the shower or create a partial divider to maximize light flow. Seasonal decor isn’t necessary—simplicity keeps the focus on the transparent design.
Measure your space carefully to determine panel size and placement. Use professional glass installers to ensure safety and precision. Seal all edges with waterproof, mold-resistant silicone to prevent leaks. Choose tempered glass for durability and safety. Regular cleaning with glass cleaner maintains clarity and shine, enhancing the illusion of space.
Add subtle decorative details like textured frames or colored accents that match your fixtures. Incorporate frosted patterns or etched designs for a personalized touch. Keep the surrounding area clutter-free to let the glass stand out. Seasonal updates could include changing the color tint or adding decorative decals—if allowed.
Glass partitions define your space beautifully without crowding it. They’re an elegant solution that combines function with style, making your bathroom feel more open and organized. Once installed, you’ll appreciate how they enhance privacy and light flow. Small changes like these turn your tiny bathroom into a sophisticated retreat.
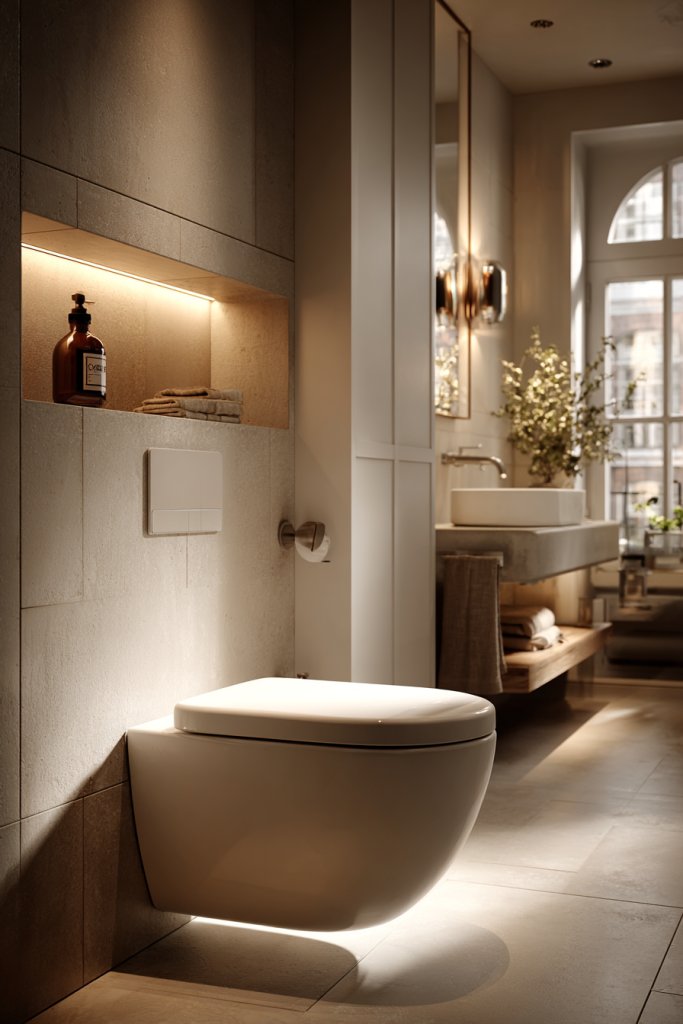
15. Maximize Small Wall Areas with Slim-Line Cabinets or Medicine Cabinets
Cluttered countertops and overflowing drawers ruin the sleekness of your small bathroom? Slim-line cabinets and medicine cabinets are perfect for squeezing in extra storage without adding bulk. They fit into narrow wall spaces and keep your essentials out of sight. Want to keep your bathroom looking tidy and modern?
Picture a narrow, wall-mounted cabinet above the sink, with a mirrored front that doubles as a functional mirror. The sleek design blends into the wall, creating a seamless look. Inside, neatly organized shelves hold toiletries, medicines, and small accessories. The reflective surface of the mirror enhances light and depth, making the space feel larger.
Choose frameless, mirrored cabinets for a minimalist appearance or add decorative frames for personality. Use high-gloss or matte finishes to match your fixtures. Vertical or horizontal orientations work depending on your wall layout. Seasonal accessories, like colorful handles or decorative trims, can personalize the look. Keep the design simple to preserve the sense of openness.
Measure available wall space carefully to select appropriately sized cabinets. Install brackets into wall studs or use strong anchors for stability. Mount at eye level or above the sink for convenience. Seal around the edges with waterproof silicone to prevent moisture damage. Keep the cabinet doors clean and free of fingerprints for a polished appearance. Reorganize periodically to maintain tidiness.
Add decorative handles or knobs that match your hardware for a cohesive look. Incorporate small organizational accessories inside to maximize space. Use labels or color-coded bins to keep everything tidy. Seasonal updates can include changing handles or adding a small decorative element on the cabinet door.
Maximizing small wall space with slim cabinets keeps your bathroom looking sleek and uncluttered. They provide essential storage without overwhelming the room’s size. Once you see how much tidier your space becomes, you’ll be motivated to keep it that way. Small updates like these bring big style and organization benefits.
16. Use Creative Corner Solutions for Toiletries and Cleaning Supplies
Ever feel like your toiletries and cleaning supplies are taking over every available surface? Corners are often wasted space, but they hold untapped potential. Creative corner solutions like baskets or slim towers help turn these dead zones into efficient storage spots. Want to keep your essentials handy and your bathroom clutter-free?
Visualize a slim, tiered corner shelf fitted snugly into an empty corner, holding neatly arranged bottles and brushes. Or imagine a vertical, narrow storage tower with multiple compartments, standing discreetly in a corner. Woven baskets or textured containers add visual interest and texture. The space feels organized, with everything within reach without cluttering the main areas.
Choose tiered baskets for flexibility or slim, modular towers for a more structured look. Match the materials and finishes to your overall decor—wood, metal, or plastic in neutral or bold colors. Use labels or color coding for quick identification of supplies. Seasonal updates might include swapping out baskets or adding decorative touches to the containers.
Assess the corner’s dimensions carefully before choosing solutions. Install tiered shelves or towers with wall brackets or secure them with adhesive strips if appropriate. For heavier items, anchor into wall studs for safety. Keep the area clean and periodically reorganize to improve accessibility. Use moisture-resistant materials, especially in humid environments. Regularly check stability and adjust as needed.
Decorate baskets with fabric covers or textured wraps that match your decor. Incorporate decorative labels or tags for easy identification. Use colored or patterned containers to add personality. Seasonal swaps like new baskets or decorative accents keep the space fresh and inviting.
Creative corner solutions maximize every inch of your small bathroom, turning wasted space into usable storage. They keep your essentials within easy reach and your space looking tidy. Seeing your bathroom stay organized boosts confidence and makes daily routines smoother. Small changes, big results—go corner smart!
17. Mount a Small, Slim LED Light Fixture for Bright, Space-Enhancing Illumination
Feeling like your small bathroom is never quite bright enough? Overhead lighting can feel overwhelming or inadequate in tiny spaces. A small, slim LED fixture offers powerful illumination without taking up valuable space. It’s a simple way to brighten your room and improve functionality.
Imagine a narrow, sleek LED strip or puck light mounted flush against the ceiling or wall. The crisp, white light floods the space evenly, eliminating shadows. The slim profile blends seamlessly into the room’s design, emphasizing openness and modernity. The gentle glow makes every surface sparkle, giving your bathroom a fresh, lively feel.
Choose from warm or cool white tones depending on your mood. Install dimmable fixtures for adjustable lighting, perfect for relaxing baths or bright mornings. Incorporate multiple fixtures for layered lighting—think vanity task lights combined with ambient LEDs. Seasonal updates might include colored LED strips for festive touches, but keep it subtle.
Select fixtures designed for moisture-prone environments, ensuring safety and longevity. Mount the lights securely into ceiling or wall surfaces using appropriate brackets and wiring. Connect to a dimmer switch or smart lighting system for flexibility. Ensure wiring is concealed and protected from humidity. Regular cleaning and bulb checks keep the lighting effective and bright.
Add decorative lighting accents, like a backlit mirror or under-shelf LEDs, to amplify brightness and style. Use color-changing LEDs for mood lighting or seasonal themes. Pair with textured or patterned textiles that reflect light subtly. Keep the installation minimalist to maintain the room’s open feel.
A small, slim LED fixture transforms your bathroom into a bright, welcoming space. It’s an energy-efficient upgrade that enhances safety and ambiance. Once you see how well it illuminates every corner, you’ll wonder how you managed in the shadows before. Bright ideas lead to brighter spaces—literally!
18. Keep Decor Simple with Neutral Tones and Functional Accents

Overcrowded decor can make a tiny bathroom feel chaotic and cramped. Simplifying your decor with neutral tones and functional accents creates a calm, cohesive environment. Want a space that’s both relaxing and practical? Less is definitely more here.
Visualize a bathroom with soft beige walls, white towels, and minimalist fixtures. The neutral palette creates a seamless flow that makes the room look larger and more open. Functional accents like a simple soap dish, a sleek toothbrush holder, and a small storage container keep everything tidy. The overall effect is a tranquil, clutter-free oasis.
Stick with monochromatic or analogous color schemes for a harmonious look. Incorporate textured textiles—like a woven rug or a linen shower curtain—to add visual interest without clutter. Use natural materials like wood or stone for accents to bring warmth and earthiness. Seasonal updates can include subtle changes in accessories, like new towels or a decorative tray.
Choose neutral-colored paint and fixtures that complement each other. Keep accessories minimal—avoid over-decoration. Use clever storage solutions like baskets or small shelves to keep clutter out of sight. Regularly review and refresh your decor to maintain a clean, uncluttered look. Focus on quality and simplicity for lasting style.
Introduce textured textiles or subtle patterns in neutral shades for added depth. Use functional accents—like a well-designed soap dispenser or a compact mirror—that serve dual purposes. Keep decorative items minimal but meaningful, such as a simple sculpture or a meaningful keepsake. Seasonal touches can be as easy as swapping out towels or adding a decorative tray.
Simple, neutral decor creates a peaceful, timeless bathroom aesthetic. It’s easy to maintain and adapts easily to changing tastes. Seeing your space clean and cohesive boosts confidence and encourages ongoing organization. Sometimes, stripping back to basics is the best way to elevate your daily routine.
Conclusion
Exploring these diverse small toilet room ideas shows that smart design can transform even the tiniest spaces into functional and stylish areas. From clever storage hacks to space-enhancing layouts, each idea offers a chance to reimagine your bathroom. Don’t hesitate to try these ideas in your own home and enjoy the satisfying blend of form and function. Your perfect small bathroom is just an inspired step away!