You’d think slapping some foam on your ceiling and calling it a day would solve your upstairs neighbor problem. Turns out soundproofing is one of those things that seems simple until you actually try to do it, and then you realize sound is basically a liquid that finds every crack, gap, and weak point in your ceiling like water through a leaky roof.
The good news is there are real solutions that work. The bad news is most of them involve more than a trip to the hardware store and a staple gun.
Why Sound Is Such a Pain in the First Place
Sound moves through your house in two main ways, and both of them are working against your peace and quiet right now. Airborne sound travels through the air like you’d expect—voices, music, that TV show your neighbor watches at full volume at 11 PM. Then there’s impact sound, which is what happens when your upstairs neighbor’s kid discovers jumping off furniture or decides to rearrange their entire bedroom at midnight.
When sound hits your ceiling, it can bounce off, get absorbed, or pass straight through. Which one happens depends on what your ceiling is made of, how dense it is, and honestly how well your house was built in the first place. Frequency matters too. Low-frequency sounds like bass or heavy footsteps are way harder to block than higher-pitched noises.
All of this means there’s no magic bullet. Different types of noise need different solutions, which is why effective soundproofing usually involves combining a few techniques instead of relying on just one.
Acoustic Panels: The Good-Looking Option
Acoustic panels are basically thick pieces of foam or fabric-wrapped fiberglass that you mount to your ceiling to absorb sound waves. They work by catching those sound waves before they can bounce around your room creating echoes and making everything louder than it needs to be.
The science is straightforward. Sound hits the panel, the material converts that energy into tiny amounts of heat through friction, and the sound wave dies instead of reflecting back into your space. Thicker and denser panels work better, which makes sense when you think about it.
Here’s the thing though. These panels are great for improving the sound quality inside your room, like if you’re setting up a home studio or just want your living room to sound less like a cave. They’re less effective at stopping noise from traveling between floors. They’ll help, but they’re not going to completely block out your neighbor’s subwoofer.
The upside is they come in different colors and designs now, so you’re not stuck with that recording studio egg crate look unless that’s what you’re going for. You can find panels that actually match your decor, which is a nice change from the usual “function over form” approach to soundproofing.
Resilient Channels and Sound Isolation Clips: The Serious Stuff
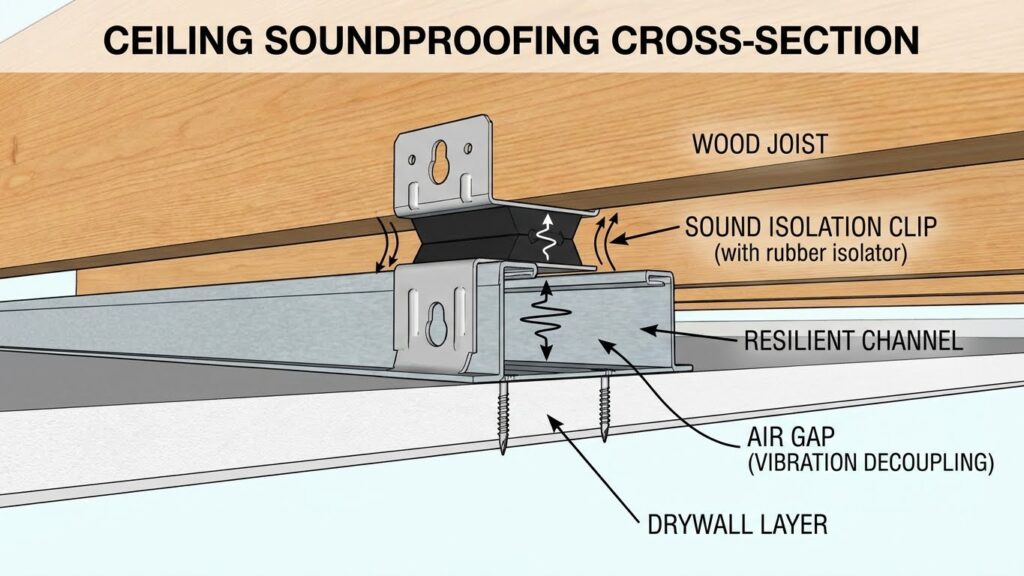
Now we’re getting into solutions that actually involve some real work. Resilient channels are metal strips that you attach to your ceiling joists before you hang drywall. The drywall attaches to the channels instead of directly to the joists, which creates a gap that interrupts the path sound takes through your ceiling.
Think of it like this. Normally your ceiling is one continuous piece from the joists down to the drywall, and sound vibrations travel right through that solid connection. Resilient channels break that connection by introducing a flexible layer that absorbs the vibrational energy instead of passing it along.
Sound isolation clips work on the same principle but they’re even more effective. These clips attach to the joists, then special channels snap into the clips, and your drywall goes on those channels. The whole system is designed to minimize any rigid connection points where sound can sneak through.
I’m not going to sugarcoat it. Installing these systems means either building a new ceiling or tearing down your existing one. That’s a real project, not a weekend DIY job. But if you’re serious about blocking noise between floors, this is one of the most effective methods out there. You’re creating actual physical separation between your living space and whoever’s stomping around above you.
The key is precise installation. You need to follow the spacing requirements exactly, and when you screw the drywall to the channels, those screws cannot touch the joists. Even one screw that goes too far creates a sound bridge that undermines the whole system. Use acoustical caulk on the seams too, because gaps defeat the purpose.
Insulation: Filling the Gaps
Fiberglass insulation in your ceiling cavities does double duty for thermal and acoustic performance. The material’s density and thickness help it absorb sound waves passing through your ceiling, reducing both airborne noise and impact noise from above.
Fiberglass has a high Noise Reduction Coefficient, which is just a fancy way of measuring how much sound energy it absorbs versus reflects. Higher numbers mean better sound absorption. Standard insulation batts work, but if you’re specifically targeting sound, look for products designed for acoustic applications.
The material itself is non-combustible and moisture-resistant, so it lasts. Install it in the cavity space between your ceiling joists before you put up drywall, and make sure you fill the space completely without compressing the insulation too much. Compressed insulation loses effectiveness.
Acoustic foam panels are a different animal. These are open-cell polyurethane panels designed specifically to absorb sound waves and reduce echo. They work great for treating the acoustics inside a room but they’re not really insulation in the traditional sense. Thickness and density matter here too, and strategic placement makes a difference. You don’t necessarily need to cover your entire ceiling. Focus on larger surface areas or the spots where noise is worst.
Mineral wool is another option worth mentioning. It’s denser than fiberglass and some people swear it performs better for soundproofing, though it costs more. Your call on whether the extra expense is worth it.
Drop Ceilings: Hiding Problems in Plain Sight
A drop ceiling with acoustic tiles gives you sound reduction and a finished look at the same time. The tiles themselves are made from materials designed to absorb sound, and the air gap you create between the drop ceiling and your actual ceiling adds another layer of sound insulation.
This is a practical solution for basements, home offices, or anywhere you’ve got exposed joists and want to improve acoustics without major construction. The tiles slide into a metal grid system that hangs below your existing ceiling, so installation is relatively straightforward if you’re even moderately handy.
The air gap is key. That space between the drop ceiling and the structure above interrupts sound transmission by adding distance and breaking direct contact. Combine acoustic tiles with insulation in that cavity and you’ve got a pretty effective system.
Drop ceilings also let you hide wiring, pipes, and ductwork while keeping access if you need to get up there later. You can swap tiles out individually if one gets damaged. The look is modern and clean if you choose decent tiles, though I’ll admit drop ceilings still remind some people of office buildings and not in a good way.
Other Tricks Worth Knowing
Soundproofing paint exists and it actually works, sort of. The paint contains sound-dampening materials that add mass to your ceiling and reduce noise transmission. Will it block your neighbor’s home theater system? No. Will it help as part of a larger soundproofing strategy? Sure.
Seal every gap and crack you can find with acoustical caulk. I mean every single one. Sound finds openings like a bloodhound, and even tiny gaps can wreck your soundproofing efforts. Around light fixtures, where walls meet ceiling, anywhere two surfaces come together, hit it with caulk.
Mass-loaded vinyl is a dense, flexible material you can install between layers of drywall or under flooring. It adds mass without taking up much space, and mass is one of your best weapons against sound. The stuff is heavy and awkward to work with, but it’s effective.
If you’re going all out, consider adding a second layer of drywall with Green Glue sandwiched between the layers. Green Glue is a viscoelastic compound that converts sound energy to heat. Use it between two layers of drywall and you’ve got a serious sound barrier. Just know that you’re adding weight to your ceiling, so make sure your structure can handle it.
Heavy curtains or sound-absorbing panels on your walls can complement your ceiling work too. Sound doesn’t just travel through ceilings. It bounces off walls and floors and finds paths you wouldn’t expect. A comprehensive approach beats focusing on just one surface.
Putting It All Together
Look, effective ceiling soundproofing isn’t cheap or easy. The methods that work best involve actual construction, adding mass and creating physical separation between surfaces. Acoustic panels and soundproofing paint help, but they’re not going to solve serious noise problems on their own.
Your best bet is combining techniques. Resilient channels or sound isolation clips to decouple your drywall. Insulation in the ceiling cavity to absorb sound. Acoustic panels if you want to improve the sound quality inside the room too. Caulk everywhere to seal gaps. Maybe a drop ceiling if that fits your space and budget.
The payoff is real though. A properly soundproofed ceiling means you can actually relax in your own home without hearing every footstep, conversation, and furniture scrape from above. That peace and quiet is worth the effort, especially if you work from home or just value being able to watch TV without cranking the volume to compete with your neighbors.
Just set realistic expectations. Even the best soundproofing won’t give you complete silence. You’re reducing noise, not eliminating it. But reducing it by 60 or 70 percent makes a massive difference in how your space feels. That’s the difference between constantly being annoyed and barely noticing the people living above you exist.