Imagine transforming your living space into a stylish haven with a perfectly designed Wall TV Unit—it’s no wonder these setups are gaining popularity! Wall-mounted units not only save space but also add a sleek, modern touch that elevates your entire room aesthetic. They combine functionality with design finesse, making your entertainment area both practical and eye-catching.
In this article, you’ll find a variety of inspiring ideas that cater to different styles and preferences. Whether you love minimalist chic, rustic charm, or bold contemporary designs, there’s something here to spark your creativity and help you craft a stunning focal point in your home.
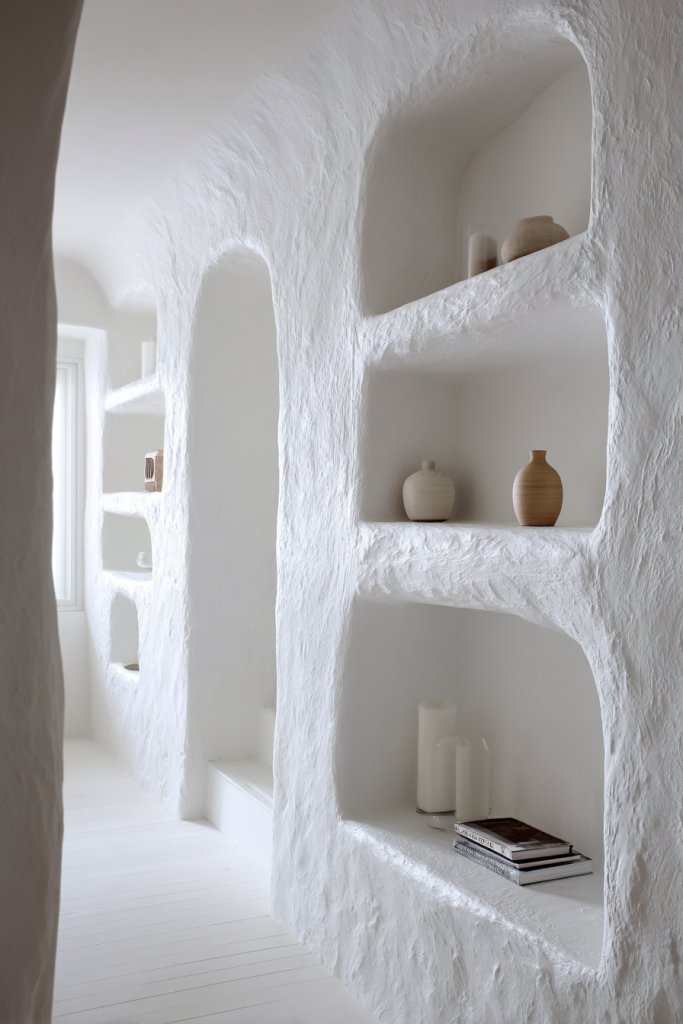
1. Rustic Wood Panel Backdrop with Built-in Shelves
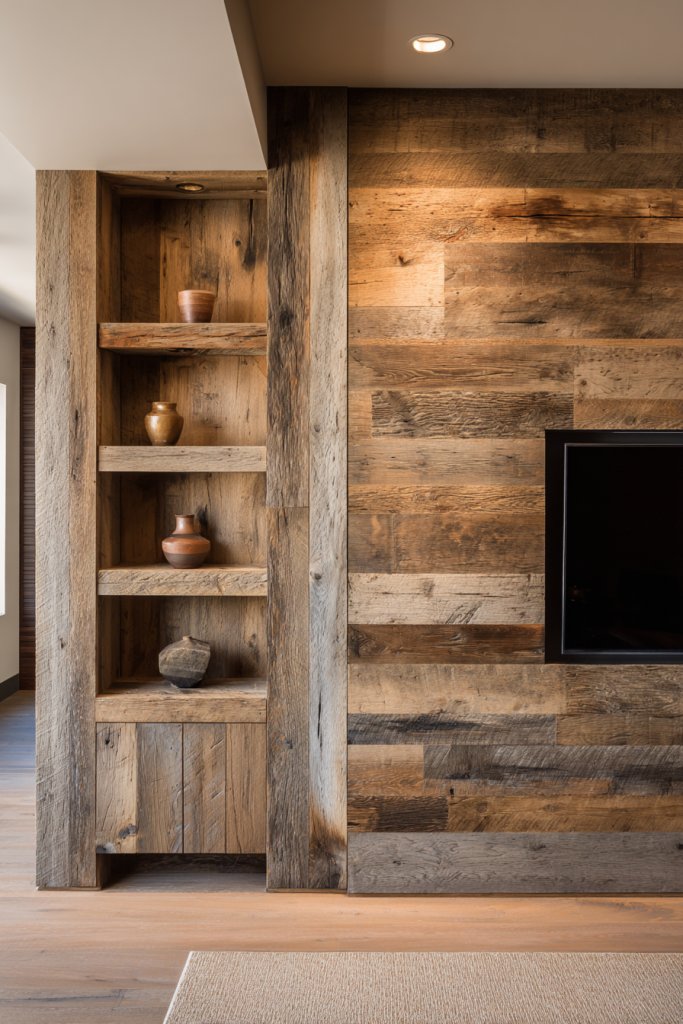
Tired of bland walls making your living room feel dull? Want to add warmth and texture without overdoing it? A rustic wood panel backdrop can do wonders, creating a cozy yet stylish environment. It’s like bringing a bit of nature inside, perfect for those craving a more inviting vibe.
Picture reclaimed wood panels arranged horizontally or vertically behind your TV, their aged grains and knots adding character. Floating shelves made of matching or contrasting wood hold media devices, decor, or books—carefully curated for aesthetic appeal. The natural textures create visual depth, making your wall a focal point. Soft ambient lighting highlights the wood’s warm tones, enhancing the rustic charm.
Opt for darker, weathered woods for a rugged look or lighter, distressed finishes for a more airy feel. Combine with metal brackets or supports for an industrial twist. You can also layer in woven baskets or fabric-lined niches for added texture. This style adapts well to both large open-plan spaces and smaller cozy corners, making it versatile.
Begin by selecting reclaimed or faux wood panels suited for interior walls. Ensure they’re treated for durability and ease of cleaning. Install using wall anchors and spacers to achieve even gaps, creating a uniform look. Position the shelves at varying heights for visual interest, securing them with hidden fixings. Finish by sealing or waxing the wood for added protection and a slight sheen.
Add decorative accents like vintage lanterns, woven baskets, or ceramic sculptures on the shelves. Consider incorporating a small gallery of framed black-and-white photos or vintage posters nearby—just avoid artwork that clashes with the rustic vibe. You can even stain or paint some panels in subtle shades to match seasonal decor.
This rustic backdrop brings a welcoming, handcrafted feel to your space that’s both timeless and trendy. It’s a great way to showcase your personality while creating a warm viewing environment. Once set up, it’s easy to maintain and adapt with new decor accents. Ready to turn your wall into a cozy retreat? Go for it!
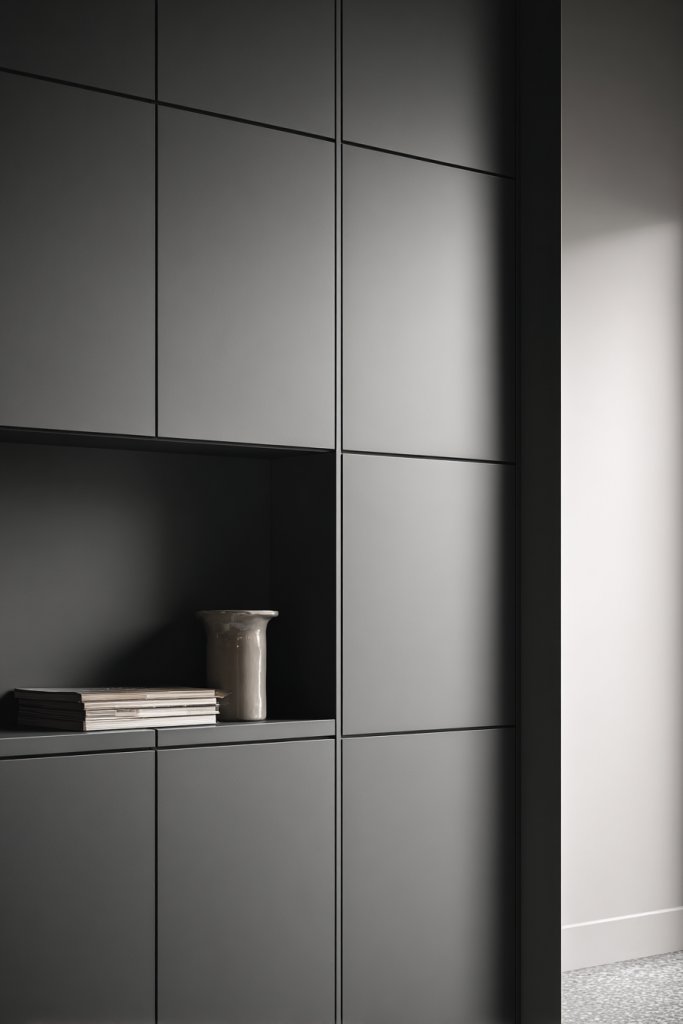
2. Modular Wall-Mounted Cabinets with Geometric Layouts
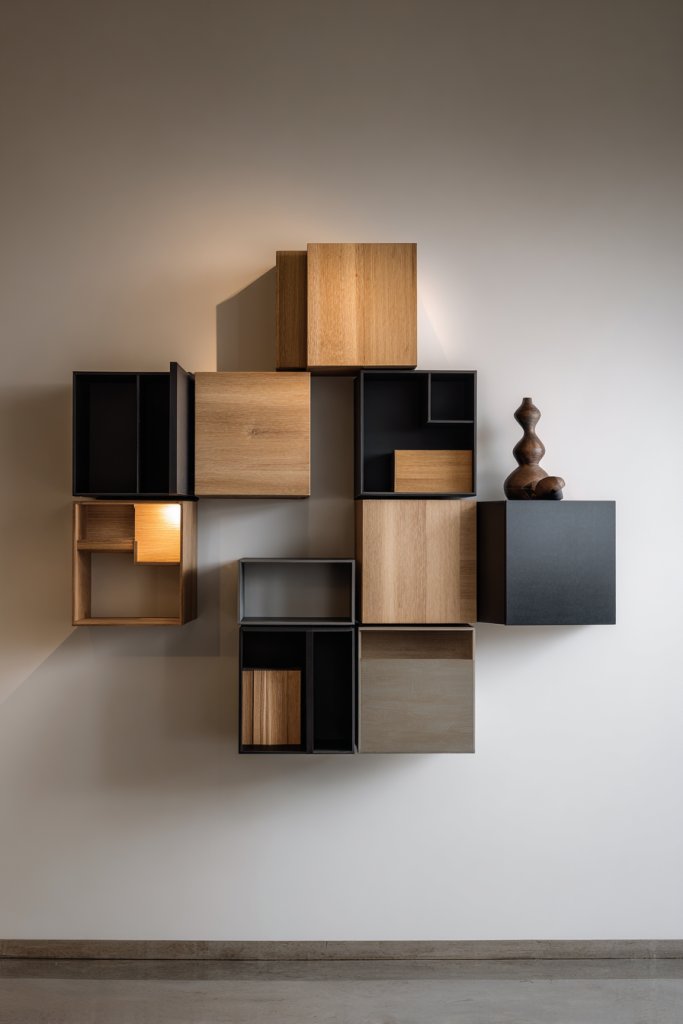
Feeling overwhelmed by clutter but craving a sleek, organized look? Modular wall-mounted cabinets offer a customizable solution that balances function and style. They let you control storage while adding a modern geometric touch to your room. Plus, no more awkward wires or scattered devices cluttering your space.
Imagine a series of cabinets arranged in eye-catching geometric patterns—triangles, rectangles, or hexagons—creating a dynamic visual. The cabinets, in matte or gloss finishes, contrast beautifully with a neutral wall or bold accent color. Open sections display curated decor, while closed compartments hide away electronics and accessories. Integrated lighting inside some modules adds drama and depth.
Choose uniform sizes for a clean, symmetric look or mix different shapes and sizes for a playful, eclectic vibe. Colors can range from monochrome schemes to vibrant hues to match your decor theme. For small rooms, vertical stacking conserves space; for larger areas, spread out the modules for a more expansive feel. Seasonal tweaks could include changing the color palette or adding decorative elements inside open compartments.
Start by planning your layout on paper or with a digital tool, considering your TV size and storage needs. Select modular cabinets with compatible mounting hardware, ensuring they can support your devices. Use a level and measuring tape during installation to keep everything precisely aligned. Secure each module to wall studs with heavy-duty anchors, and hide cables behind or inside the units. Finish by sealing gaps or adding decorative trims for a polished look.
Personalize your setup by adding LED strip lighting inside open compartments or installing decorative handles in different finishes. Incorporate textured backs or patterned panels behind open sections for extra visual interest. You can also integrate small sculptural elements or faux plants in open spaces for a balanced aesthetic. Regular updates to decor inside open compartments keep the look fresh.
This modular, geometric approach elevates your TV wall from ordinary to extraordinary. It offers endless versatility, making it easy to adapt as your needs change. The clean lines and clever storage solutions create a clutter-free, stylish focal point. Ready to experiment with modern design? Go ahead—your wall will thank you!
3. Frameless Wall-Mounted TV with Surrounding LED Backlighting
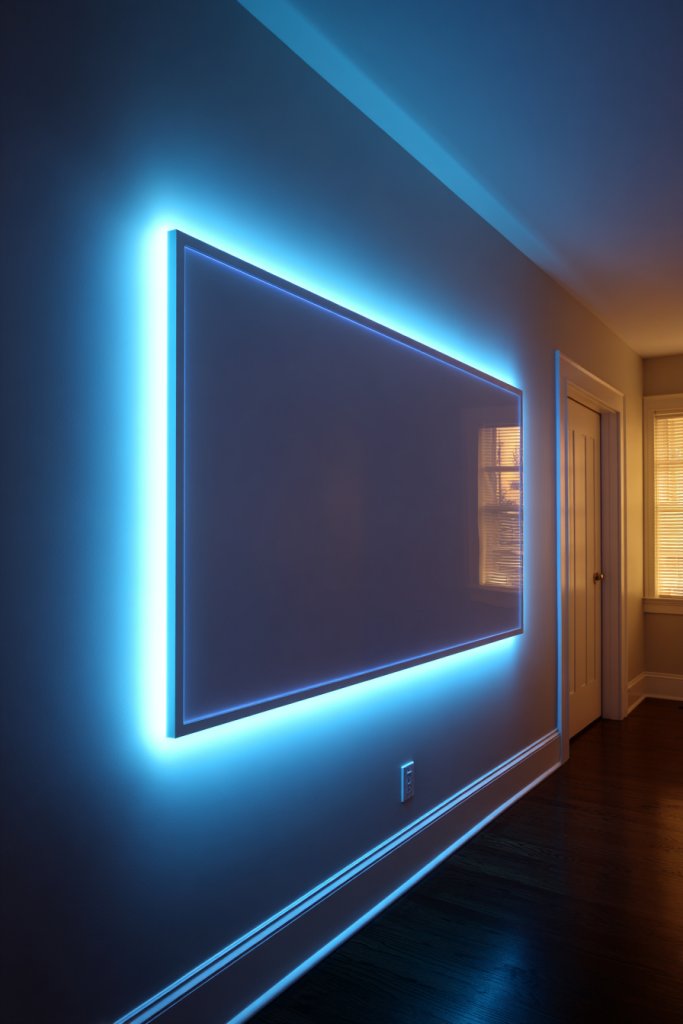
Tired of bulky TV frames distracting from a sleek, modern look? A frameless wall-mounted TV creates a seamless, almost floating effect that’s pure eye candy. Add surrounding LED backlighting, and suddenly your viewing experience becomes cinematic and immersive. It’s a game-changer for minimalist spaces craving a high-tech vibe.
Visualize a TV mounted flush with the wall, its edges disappearing into the surface. Soft LED strips frame the perimeter, casting a gentle glow that enhances color depth and contrast. The light subtly illuminates the wall behind, creating a vibrant, theater-like atmosphere. The entire setup transforms your living room into a sophisticated entertainment hub, all while maintaining a clutter-free aesthetic.
Choose neutral wall colors like charcoal, white, or navy to maximize the backlighting effect. For a more dramatic look, opt for color-changing LED strips that sync with your mood or content. You can also add textured wall finishes, such as matte paint or subtle patterns, to complement the lighting. This idea works well in large open spaces or media rooms designed for binge-watching.
Start by selecting a frameless TV that supports flush wall mounting, and ensure your wall is strong enough to support the weight. Mount the TV using a low-profile bracket, making sure it’s perfectly level. Install LED strips behind the TV and along the wall edges, hiding wires inside conduit or wall channels. Use a remote or app to control the lighting, adjusting brightness and color as desired. Finally, calibrate your TV settings for optimal picture quality in the ambient light.
Add a soundbar below the TV for enhanced audio, blending seamlessly with the minimalist theme. Consider attaching a sleek, fabric-covered acoustic panel nearby to improve sound quality without cluttering the space. Customize the LED colors for different occasions—warm tones for cozy nights, vibrant colors for parties. Keep the wall behind the TV simple or add a textured surface to elevate the look.
This setup offers a sleek, modern aesthetic that impresses guests and elevates your space. It’s perfect for tech lovers and minimalists alike. Once installed, the seamless look and ambient glow make every viewing a cinematic experience. Ready to ditch the bulky frames and embrace the future of TV design? It’s simpler than you think!
4. Industrial Steel and Wood Wall Unit with Open Shelving
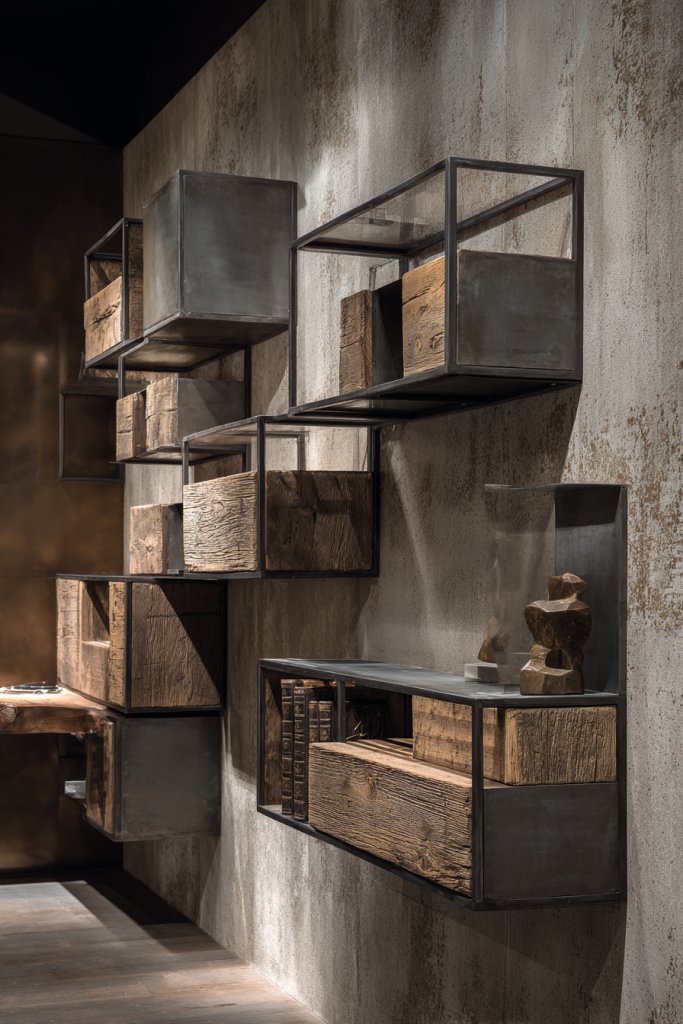
Looking for a bold, edgy look that combines raw materials and functionality? An industrial steel and wood wall unit can give your space that rugged, modern vibe. It’s perfect if you love a mix of metals and natural textures, creating a striking focal point that’s both practical and stylish. Who says your TV wall has to be boring?
Picture a sturdy steel frame with open shelves made of reclaimed or stained wood planks. The industrial pipes support the shelves, adding an architectural element to your wall. The open design means easy access to media devices and decorative accents—think vintage cameras or sculptural objects instead of typical decor. The contrast between metal and wood adds depth, while exposed bolts and rivets reinforce the industrial aesthetic.
Opt for dark metal finishes like matte black or brushed nickel, paired with weathered or dark-stained wood. For a softer look, choose lighter woods and matte black supports. Incorporate different shelf depths for visual interest or add metal brackets for a more rugged feel. This style works well in lofts, garages, or any space craving an industrial edge. Seasonal changes might include swapping out accessories for warmer textiles or metallic accents.
Begin by selecting sturdy steel piping and reclaimed wood planks, ensuring they’re treated for indoor use. Secure the steel frame to the wall with heavy-duty anchors, making sure it’s level and firmly attached. Attach the wooden shelves using brackets or support brackets hidden behind the wood for a seamless look. Arrange your media devices on the shelves, and consider cable management clips to keep wires tidy. Finish by sealing the wood for longevity and aesthetics.
Personalize with vintage industrial lighting fixtures or Edison bulbs in cage pendants above the unit. Incorporate decorative elements like metal sculptures, antique radios, or leather accents nearby. Use storage baskets or metal containers to organize smaller accessories. You can also add a pop of color with textiles or painted supports for a modern twist.
This industrial wall unit transforms your TV wall into a statement piece full of character. It’s a durable, stylish solution that ages beautifully and adapts over time. Your space will exude confidence and creativity, inspiring conversations and admiration. Eager to embrace the industrial look? Start with simple materials and build from there—you’ll love the results!
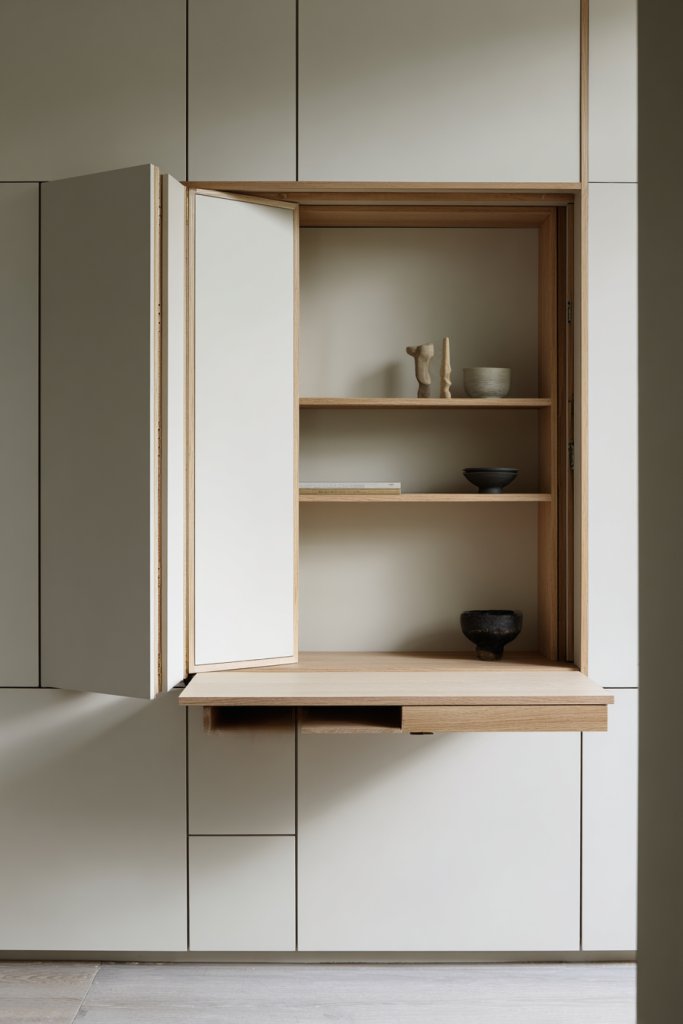
5. Scandinavian-Inspired Wall Panel with Integrated Storage
Craving a clean, calming space that feels both modern and cozy? Scandinavian design offers a perfect balance with light tones and simple lines. An integrated wall panel with hidden storage keeps your room clutter-free while embracing a minimalist aesthetic. It’s like bringing tranquility into your entertainment zone.
Imagine a wall clad in soft, whitewashed wood panels that stretch from floor to ceiling, creating a seamless backdrop. Built-in niches and shelves are subtly incorporated into the panels, holding essential media devices or decorative objects. The natural light bouncing off the light-colored surfaces makes the space feel airy and bright. The overall look is sleek, with a focus on functionality and understated beauty.
Choose natural wood finishes like birch or ash, or go for painted panels in pastel shades for a softer look. Incorporate open shelves or hidden compartments based on your storage needs. This style adapts well to small apartments or large open-plan rooms, providing a sense of order without visual clutter. Seasonal updates might include swapping decor items or changing the color palette for a fresh look.
Start by selecting high-quality, lightweight wood panels, ensuring they’re treated for durability. Mount panels using hidden brackets or clips for a seamless appearance. Design your built-in niches and shelves in a planned layout that accommodates your media devices. Use precision tools to cut and install the panels and fixtures accurately. Finish with a clear or matte sealant to protect the surface and enhance the natural grain.
Add soft textiles like woven poufs or plush cushions nearby to enhance comfort. Incorporate minimalist decor such as ceramic bowls or simple vases—no artwork or plants, per restrictions. Customize by installing subtle lighting within niches or under shelves for a gentle glow. Use personal mementos that keep the space lively without cluttering the clean aesthetic.
This Scandinavian-inspired wall panel creates a peaceful, stylish retreat that’s easy to maintain. It emphasizes quality over quantity, making your entertainment area both functional and beautiful. Once set up, it’s a calming focal point that complements a modern lifestyle. Feeling inspired to embrace minimalism? This is your blueprint!
6. Multi-Tiered Wall Unit with Floating Desks and Cabinets
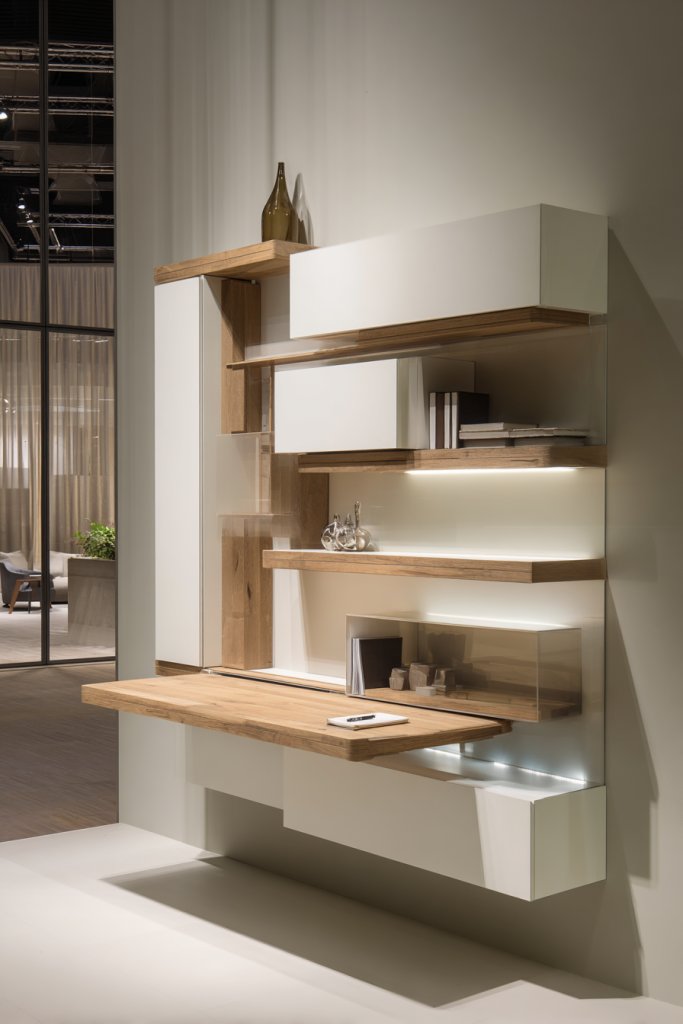
Feeling squeezed for space but craving a multifunctional setup? A multi-tiered wall unit with floating desks and cabinets offers the perfect solution. It combines entertainment, work, and storage zones into one sleek design. No more sacrificing style for practicality—this setup delivers both.
Visualize a layered wall with floating cabinets at different heights, some open for display, others closed for hidden storage. A slim, fold-away desk extends from the wall, perfect for work or hobbies. The tiers create a dynamic visual rhythm, guiding your eye across the room. The combination of textures—matte cabinets, wood desktops—adds richness and depth.
Opt for light-colored woods or painted finishes to match your aesthetic. For larger spaces, extend the tiers horizontally; in smaller rooms, stack vertically for space efficiency. The floating desk can be a permanent feature or a fold-down model for flexibility. Adapt the storage to include drawers, open shelves, or niches based on your needs.
Begin by measuring your wall and planning the layout on paper. Use sturdy wall anchors and supports designed for floating furniture. Mount the cabinets at varying heights for visual interest, ensuring they’re level and secure. Attach the fold-out desk with durable hinges and supports, testing for stability. Organize your media devices and office supplies within the cabinets, keeping wires tidy with clips or conduits. Finish with paint or veneer to match your decor.
Add decorative accents like textured wall panels or sculptural elements on the cabinets. Personalize the workspace with a comfortable, ergonomic chair or a soft throw blanket for the desk area. Incorporate under-cabinet lighting or LED strips to brighten the workspace. Keep the design flexible with removable or adjustable components.
This multi-tiered wall unit turns your wall into an all-in-one hub of activity. It’s perfect for compact living or home offices that need to maximize every inch. The layered look adds architectural interest and a sense of order. Ready to turn your wall into a multifunctional masterpiece? Just start planning!
7. Wall-Mounted Unit with Vertical Slats for Texture
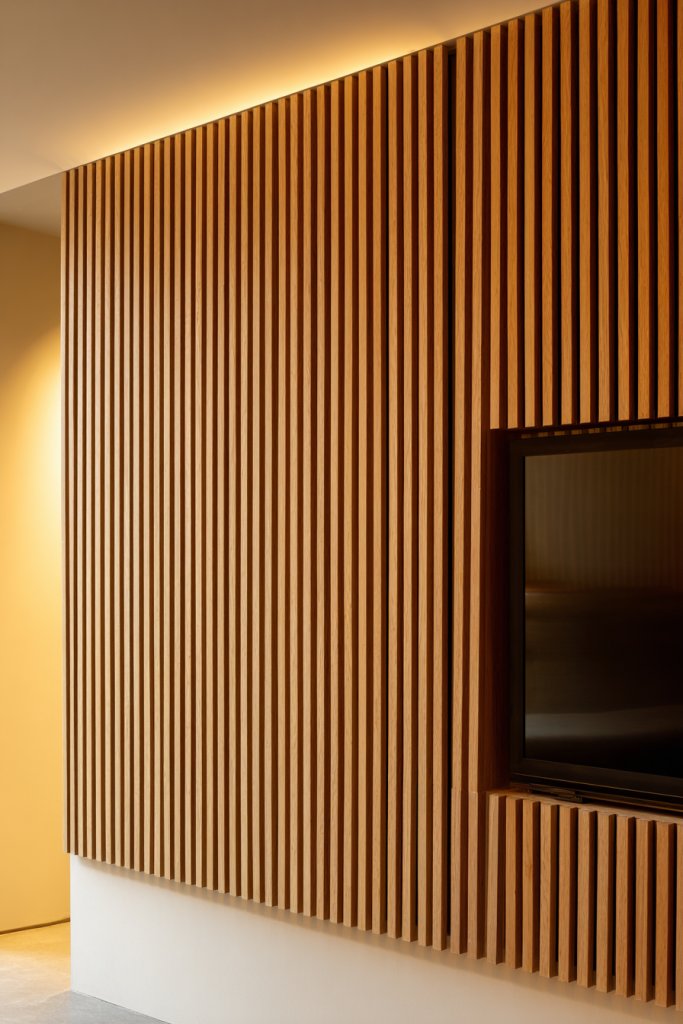
Bored with flat, uninspiring walls? Want to add visual interest without clutter? A wall-mounted unit with vertical wooden slats creates a striking textured backdrop that elevates your space instantly. It’s minimal yet full of character, perfect for modern or contemporary interiors. Who says texture can’t be sleek?
Visualize a wall covered with evenly spaced, vertically oriented wooden slats—light or dark finishes depending on your decor. The slats create a rhythmic pattern, adding depth and dimension. Behind or around the slats, concealed compartments or media devices maintain a clean look. Soft lighting from above or below accentuates the vertical lines, making the wall come alive.
Use different wood tones or painted slats for contrast. For a more dramatic effect, vary the widths of the slats or alternate materials like metal or acrylic. This design adapts well to both small spaces seeking texture and large walls needing visual anchoring. Seasonal updates can include changing lighting color or adding textiles nearby for warmth.
Start by measuring wall dimensions and selecting slats in your preferred finish. Mount the vertical supports securely to studs or wall anchors. Attach the slats using hidden fasteners or clips for a seamless appearance. Incorporate channels or compartments behind the slats for media equipment or storage if needed. Finish by sealing or treating the wood to enhance durability and appearance.
Personalize the look with LED strip lighting to highlight the texture or add decorative elements like small sculptures or textured panels. Incorporate a sleek sound system or hidden speakers for a complete media wall. Keep decor minimal around the textured wall to let the slats stand out. This approach adds sophistication without sacrificing simplicity.
Vertical slats add architectural interest and make your wall a focal point. They create a sense of height and rhythm, elevating your entire room. Once installed, this textured feature requires minimal maintenance and offers long-lasting style. Ready to add depth and dimension? Start with a plan and enjoy the transformation!
8. Bold Contrasting Colors for a Statement Wall
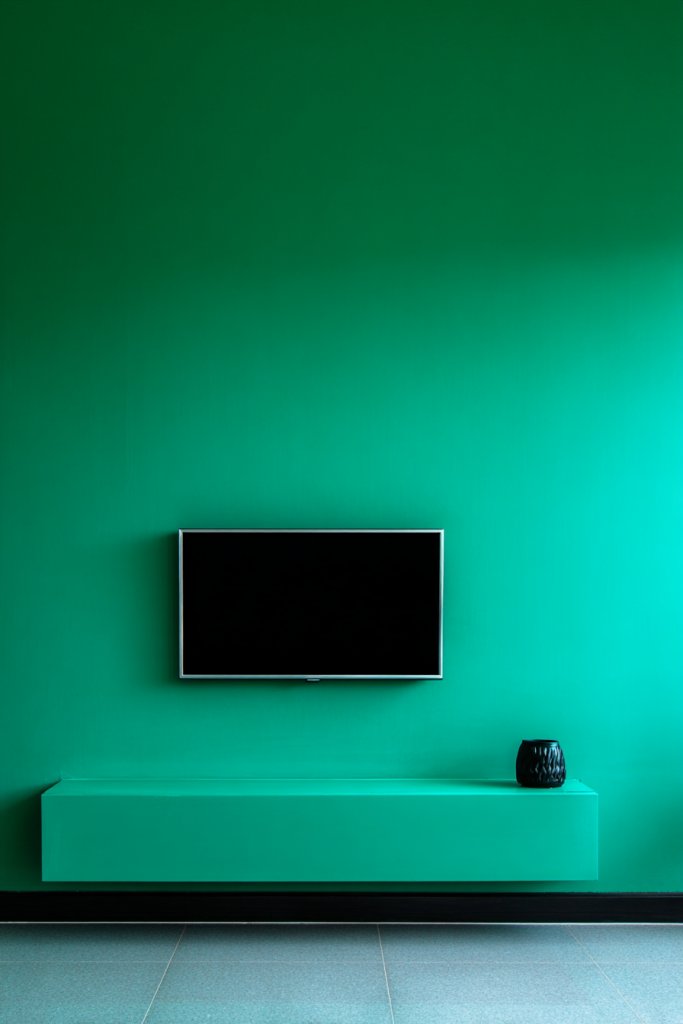
Feeling like your TV wall blends into the background? Want to make a bold statement that grabs attention? Using vibrant, contrasting colors behind a minimalist setup transforms your space instantly. It’s an easy way to inject personality and energy into your living room. Who says neutrals are the only way?
Imagine a bright teal or fiery red wall serving as a backdrop for a sleek, black TV. The contrast makes the screen pop, creating a dynamic visual effect. The bold hue amplifies the room’s mood, whether energetic or sophisticated. Minimal decor in neutral tones keeps the focus on the color, making your TV wall the star of the show.
Choose colors that complement your existing furniture—think navy with gold accents or emerald green with brass fixtures. For a softer approach, pastel shades paired with crisp whites work well in smaller spaces. You can also create a mural or geometric pattern for added visual impact. Seasonal updates might include changing the wall color or adding temporary decals or tape designs.
Prepare the wall by cleaning and priming for paint or wallpaper. Use high-quality paints suitable for walls, applying multiple coats for vividness. If opting for wallpaper, choose a bold pattern or solid hue with minimal seams. Keep the TV mounted securely and ensure cables are hidden or routed neatly. Finish with a clear coat or matte finish to protect your work.
Accentuate with metallic hardware, such as gold or chrome, to add a touch of glamour. Incorporate textured textiles nearby in complementary shades to soften the look. Use lighting to enhance the color—think spotlights or colored LED strips—to create a mood. Remember, simplicity in decor keeps the focus on the wall’s bold statement.
A statement wall in bold colors instantly energizes the room and reflects your personality. It’s a simple, impactful change that can be updated easily for different seasons or moods. Once done, you’ll enjoy a vibrant, personalized space that stands out. Ready to take color risks? It’s easier than you think!
9. Slim Profile Wall Unit with Concealed Cables
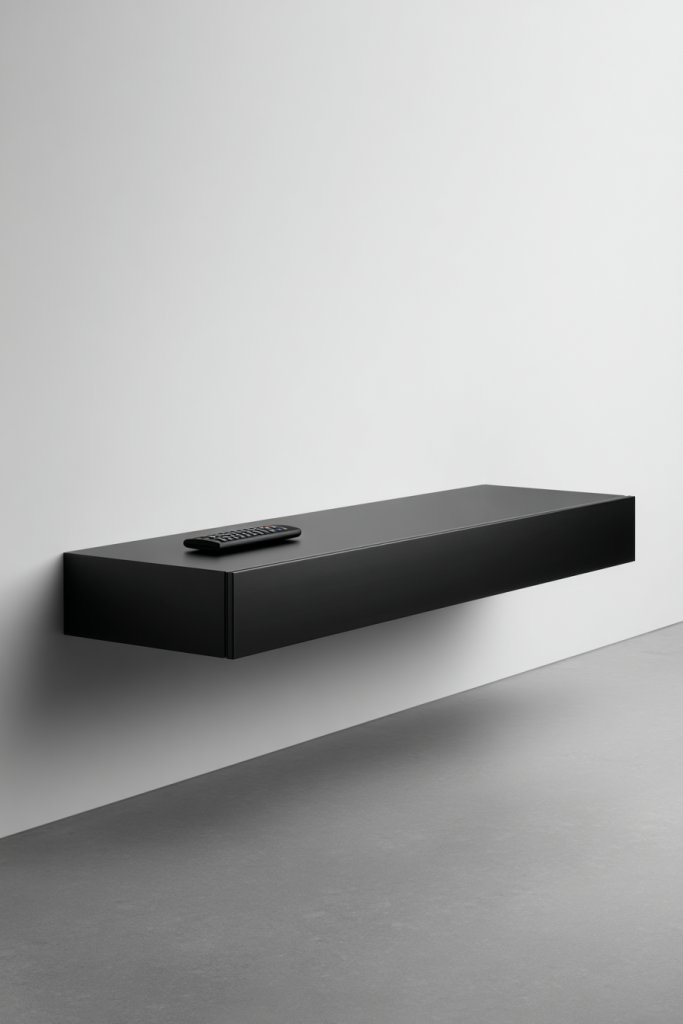
Frustrated with tangled wires and bulky furniture cluttering your space? A slim profile wall unit with concealed cables is the sleek fix you need. It keeps everything organized and out of sight, while still providing ample storage and display options. Say goodbye to cable chaos and hello to pure minimalism.
Visualize a narrow, wall-mounted console that hugs the wall with a clean, uninterrupted surface. Cables run through channels or behind panels, hidden from view. The unit features sleek drawers or compartments to hide remotes, gaming consoles, and other accessories. The overall look is streamlined, emphasizing clean lines and a clutterless aesthetic.
Opt for matte or gloss finishes in neutral tones for a versatile look. For small spaces, choose a narrow, elongated design; for larger rooms, extend the length for a dramatic effect. Incorporate subtle textures like matte lacquer or wood veneer. Seasonal updates could include changing hardware or adding decorative trims to refresh the style.
Start by measuring your wall and selecting a slim, wall-mounted unit designed for cable management. Use a stud finder and level to ensure perfect installation. Route cables through built-in channels or behind panels to keep them hidden. Secure the unit firmly to wall studs, and organize all devices inside drawers or compartments. Use cable clips and covers for a tidy appearance. Finish by testing all connections and adjusting for optimal placement.
Add custom touches like soft-close drawers, hidden compartments, or textured finishes. Incorporate a small shelf or niche for decorative objects that don’t interfere with electronics. Use color-matched or metallic hardware for a sophisticated look. Keep the setup simple but functional, with easy access to cables and devices.
A slim profile, cable-hidden wall unit elevates your living space into a clean, modern haven. It’s an effortless upgrade that makes your entire room feel more spacious and organized. Once installed, it requires minimal maintenance and provides a polished look. Ready to declutter your wall? It’s surprisingly simple!
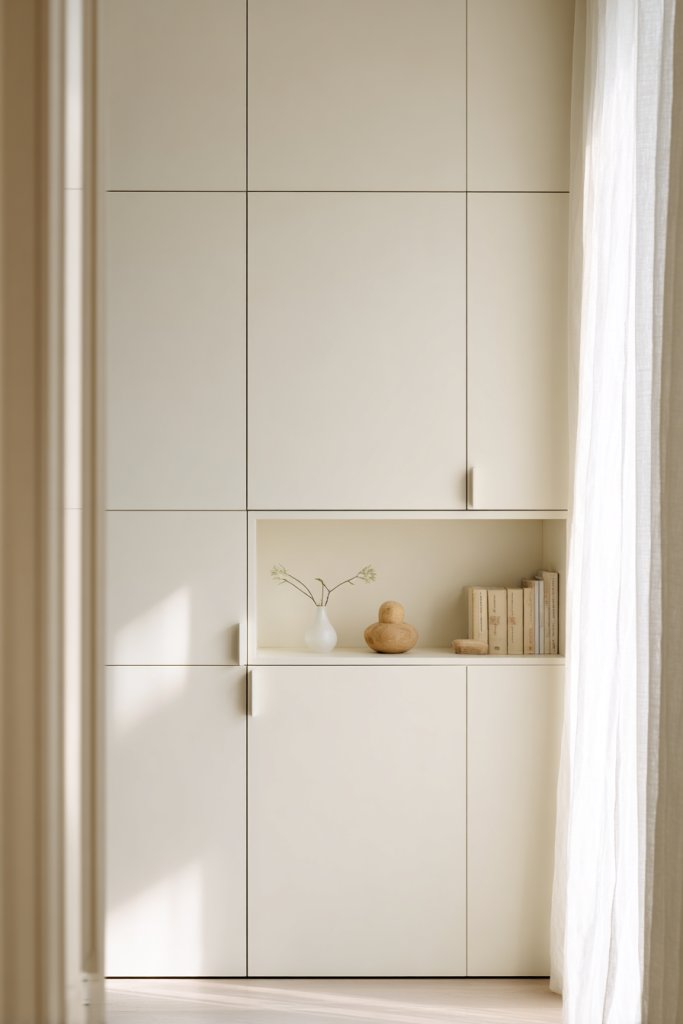
10. Monochrome Wall Panel with Hidden Storage Compartments
Are mismatched cords and clutter ruining your sleek decor? A monochrome wall panel with hidden storage can bring harmony and order. It creates a seamless, stylish backdrop that conceals everything you don’t want visible. Perfect for minimalists who crave simplicity and sophistication.
Envision a wall painted in a single, matte color like charcoal, beige, or soft gray. Behind a smooth panel, hidden compartments store media gear, wires, or manuals. The panel’s uniform color enhances a sense of calm, while discreet handles or push-to-open mechanisms keep the look clean. Subtle lighting highlights the panel’s edges, adding depth.
Choose a monochrome palette that matches or contrasts your furniture—black with white accents, or beige with cream. Incorporate textured finishes like matte, satin, or velvety paint for subtle variation. For larger walls, extend the panel across the entire surface; in smaller rooms, keep it focused behind the TV. Seasonal updates include swapping out hardware or painting accents.
Start by prepping the wall with primer and paint in your chosen monochrome. Select a smooth, high-quality panel that can be mounted flush to the wall. Use hidden hinges or push-to-open fittings for access to concealed compartments. Mount the panel level, ensuring all wires are routed internally. Attach any hardware or decorative trims last, sealing all edges securely. Organize your devices inside the hidden compartments.
Personalize with soft-close drawers, magnetic closures, or subtle LED strips inside the compartments. Incorporate minimalist handles or keep everything push-to-open for a sleek look. Keep the surrounding decor simple—think plush textiles or textured cushions—to complement the monochrome scheme. Regularly update accessories stored within for a fresh feel.
A monochrome wall panel offers a timeless, elegant solution that adapts to various decor styles. It simplifies your space while adding a sophisticated touch. Once installed, it provides a clutter-free, cohesive backdrop that elevates your entire room. Feeling inspired to embrace minimalism? This is your move!
11. Customizable Pegboard Wall with Articulating Shelves
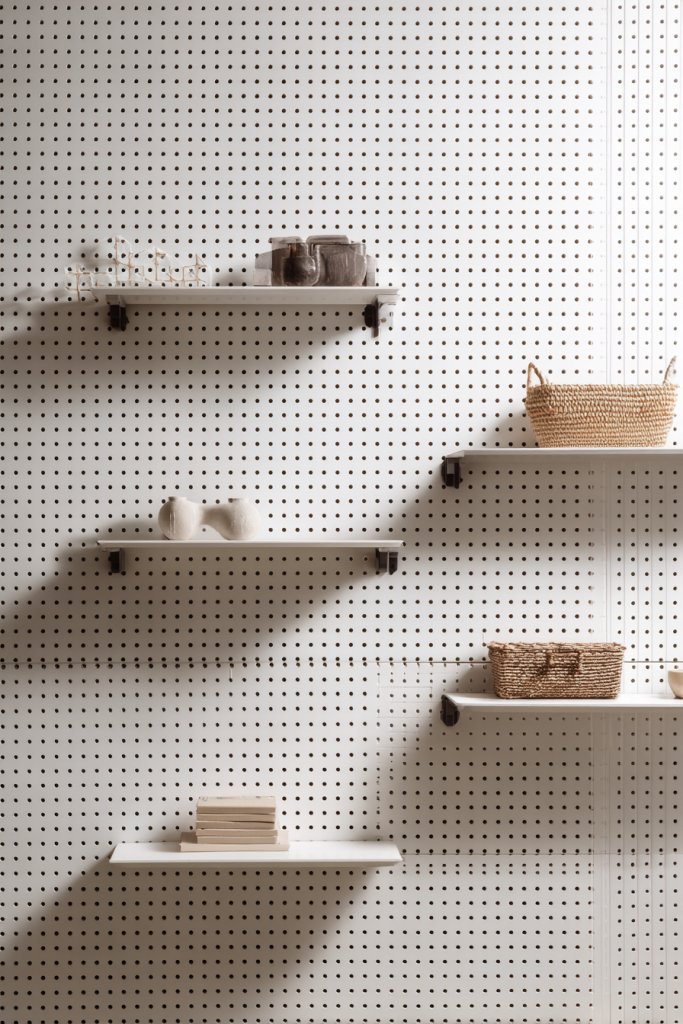
Want a flexible, playful way to organize your media and accessories? A customizable pegboard wall with articulating shelves offers endless options to keep things neat and accessible. It’s perfect for creative souls who like changing things up or showcasing unique pieces. Plus, it adds a fun, modern element to your living space.
Picture a large metal pegboard painted in a bold color or sleek matte finish, mounted behind your TV. Articulating shelves and hooks can be repositioned easily, holding everything from media devices to decorative objects. The modular setup allows for instant reconfiguration, creating a dynamic, interactive wall. Nearby, a few small sculptures or functional organizers keep your space tidy and stylish.
Choose a pegboard in a neutral tone or a vibrant hue to match your decor. Use different-sized shelves, hooks, or baskets to accommodate various items. For a more industrial look, opt for metal or pipe-based supports. This flexible system works well in small apartments or creative studios, where adaptability is key. Seasonal changes might involve swapping out accessories or repositioning shelves for fresh energy.
Start by selecting a durable pegboard and planning your layout on paper. Mount the board securely to studs or wall anchors, ensuring it’s level. Attach articulating shelves and hooks using compatible fittings, testing their stability. Organize your media devices on the shelves, hiding wires behind clips or conduits. Keep your setup tidy by regularly adjusting and cleaning the accessories. Finish with a coat of paint or sealant if desired.
Add decorative elements like small planters, sculptural pieces, or minimalist storage bins. Use labels or color coding for easy access and visual appeal. Integrate LED lighting strips or spotlights to highlight specific items or create ambient mood lighting. Keep the system flexible so you can change your display as your style evolves.
A pegboard wall turns your space into a creative playground, merging function and fun. It encourages personalization and experimentation, keeping your environment fresh. Once set up, it requires minimal maintenance while delivering maximum style impact. Ready to get crafty with your TV wall? Start customizing today!
12. Textured Stone or Brick Accent Wall with Mounting Bracket
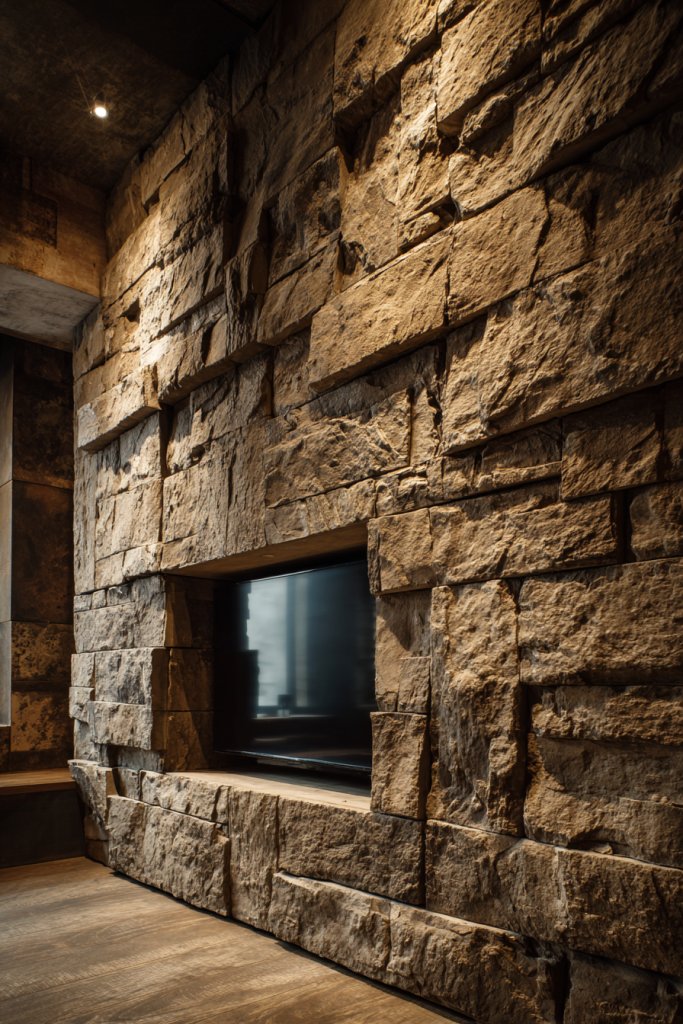
Looking to add instant drama and character? An accent wall of textured stone or brick can transform your TV area into a striking feature. It brings depth and warmth, especially when paired with sleek, modern furniture. It’s bold, timeless, and impossible to ignore.
Visualize a wall clad in rough-hewn stone tiles or brick veneer, adding tactile richness to your space. The natural textures catch light and shadow, creating a constantly changing visual effect. Your TV is mounted flush against this rugged backdrop, making the screen pop with contrast. The surrounding decor stays minimal to let the wall steal the show.
Choose between warm earth tones or cooler grays to match your overall palette. For a contemporary twist, opt for large-format stone panels or sleek brick layouts. You can also mix materials—stone with wood or metal accents—for a layered look. This style adapts well to open-plan living or media rooms, creating a cozy yet dramatic atmosphere.
Begin by preparing the wall with a clean, level surface. Attach mounting brackets or a sturdy frame to support the weight of the stone or brick panels. Use adhesive suitable for heavy materials, and reinforce with mechanical fasteners if necessary. Ensure all wires for your TV are routed behind or through the wall to keep the surface tidy. Seal gaps and finish with a protective sealant for durability.
Complement the textured wall with minimalistic furniture and soft textiles in neutral tones. Incorporate subtle lighting—like wall washers or spotlights—to accentuate the texture. Add metallic or wooden accessories nearby to soften the ruggedness or add sophistication. Keep decor simple to maintain focus on the striking wall.
A textured stone or brick accent wall anchors your space with a sense of permanence and style. It’s a statement that elevates your entire room, making it feel more curated and inviting. Once installed, it requires minimal upkeep but offers long-lasting impact. Eager to add a touch of history and texture? This is your answer!
13. Wall-Mounted Media Tower with Floating Shelves
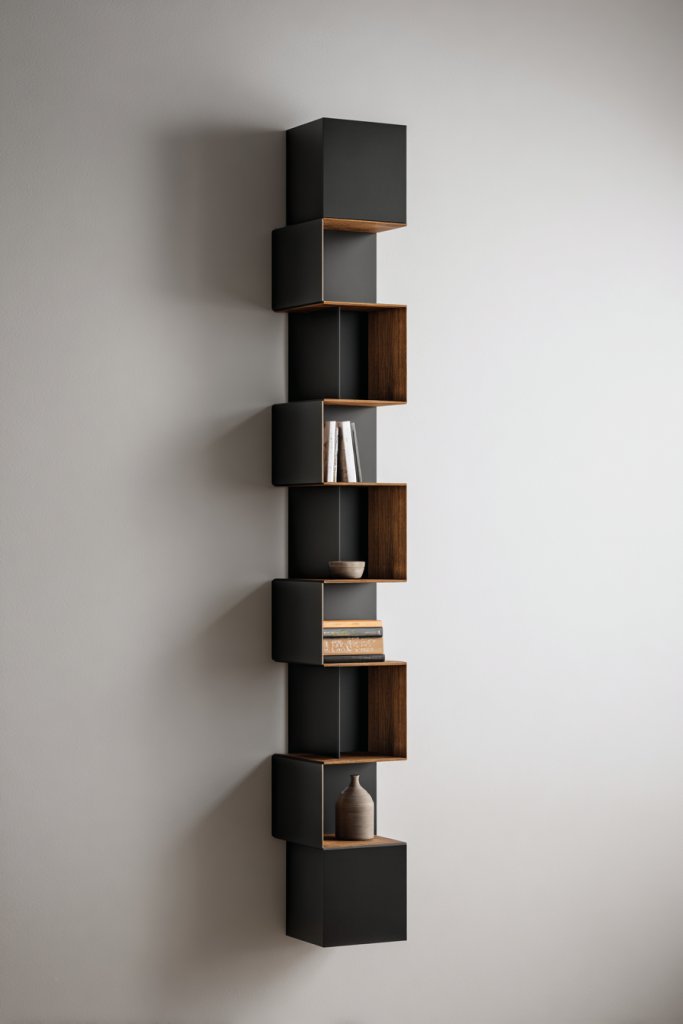
Want a sleek, vertical solution to organize your media and accessories? A wall-mounted media tower with floating shelves creates a tall, elegant focal point. It maximizes vertical space and offers plenty of storage without cluttering your floor. Perfect for those craving a tidy, modern aesthetic.
Imagine a tall, slim tower reaching from floor to ceiling, with open shelves for media devices, books, or decorative objects. Floating shelves above or beside support additional gear or display items, creating a layered, dynamic look. The combination of vertical and horizontal elements adds architectural interest. Soft lighting within or beneath the shelves enhances the overall effect.
Choose a monochrome finish for a seamless look or mix materials like wood and metal for contrast. Vary shelf depths and spacing based on your storage needs. For smaller spaces, opt for a narrow tower; in larger rooms, extend the height or add multiple towers for a dramatic statement. Seasonal updates can include changing shelf decor or adding textiles nearby.
Start by measuring your available wall space and selecting a tower system designed for easy wall mounting. Use a level and stud finder to secure the tower firmly into wall studs. Install floating shelves at desired heights, ensuring they’re supported securely. Organize your media devices neatly on the tower, routing cables discreetly behind or inside the unit. Finish with clean wiring and test all devices for proper function.
Personalize with decorative objects like sculptural pieces, textured boxes, or unique bookends on the shelves. Incorporate subtle lighting to highlight key items or add ambiance. Keep the overall look cohesive by choosing matching finishes or complementary colors. Regularly update the shelf items to keep the display fresh and engaging.
A vertical media tower adds height and sophistication to your wall, making your room feel taller and more organized. It’s a functional yet stylish solution that grows with your needs. Once installed, it’s low-maintenance and highly adaptable. Ready to elevate your media storage? Start with a plan and enjoy the sleek results!
14. Mirror-Integrated Wall Unit for Brightness and Style
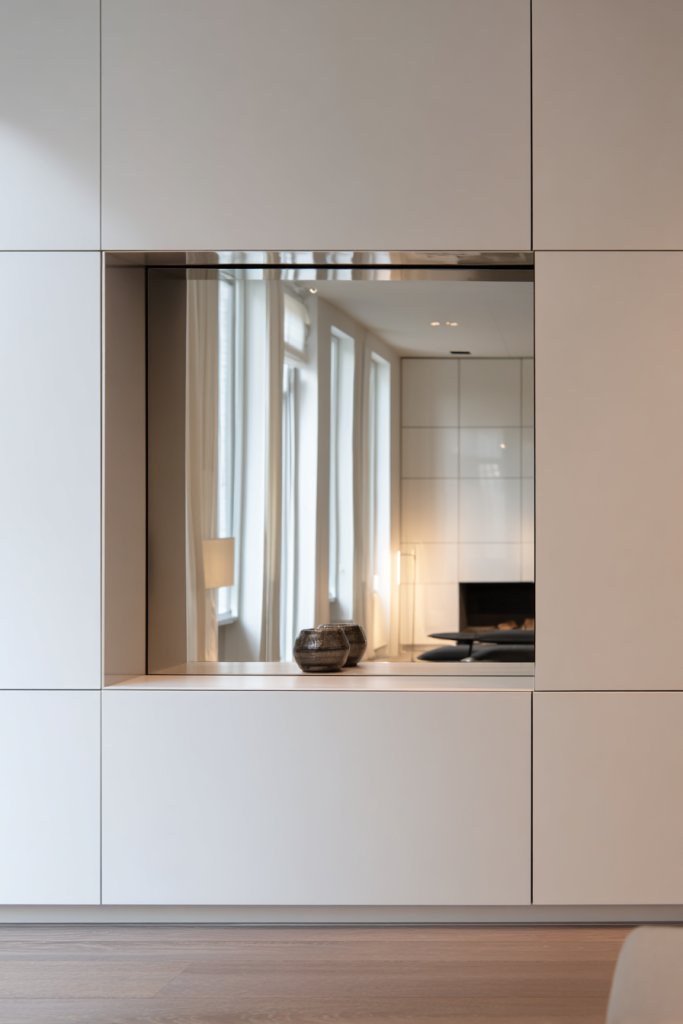
Want to make your space feel larger and more luminous? Incorporating a large mirror into your TV wall can double your room’s brightness and create an illusion of space. It’s a stylish way to add functionality without sacrificing design. Plus, it’s perfect for quick check-ins or adding a touch of glamour.
Picture a sleek, frameless mirror spanning the width of your TV, mounted flush to the wall. The reflective surface amplifies natural light, bouncing it around the room. Surrounding the mirror, minimalistic shelves or hidden compartments keep your media devices organized. The overall look is modern, bright, and effortlessly chic.
Choose a mirror with a simple, clean border or a frameless design for a seamless look. You can also incorporate textured or patterned frames to match your decor. This idea suits small or dark rooms seeking more light and openness. Seasonal updates might include changing the mirror’s frame or adding decorative lighting around it.
Start by selecting a high-quality, shatter-resistant mirror large enough to cover your wall space. Mount it securely using specialized brackets or adhesive designed for mirrors. Ensure the wall surface is smooth and clean before installation. Route cables for your TV behind the mirror or conceal them within the wall to maintain a tidy appearance. Finish by testing stability and adjusting for perfect alignment.
Add soft backlighting or LED strips around the mirror for a glamorous effect. Surround the mirror with minimalist shelving or storage in matching finishes to keep your media accessories close. Consider decorative elements like sculptural wall sconces or textured trims to frame the mirror without cluttering the space. Keep decor minimal to let the mirror be the statement.
A mirror-integrated wall unit opens up your room and adds a luxe touch to your decor. It’s a clever way to enhance brightness and style simultaneously. Once in place, it’s low-maintenance and endlessly adaptable to changing trends or moods. Ready to brighten your space and boost your style? Start with a mirror and go from there!
15. Curved Wall Panel with Hidden Lighting for a Soft Glow
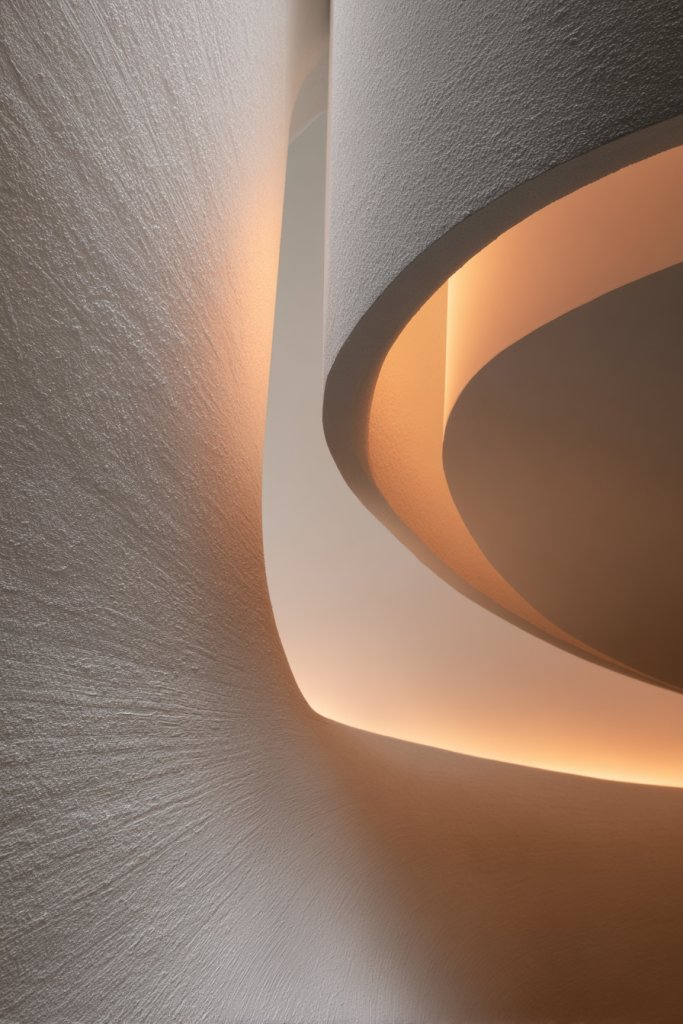
Craving a softer, more inviting ambiance? A curved wall panel with hidden lighting creates a gentle glow that relaxes the room’s vibe. It adds a sculptural element to your TV wall, turning it into a piece of art. Perfect for cozy nights or creating a luxurious retreat.
Picture a smoothly curved wall panel made of textured plaster or wood veneer, wrapping around your TV. Hidden LED strips line the curve, emitting a warm, diffused light. The gentle glow highlights the wall’s shape, casting soft shadows and creating a calming atmosphere. The TV appears embedded within this fluid, elegant design. Surroundings remain minimal to emphasize the sculptural effect.
Choose neutral tones like soft beige, warm gray, or muted pastels for a serene look. For a more dramatic effect, opt for bold colors or textured finishes on the curved panel. This design works well in spacious living rooms or dedicated media rooms, especially when paired with plush textiles or soft furnishings. Seasonal updates could include changing light colors or adding decorative accents nearby.
Begin by designing a curved wall template using flexible materials or digital tools. Construct the panel from lightweight, durable materials like MDF or plasterboard, shaping it to match your curve. Mount the panel securely, ensuring it’s level and stable. Install concealed LED strips within the curve, hiding wires inside the wall or within the panel’s structure. Test the lighting, adjusting brightness and color for best effect. Finish with a protective coating or paint.
Incorporate textured fabrics or soft furnishings nearby to enhance the cozy feel. Use dimmable lighting controls for adjustable ambiance. Keep decor minimal, focusing on the flowing shape of the wall. For added elegance, integrate subtle metallic or wooden accents that complement the curved theme. Regularly update the lighting for different moods or seasons.
A curved wall panel with hidden lighting introduces a sculptural, calming element to your space. It elevates your decor with a blend of art and function, creating a unique focal point. Once installed, it requires minimal upkeep while delivering a distinctive style. Ready to soften your environment? This design makes it easy!
16. Multi-Functional Wall Unit with Desk and Storage
Lacking space and functionality? A multi-purpose wall unit that combines a media center, desk, and storage solves this problem perfectly. It turns a single wall into a versatile hub for work, entertainment, and organization. Ideal for small apartments or home offices that need to do double duty.
Imagine a sleek wall-mounted unit with a fold-out desk integrated into the lower section. Open shelves above hold media gear, books, or decorative objects, while concealed cabinets hide cables and supplies. The design creates a seamless transition between work and leisure zones, with clean lines and minimal clutter. Soft lighting or a subtle color palette keeps it calm and inviting.
Choose a finish that matches your decor—light woods for a Scandinavian vibe or dark veneers for a more dramatic look. The desk can be a fixed surface or fold-down for space-saving convenience. Shelves can be open or closed, depending on your preference. This setup adapts well to small bedrooms, studio apartments, or multifunctional living rooms, with seasonal decor updates in textiles or accessories.
Start by measuring your wall and designing a layout that balances storage and workspace. Select a sturdy, wall-mounted system with adjustable supports. Attach the main unit securely to wall studs, ensuring stability. Install the fold-down desk with reinforced hinges and supports, testing for weight capacity. Organize your tech and office supplies inside cabinets or on open shelves, routing cables neatly. Finish with a smooth paint or veneer for a refined look.
Add a comfortable chair or cushion to the fold-down desk for ergonomic seating. Incorporate task lighting or LED strips to brighten work zones. Keep clutter hidden with matching storage boxes or organizers. Personalize with decorative trims or colorful accessories that reflect your style, making the space inspiring and functional.
A multi-functional wall unit transforms a small space into a productivity and entertainment powerhouse. It simplifies your environment and maximizes every inch. Once set up, it’s adaptable for work, gaming, or relaxing—whatever your mood. Ready to make your wall work harder? Start planning today!
17. Slatted Wood Wall with Floating Media Shelf
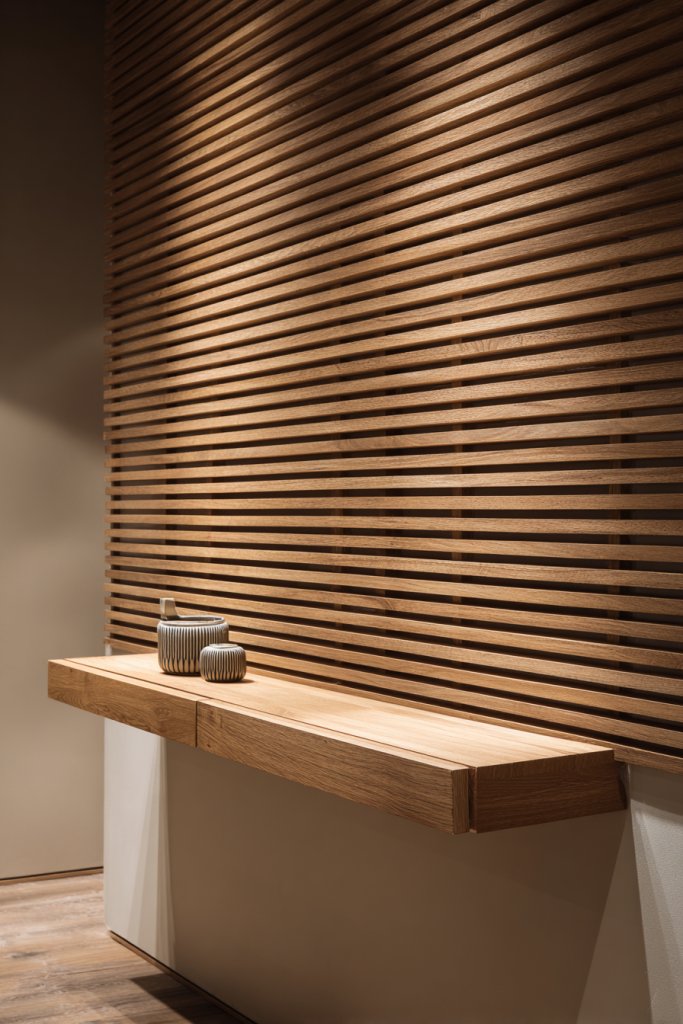
Want a warm, modern look that adds texture without overwhelming? A slatted wood wall combined with a floating media shelf creates a cozy yet sleek aesthetic. It’s a practical way to organize your media gear while making a stylish statement. Who says functional can’t be beautiful?
Imagine horizontal wooden slats running across your wall, their natural grains adding warmth and depth. A narrow floating shelf sits just below or in front of the slats, holding your media devices or decorative objects. The texture of the wood contrasts with smooth screen surfaces, creating visual interest. Soft lighting accentuates the natural beauty of the wood, enhancing the ambiance.
Choose different wood tones—light oak, warm cherry, or dark walnut—for varied effects. Vary the slat widths or spacing to customize the look. The shelf can be made of matching wood or a contrasting material like metal or acrylic for a contemporary twist. This style suits both rustic and modern interiors, adaptable to small or large walls. Seasonal updates include changing lighting or accessories.
Start with measuring your wall and selecting slats that fit your style. Mount the slats securely using hidden supports or brackets, ensuring they’re level. Attach the floating shelf with concealed brackets or supports, confirming weight capacity. Route cables behind or within the slats for a tidy appearance. Seal or finish the wood to protect against wear and moisture. Organize your media gear neatly on or behind the shelf.
Decorate with textured textiles or sculptural objects on the shelf for added personality. Use LED lighting underneath the slats or within the shelf to create ambient effects. Keep the overall aesthetic minimal and cohesive, matching accessories to your decor palette. Regular updates with new tech or decor keep the look fresh.
This slatted wood feature adds architectural interest and warmth to your room. It’s a stylish, versatile solution that ages gracefully and complements various decor styles. Once installed, it’s low-maintenance and enhances your space’s overall vibe. Ready to add texture and warmth? Start with a plan and enjoy the transformation!
18. Black Matte Finish Wall Panel with Metallic Accents
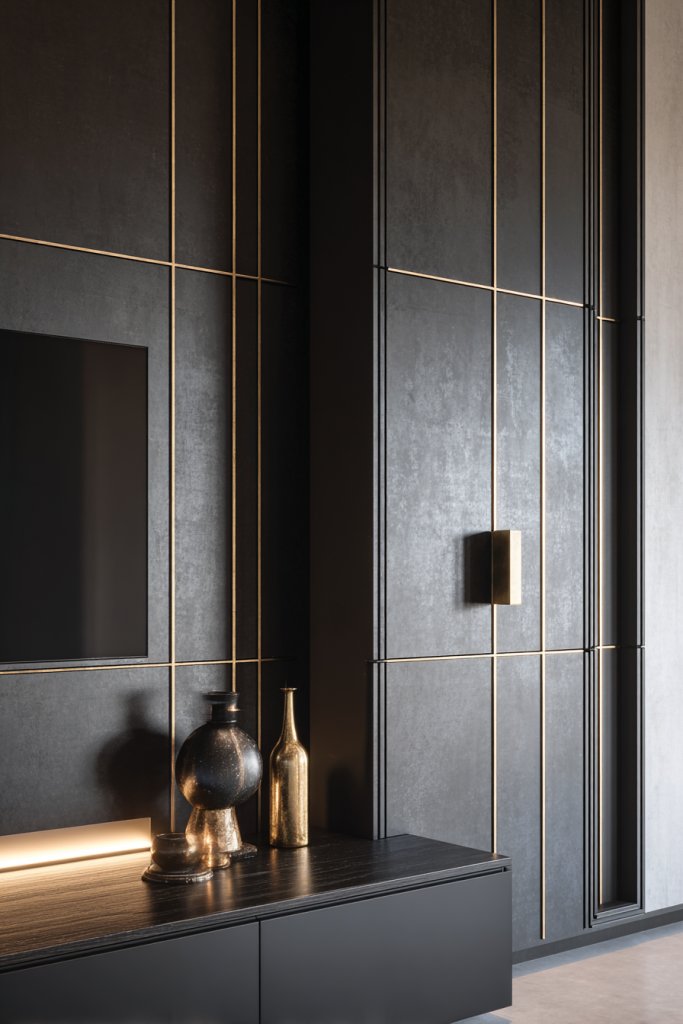
Looking for a bold, sophisticated backdrop? A black matte wall panel with metallic accents makes your TV and media setup stand out with understated elegance. It’s perfect for modern interiors that love contrast and sleek finishes. Who says dark walls are only for moody spaces?
Visualize a large, matte black panel covering your wall, with subtle metallic trims or hardware adding a touch of shine. The dark surface creates a dramatic background, making your TV pop visually. Metallic elements—gold, silver, or bronze—bring richness and reflectivity, catching light and adding dimension. The overall effect is refined, mysterious, and luxurious.
Choose hardware finishes that complement your decor—brass for warmth, chrome for sleekness, or matte black for uniformity. Incorporate textured or patterned metallic accents for extra detail. This style suits contemporary or industrial interiors, especially in larger living rooms or media zones. Seasonal updates could involve swapping hardware or adding decorative metallic objects nearby.
Start with a high-quality wall panel in a matte black finish, ensuring it’s large enough to cover your media area. Mount it securely using hidden supports or brackets aligned with wall studs. Attach metallic accents with concealed fasteners, keeping the surface smooth. Route cables behind the panel or through discreet channels. Finish by sealing edges and ensuring all hardware is flush and stable.
Add metallic decorative objects or sculptures nearby to echo the accents. Incorporate textured textiles or leather seating to complement the luxe feel. Use adjustable lighting to highlight metallic details or create mood lighting. Keep the decor minimal to maintain the sophisticated ambiance.
A black matte panel with metallic accents elevates your decor to a high-end look. It’s a statement of style and confidence, perfect for making your space memorable. Once installed, it’s durable and timeless, fitting into various design themes. Ready to go bold? Start with a panel and metallic accents—you’ll love the impact!
19. Tiered Open Shelving with Decorative Baskets
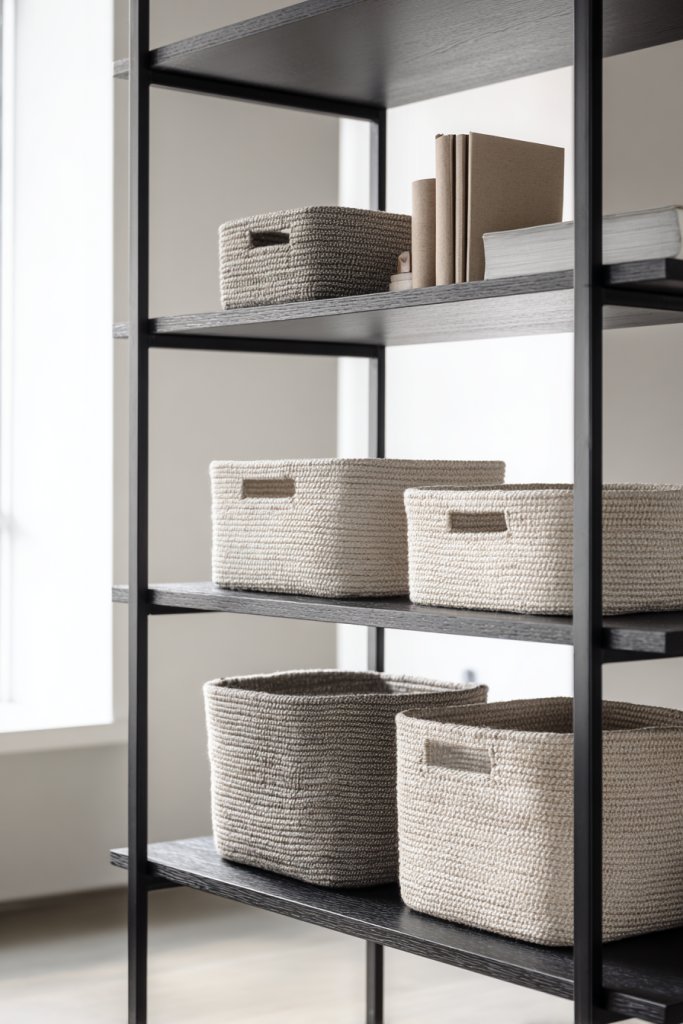
Want to combine style with smart storage? Tiered open shelving topped with decorative baskets creates a functional focal point. It’s perfect for organizing media accessories, remotes, or even small decor items. Plus, it adds a layer of visual interest to your TV wall.
Envision a series of horizontal shelves arranged in tiers, each holding a mix of tech gadgets, books, or decorative baskets. The baskets, in woven or fabric textures, hide clutter while adding warmth and softness. The open shelving creates an airy feel, and the tiered arrangement guides your eye upward, adding height and rhythm. Soft lighting or accent lights highlight the textures and objects.
Choose natural fibers, woven baskets, or sleek metallic containers depending on your decor theme. Vary shelf depths to accommodate different items, and arrange baskets in a balanced, aesthetically pleasing way. This style works equally well in contemporary, boho, or eclectic interiors. Seasonal updates could include changing baskets or adding textiles inside for color pops.
Start with measuring your wall and selecting sturdy floating shelves in your preferred finish. Mount the shelves securely, ensuring they’re level and supported by wall anchors. Organize your media gear on the upper shelves, placing baskets on the lower tiers. Route cables behind or within the shelves for a tidy look. Keep the space organized by regularly swapping out or rotating baskets and decor.
Personalize with different basket styles, adding decorative labels or tags. Incorporate textiles like soft throws or cushions nearby for comfort. Use warm lighting to enhance the texture of baskets and shelves. Keep the setup flexible so you can change accessories and decor as your style evolves.
Tiered open shelving with baskets turns your TV wall into a stylish, practical storage zone. It’s a versatile solution for decluttering while adding visual interest. Once set up, it’s easy to maintain and adapt for different seasons or trends. Ready to organize with flair? Start layering and decorating!
20. Art Deco-Inspired Wall Panel with Geometric Patterns

Craving a touch of glamour and elegance? An Art Deco-inspired wall panel with bold geometric patterns can transform your TV wall into a luxurious statement piece. It injects style, symmetry, and sophistication into your space. Who says minimalism can’t have a little sparkle?
Visualize a wall adorned with a decorative panel featuring gold or metallic accents in geometric shapes—zigzags, chevrons, or polygons. The panel’s reflective surfaces catch light, adding depth and shine. Your TV is mounted flush, with the patterned panel serving as a dazzling backdrop. Subtle lighting enhances the metallic details, creating a mesmerizing effect.
Choose finishes that complement your decor—black and gold for a luxe look or silver and white for a cooler, chic vibe. Incorporate mirrored or glossy elements to amplify the geometric shapes. This style suits art deco or glam interiors and works well in larger rooms with high ceilings. Seasonal updates include swapping out lighting or adding decorative accessories that echo the geometric theme.
Start by selecting a decorative panel with geometric patterns in metallic or high-gloss finishes. Mount it securely using brackets or adhesive designed for heavy, decorative surfaces. Ensure the panel covers the entire wall area behind your TV for maximum impact. Route cables behind or within the panel, keeping everything hidden. Finish by adding accent lighting or spotlights to make the metallic details pop.
Add complementary decor like sculptural objects, textured textiles, or metallic vases nearby—avoiding wall art or plants. Use dimmable lighting to control the ambiance, emphasizing the metallic surfaces. Incorporate small accessories such as vintage radios or art deco sculptures to reinforce the theme. Keep the overall decor elegant and restrained to let the panel shine.
An Art Deco-inspired wall panel exudes glamour and confidence, elevating your entire space. It combines timeless style with modern function, making your TV wall a true focal point. Once installed, it requires minimal upkeep and ages beautifully. Want to add a touch of luxury? Start with a geometric panel and enjoy the transformation!
21. Lighted Recessed Wall Niche for TV and Decor
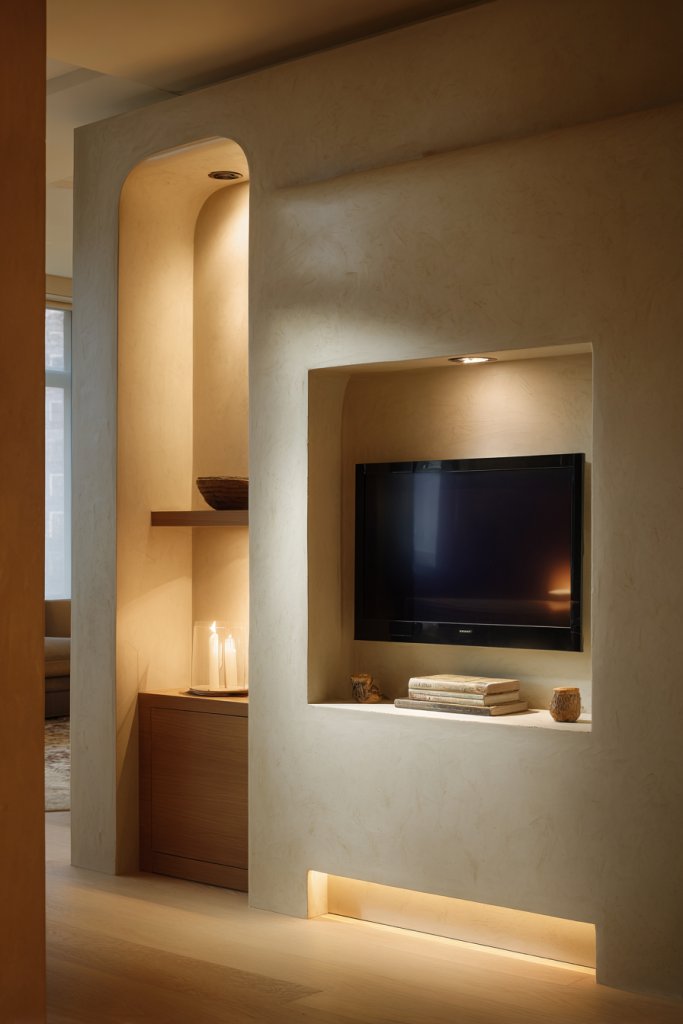
Looking for a sleek way to highlight your TV and decor? A lighted recessed wall niche frames your TV with built-in lighting, creating a dramatic, gallery-like effect. It adds depth, focus, and a touch of luxury to your entertainment space. Who says you need a gallery wall to make a statement?
Imagine a custom-built niche carved into the wall, with soft, indirect lighting illuminating the edges. Your TV sits flush within, with hidden wiring routed behind the wall for a seamless look. The niche’s glow accentuates the wall’s texture or color, drawing all attention to the media setup. Nearby, a few decorative objects or sculptures can be subtly showcased in the glow.
Choose a neutral or dark wall color to make the lighting stand out. The niche can be rectangular, arched, or custom-shaped to fit your decor style. Incorporate adjustable LED lighting or color-changing options for different moods. This idea adapts well to large open walls or dedicated media rooms and can be combined with other lighting features.
Begin by designing the niche with precise measurements, ensuring enough space for your TV and lighting fixtures. Cut and frame the opening in the wall, reinforcing for stability. Install LED strips or recessed fixtures, hiding wires inside the wall cavity. Mount the TV flush with the wall surface, routing cables through conduits or conduits. Finish with a smooth paint or textured wall surface around the niche.
Personalize the lighting with color-changing LEDs to match seasons or moods. Add small, sculptural objects or subtle artwork in the niche to create visual interest. Use dimmable lights to control brightness, maintaining a cozy or dramatic ambiance. Keep surrounding decor minimal to highlight the niche’s architectural feature.
A recessed, lighted niche elevates your TV wall into an architectural feature, combining function with style. It’s a modern solution that impresses guests and enhances your home’s aesthetic. Once installed, it’s easy to maintain and adapt over time. Ready to frame your media in style? Start designing your niche!
22. Monolithic Wall Unit with Seamless Finish
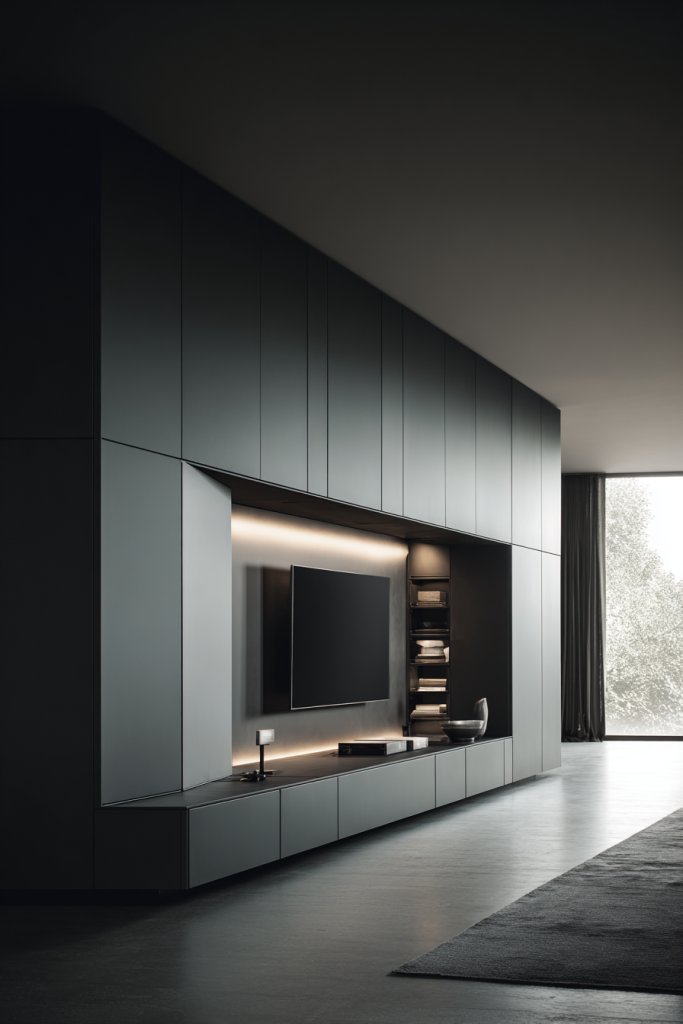
Crave a bold, unified look that commands attention? A monolithic wall unit that covers the entire wall creates a seamless, striking statement. It’s the ultimate way to make your entertainment area look sleek, modern, and integrated. Who needs breaks in the design when you can have a monolith?
Picture a single, large panel in a matte finish or textured veneer, spanning from ceiling to floor. Your TV is embedded flush within the panel, almost disappearing into the surface. The entire wall exudes a sense of solidity and elegance, with hidden compartments or drawers for a clutter-free appearance. Soft lighting or subtle accents highlight the wall’s uniformity and craftsmanship.
Choose a monochrome color scheme—black, white, or grey—for maximum impact. Use textured finishes like wood veneer, plaster, or high-gloss surfaces for variation. This style works especially well in large, open spaces where you want a commanding presence. Seasonal updates include adding decorative lighting or changing hardware accents.
Start by designing or selecting a large, high-quality wall panel in your preferred finish. Mount it securely using hidden supports, anchoring into wall studs for safety. Integrate your TV into the panel with a flush mount system, routing cables internally. Finish by sealing all edges and adding hardware or handles discreetly, if needed. Consider adding concealed compartments or drawers for storage.
Add subtle lighting, such as LED strips or backlit accents, to enhance depth and drama. Incorporate your preferred hardware in metallic or matte finishes for a personalized touch. Keep decor minimal around the unit—think textured textiles or sculptural objects—to focus on the monolithic effect. Regular updates with new electronics or lighting keep it fresh.
A monolithic wall unit creates a powerful focal point that exudes confidence and sophistication. It elevates your entire living space into a statement of style and stability. Once installed, it requires minimal upkeep and ages gracefully. Ready to make a bold move? The monolith awaits!
23. Scandinavian Whitewashed Wall with Built-in Shelves
Longing for a bright, airy, and minimalistic vibe? A Scandinavian whitewashed wall with built-in shelves offers a clean, fresh look that complements practical lifestyles. It’s perfect for creating a calm, inviting space that feels open and uncluttered. Who says simplicity can’t be stunning?
Imagine a wall painted in a soft, whitewashed finish, showcasing the natural grain of the wood. Recessed built-in shelves run horizontally or vertically, providing space for essential media devices or subtle decor. The light, neutral tones bounce natural light, making the room feel larger and more welcoming. The balanced design emphasizes function without sacrificing style.
Choose light woods like ash, birch, or maple for a typical Scandinavian look. Incorporate open shelving for easy access or hidden compartments for a cleaner appearance. This style adapts effortlessly to small apartments or open-plan living areas, adding a sense of calm and order. Seasonal updates include swapping decor or adding textiles in soft pastel shades.
Start with selecting high-quality, lightweight wood panels or veneer in a whitewashed finish. Mount the panels securely using hidden brackets or supports, ensuring they’re level. Design your shelving layout, then install the shelves with precise measurements. Route cables for media devices discreetly behind the panels and finish with a matte or satin sealant to preserve the look. Keep all hardware concealed for a seamless design.
Add soft textiles like wool throws or plush cushions nearby for added comfort. Keep decor minimal, using ceramic or wooden objects that match the Scandinavian aesthetic. Incorporate hidden LED lighting inside or under the shelves for soft illumination. Regularly update small accessories to keep the space feeling fresh and inviting.
This Scandinavian wall setup creates a serene, clutter-free environment that’s easy to maintain. It combines practicality with subtle elegance, making your living space feel larger and more peaceful. Once installed, it ages gracefully and suits various decor updates. Ready to embrace simplicity? Start with a whitewashed wall and build from there!
24. Multi-Colored Wall Panel with Artistic Texture
Looking to add a playful, energetic touch to your TV wall? A multi-colored textured panel injects fun and personality into your space. It’s a bold way to break the monotony and create a lively backdrop. Who says your walls can’t have a little artistic flair?
Imagine a wall covered in textured panels in multiple colors—think layered plaster, textured paint, or sculptural elements. The varied colors and textures create a dynamic, vibrant scene that draws attention. Your TV is mounted flush, with the textured, colorful background serving as a lively frame. Soft lighting enhances the tactile qualities and adds depth.
Choose a palette that complements your overall decor—bright primaries for a playful vibe or muted tones for a more subtle effect. Incorporate textured materials like stucco, patterned wallpaper, or 3D wall panels. This style suits eclectic, boho, or modern interiors, especially in spaces that celebrate creativity. Seasonal updates include switching out colors or adding new textured accents.
Start by planning your color scheme and selecting textured wall panels or paints. Prepare the wall surface by cleaning and priming. Install the panels securely with adhesives or supports, ensuring a seamless surface. Route cables behind or within the panels, keeping everything hidden. Finish with a protective coating or additional textured layers if desired for added depth.
Personalize with decorative objects, textiles, or sculptural pieces that echo the vibrant theme. Use accent lighting to cast shadows and highlight textures. Incorporate your favorite colors or motifs to make it uniquely yours. Regular updates with new textures or colors can keep the look fresh and lively.
A multi-colored, textured wall panel energizes your space and showcases your personality. It’s a playful, artistic way to transform your TV wall into a lively feature. Once installed, it’s a conversation starter and a source of inspiration. Want to add a splash of color and texture? Dive in and experiment!
Conclusion
From minimalist to elaborate, these Wall TV Unit Design Ideas showcase a wide spectrum of styles to suit any home. Try integrating these concepts into your space to create a functional yet fashionable entertainment zone. Don’t hesitate—your perfect wall unit is just an idea away. Transform your living area today and enjoy a stylish, personalized touch that truly reflects your taste!